|
|
|
 | 722.Windshield Frame Hardware.I decided to try and make all the slide hardware for the windshield frame. I say try as this would take some pretty serious tooling to get done. Some of this stuff was uncharted territory for me as I had never tried what I guess is called draw forming. All the sheet stainless shown here is 1/8 inch thick and takes some serious force to get it to move around.
Learned a lot here as well and mirror polishing these small pieces wasn't fun. | |
|
 | 723.TaillightsFor taillights i wanted them tucked under the truck as opposed to on the fenders. I wanted the turn signals not to be so obvious so I'm using Visibolts. I wanted to hide all the wiring too as I never liked seeing wires coming out. It just looks unfinished to me. Went to the drawing board and this is what I cam up with. | |
|
 | 724.rz28Details coming....see www.hermansclassics.com for full details. | |
|
 | 725.The Back Window ScreenUp next was the back window screen. These were only on the military trucks and if you have four, recessed, threaded holes around your back window, you definitely have a military cab. Originals had the wire wrapped around the edges and I wanted a cleaner look. I decided to try to drill on a 45 degree angle and weld them flush like the grill headlight guards. follow along as I show how I got it done. | |
|
 | 726.Tech stuff 2 electrical and heaterIF YOU email me Please be sure
to use a good email address if you expect me to email back!!!
When you pull up a photo it is often smaller
than the orginal. To bring up to full size
look below photo that has been picked and
click on "orginal" that is highlighted in blue. | |
|
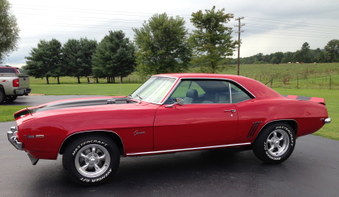
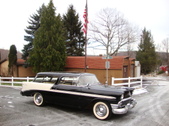
 | 727.Finished TruckIncluded here are pics of the truck completed. It's nice to see this project come together as this is what has been in my head all these years while working towards this goal. When I told people I was working on a military truck while making the parts, they couldn't see what I did. Now that it is done, most can. | |
|
 |
|
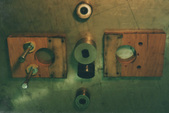
 | 729.Small Stainless ProjectsThought I'd throw some of the smaller stuff in an album. I've always liked figuring out how to make things like the original pieces.
You learn from everything you do and pull from past experiences to do the more complicated stuff. Some things work while others take a few tries. I normally do test pieces in mild steel then go to the stainless.
People ask what I do for a living and when I tell them I work in a manufacturing plant they say, "Oh, that is why you can do this. You have all those machines you can use" I always tell them that most all this stuff was made at home with some pretty basic tools. What I DO have is the DESIRE to try and see it through. I have bought some machinery while doing this project which makes it easier but it CAN be done without them, just a little harder to do.
My lathe is from the 1800's and was originally driven by an overhead line shaft. I still do not have a mill at home but will sometiime in my lifetime. All I can say if you don't try, you'll never get anything done. | |
|
 |
|
 | 731.Headlight Ring Retainers.These are the parts Dodge should have made. They made stainless headlight rings as an option for the 2WD trucks and Power Wagons but the retainers were all mild steel. Quickly rusted and always look out of place painted. I decided to make some dedicated tooling to make/sell these as I thought others might want them. To make them exactly like originals takes quite a few steps and jigs so follow along as I take you through it. I'm currently selling them for $40.00 a set(enough for one truck) | |
|
 | 732.The GrillThis was the largest stainless project I did for the truck. Lots of bending here and lots of different methods were used. I thought if I could get the main curve bent I could do the rest of it so I started there. I went to a local fab shop and ask if they could bend 1/4" X 2" stainless on edge for me in a curve. They said they had a $150.00 set up fee and labor would go from there. They also stated the didn't know if they could even do it so I opted to try it myself. I would modify a roll bender I had bought. | |
|
 | 733.Tie down hooksI debated on whether to even put these on the truck at all. My first plan was to use originals so I smoothed out a set and got them ready for paint. After painting the bedsides i could see it would be too much red with the hooks painted the same so I decided to try to make them out of stainless steel.
It would be pretty involved to turn these all out on my 1800's era metal lathe so I said if I could get the blanks all turned the same I'd give it a try.
I did some searching and was able to find someone willing to do it for me. I gave a friend my measurements and he drew up a CNC print which I gave to another operator who turned them up. Without them I would not have been able to do this so thanks goes out to Tom. Jimmy and Lynne for helping me on this one. | |
|
 | 734.Frame Work and SpringsThe frame is going to be very visible on this truck so all unused holes will be welded shut and smoothed. It was shortened and both ends modified as well so that will all be worked out so you won't be able to see that anything was ever done.
I'm going to completely take it apart and paint everything piece by piece and then bolt it all together once painted. All brackets will be rounded and smoothed And bolted back together with polished, stainless fasteners. | |
|
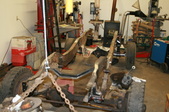
 | 735.Front and rear axle workWith this truck being as high as it is I knew the undercarriage would be easy to see. During planning of this project I decided to fully detail the chassis/running gear.
With everything smoothed and painted I decided to do the same to the axles. Major undertaking as these are cast pieces and very rough. Lots of curves, recesses and pieces make it pretty involved so here we go. | |
|
