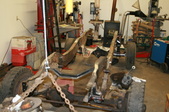
 Started to take the frame apart and had to drill all the rivets out. These are VERY tight as they are mushroomed into the angled punched holes from the factory. Current rivets are 3/8", I will replace with shouldered 1/2" polished stainless. Started to take the frame apart and had to drill all the rivets out. These are VERY tight as they are mushroomed into the angled punched holes from the factory. Current rivets are 3/8", I will replace with shouldered 1/2" polished stainless.
|  All the center crossmembers but one are out. I remove rivets by center punching. Then I stair step drill real close to 3/8, not breaking through the backside. I put a round of tape on the drill to serve as a depth gauge of sorts. All the center crossmembers but one are out. I remove rivets by center punching. Then I stair step drill real close to 3/8, not breaking through the backside. I put a round of tape on the drill to serve as a depth gauge of sorts.
|  I then knock the head off with cold chisel and use a long punch to knock the rivet out. All apart now and ready to start smoothing and welding the holes shut. I then knock the head off with cold chisel and use a long punch to knock the rivet out. All apart now and ready to start smoothing and welding the holes shut.
|  I should be noted that I got a dedicated notebook for doing this. Prior to disassembly I drew a detailed drawings showing ever inch of all the frames and brackets as to what each hole was for and those to be filled. takes all the guess work out of it. I I got each one done I'd mark it with highlighter so I knew it was "off" the list. I should be noted that I got a dedicated notebook for doing this. Prior to disassembly I drew a detailed drawings showing ever inch of all the frames and brackets as to what each hole was for and those to be filled. takes all the guess work out of it. I I got each one done I'd mark it with highlighter so I knew it was "off" the list.
|
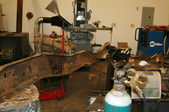
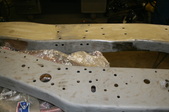
 I sandblasted the rail clean making sure to really get the holes. I usually would drill them or run a carbide burr in there to ensure they were clean. I sandblasted the rail clean making sure to really get the holes. I usually would drill them or run a carbide burr in there to ensure they were clean.
|  Same view with unused holes welded shut. I use a thick copper plate held flush with C clamp to make it easy. Rail is flipped over and inside rewelded too. It will be as smooth as the outside when done. Same view with unused holes welded shut. I use a thick copper plate held flush with C clamp to make it easy. Rail is flipped over and inside rewelded too. It will be as smooth as the outside when done.
|  I use a 9 inch angle grinder with 80 grit fiber back disc. Keeps everything nice and flat so very little, if any, filler is needed. Ready to move to the next section. I use a 9 inch angle grinder with 80 grit fiber back disc. Keeps everything nice and flat so very little, if any, filler is needed. Ready to move to the next section.
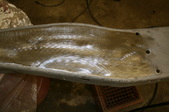
|  This is the front end of the frame. It was originally a rounded, edged circle. You can see where I cut it and welded on metal to be a open C channel. Welding and smoothing this out is next. This is the front end of the frame. It was originally a rounded, edged circle. You can see where I cut it and welded on metal to be a open C channel. Welding and smoothing this out is next.
|
 Slowly laying bead after bead to build it up for smooth contour. You have to go slow or it will warp out. Slowly laying bead after bead to build it up for smooth contour. You have to go slow or it will warp out.
| 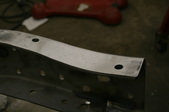 Same area all smoothed out and you can not tell any work was done here. Same area all smoothed out and you can not tell any work was done here.
|  All the welding done on one side and ready to start on the other. I'll sand down both side completely once all the welding is done. All the welding done on one side and ready to start on the other. I'll sand down both side completely once all the welding is done.
|  There was close to 300 holes that were filled. This gives you an idea how many were punched at the factory. There was close to 300 holes that were filled. This gives you an idea how many were punched at the factory.
|
 This all took a couple weeks of spare time working to get it done. This all took a couple weeks of spare time working to get it done.
|  Once all the final sanding was done, I resandblsted the rails and skimmed the inside and outside with Rage. Once all the final sanding was done, I resandblsted the rails and skimmed the inside and outside with Rage.
|  After blocking out you can see how little is left on there. Just what I call a ghost coat is left but it will make it glass smooth as I'm using gloss black. After blocking out you can see how little is left on there. Just what I call a ghost coat is left but it will make it glass smooth as I'm using gloss black.
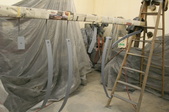
|  Went epoxy primer first, then used a sandable primer. This will be blocked out again. I'm doing all my spraying in the shop and it does get messy. I'll do all the black in here as well but the final red on the sheetmetal will be done in the downdraft part of my garage.. Went epoxy primer first, then used a sandable primer. This will be blocked out again. I'm doing all my spraying in the shop and it does get messy. I'll do all the black in here as well but the final red on the sheetmetal will be done in the downdraft part of my garage..
|
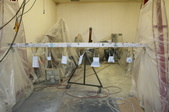 I normally do one big thing and a bunch of smaller brackets. Basically what I think I have enough space/hangers for. I'll have MANY black sessions as there are SO many pieces here. I normally do one big thing and a bunch of smaller brackets. Basically what I think I have enough space/hangers for. I'll have MANY black sessions as there are SO many pieces here.
|  1st round of black on. I'm using acrylic urethane and happy with the results. 1st round of black on. I'm using acrylic urethane and happy with the results.
|  Hard to show but it turned out flat and straight. The mount the rail is on uses the cab spinner ends I can spin and lock the rail wherever I want so it's easy to paint. Hard to show but it turned out flat and straight. The mount the rail is on uses the cab spinner ends I can spin and lock the rail wherever I want so it's easy to paint.
|  Piece by piece! The hanging rail is 2 2x4's crewed together with a gap between. Welded T rods together and bent the ends to slip through the 1/2 holes so I can paint all surfaces at once. Piece by piece! The hanging rail is 2 2x4's crewed together with a gap between. Welded T rods together and bent the ends to slip through the 1/2 holes so I can paint all surfaces at once.
|
 This round of final primer had the bed frame assembly in it. Filled all the holes to keep blow through from happening and spinner lets it roll around to do all sides easier. This round of final primer had the bed frame assembly in it. Filled all the holes to keep blow through from happening and spinner lets it roll around to do all sides easier.
|  Close up of spinner and mounting. Close up of spinner and mounting.
|  Final Black done and I'll let it completely cure out. Sometime slow has it's advantages! Final Black done and I'll let it completely cure out. Sometime slow has it's advantages!
|  Put the poly strips on. They keep the Tread Bright floor from rubbing on the paint and squeaking. Put the poly strips on. They keep the Tread Bright floor from rubbing on the paint and squeaking.
|
 Leaf springs are next. I tried just sandblasting and painting but they looked terrible. I wanted to keep paint layers to a minimum for fear of cracking. I decided to smooth them out to 150 grit, epoxy prime, then straight to coat with no sanding or sandable primer. Leaf springs are next. I tried just sandblasting and painting but they looked terrible. I wanted to keep paint layers to a minimum for fear of cracking. I decided to smooth them out to 150 grit, epoxy prime, then straight to coat with no sanding or sandable primer.
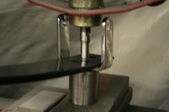
|  Hard to see here but the long leaf is on a turnable quick hook mount. I spray on this then return the piece to the hanging rail if I can't get to all the sides easily. Makes it nice as I have an array of bright lights focused there. Hard to see here but the long leaf is on a turnable quick hook mount. I spray on this then return the piece to the hanging rail if I can't get to all the sides easily. Makes it nice as I have an array of bright lights focused there.
|  On the spin hanger. On the spin hanger.
|  Just a piece of pipe welded to a threaded rod. Pipe has slit cut into it to hold the T hanger in position. Quick and easy. Just a piece of pipe welded to a threaded rod. Pipe has slit cut into it to hold the T hanger in position. Quick and easy.
|
 Another round of black done. Another round of black done.
|  This kinda shows how smooth the paint turned out. This kinda shows how smooth the paint turned out.
| 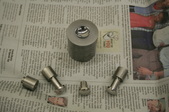 Now that the springs are done I can assemble them. I ditched the mild keeper straps and made some from stainless. Polished them out and had to mount them so I made up some rivets. I ground them out on the surface grinder and made up a die for installation. Jeff M. did the pocket for me. Rivet head side was polished so their will be no marring. Now that the springs are done I can assemble them. I ditched the mild keeper straps and made some from stainless. Polished them out and had to mount them so I made up some rivets. I ground them out on the surface grinder and made up a die for installation. Jeff M. did the pocket for me. Rivet head side was polished so their will be no marring.
|  For the keeper straps on the springs I cut out some stainless strap from large plate. Polished them all out and bent them into a U shape. For the keeper straps on the springs I cut out some stainless strap from large plate. Polished them all out and bent them into a U shape.
|
 Then I drilled them all and filed one side square and drilled a hole on the bottom for attachment. Took 8 of them and it will really show up when installed on that black. Then I drilled them all and filed one side square and drilled a hole on the bottom for attachment. Took 8 of them and it will really show up when installed on that black.
|  Center drilled the rivets part way down and made a tapered punch to mushroom them out. Center drilled the rivets part way down and made a tapered punch to mushroom them out.
| 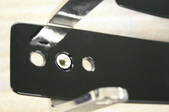 Underside view of "peen" and this ain't going anywhere. Other holes are for the poly slip pads manufacturer uses on these. Underside view of "peen" and this ain't going anywhere. Other holes are for the poly slip pads manufacturer uses on these.
|  Assembled view with poly installed Assembled view with poly installed
|
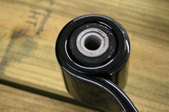
 Simple carriage with acorn nut with gun drilled rod for spacer. Simple carriage with acorn nut with gun drilled rod for spacer.
| 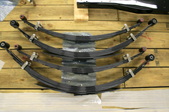 All the springs are done and time for the next phase. All the springs are done and time for the next phase.
|  Front shackles were next for smoothing. I bolt them together and rough grind with angle grinder. Them move to hand held belt sander mounted upside down in a vise. Hey, it works! Front shackles were next for smoothing. I bolt them together and rough grind with angle grinder. Them move to hand held belt sander mounted upside down in a vise. Hey, it works!
|  Before and after and the 2 bolted together make it thicker which makes getting them straight easier for me. Before and after and the 2 bolted together make it thicker which makes getting them straight easier for me.
|
