 I first got some mild round rod and bent the to different curves to get that straightened out for measurements. Had to use 2 different benders to get this done. I first got some mild round rod and bent the to different curves to get that straightened out for measurements. Had to use 2 different benders to get this done.
|  Moved to the stainless rod next and needed to weld it together to make it one solid piece. I wanted it so you wouldn't be able to tell where it was done. Moved to the stainless rod next and needed to weld it together to make it one solid piece. I wanted it so you wouldn't be able to tell where it was done.
|  I got a long, thick chunk of tool steel. I laid out a pattern for the wires and needed holes drilled on 45 degrees. I had a friend Mark R, do this on a CNC mill for me and thanks to him for that. I then had it heat treated. Ground a groove the same size as the surround rod into the jig in the center of the hole line. I got a long, thick chunk of tool steel. I laid out a pattern for the wires and needed holes drilled on 45 degrees. I had a friend Mark R, do this on a CNC mill for me and thanks to him for that. I then had it heat treated. Ground a groove the same size as the surround rod into the jig in the center of the hole line.
|  I clamped the two pieces end to end and TIG welded it up. I clamped the two pieces end to end and TIG welded it up.
|
 Once welded I rough ground it being very careful not to gouge it anywhere. Once welded I rough ground it being very careful not to gouge it anywhere.
|  I then covered the area with a Magic Marker and started hand filing in straight sweeping, curving motion, keeping the file parallel. If you get crooked the marker will tell you. I use a very fine mill file for this. Here you can see it is getting real close to flush. I then covered the area with a Magic Marker and started hand filing in straight sweeping, curving motion, keeping the file parallel. If you get crooked the marker will tell you. I use a very fine mill file for this. Here you can see it is getting real close to flush.
|  On our grinders at work we use this method with pieces that are ground in size to a total .0002 of an inch tolerance. We blend these without removing any stock from that .0002. This is ready for sanding and polishing. If I drill the holes now it will distort around them when sanding/polishing so get it shiny at this point. On our grinders at work we use this method with pieces that are ground in size to a total .0002 of an inch tolerance. We blend these without removing any stock from that .0002. This is ready for sanding and polishing. If I drill the holes now it will distort around them when sanding/polishing so get it shiny at this point.
|  Making sure the first hole was correctly positioned was critical as if you screw up there the gaps wouldn't look right. Once the first one was in I left the drill bit in and went to the next one. It now was a self locating jig and worked my way down the line Making sure the first hole was correctly positioned was critical as if you screw up there the gaps wouldn't look right. Once the first one was in I left the drill bit in and went to the next one. It now was a self locating jig and worked my way down the line
|
 I then remeasured and drill all the holes the other way. Jig worked great and I got it all right. I then remeasured and drill all the holes the other way. Jig worked great and I got it all right.
|  Polished all the rods out and laid them in. Original was woven But I decided against that as it was too hard to do. I left the rods long and TIG welded them down. I'd heat them and the metal would flow and blend in into the surround, No filler rod was used on this. I did the same blending thing here and you can see the steps. Polished all the rods out and laid them in. Original was woven But I decided against that as it was too hard to do. I left the rods long and TIG welded them down. I'd heat them and the metal would flow and blend in into the surround, No filler rod was used on this. I did the same blending thing here and you can see the steps.
|  Cut out some flat stock for tabs and rounded the corners to match original. Sanded out and polished it all again. Tig welded the tabs on after careful measurement. I put transfer screws in the cabs mounting holes then pushed the screen onto them, thus marking all the holes at once.so I knew they'd line up that way. Cut out some flat stock for tabs and rounded the corners to match original. Sanded out and polished it all again. Tig welded the tabs on after careful measurement. I put transfer screws in the cabs mounting holes then pushed the screen onto them, thus marking all the holes at once.so I knew they'd line up that way.
| 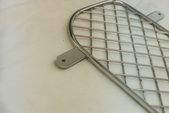 Drilled the holes and it's now done. Drilled the holes and it's now done.
|
 No distortion on the edges where it was welded and blended. Gives a lot cleaner look. No distortion on the edges where it was welded and blended. Gives a lot cleaner look.
|  Ready to put on. Ready to put on.
| |
