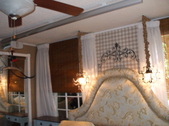
 HEADBOARD HEADBOARD
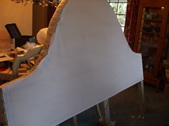
This is the basic shape and framework of the headboard. We followed instructions from Kim's Upholstery on Youtube for the construction. It was from 2 x 4s and 1/4" birch plywood.
|  I followed another Youtuber, "gacmkc", for the upholstered portion since I wanted a shirred border. They made it look doable--and it was! I followed another Youtuber, "gacmkc", for the upholstered portion since I wanted a shirred border. They made it look doable--and it was!
|  Upholstery cardboard strips were laid out, inside the interior pattern line, then foam was stapled down onto it. Upholstery cardboard strips were laid out, inside the interior pattern line, then foam was stapled down onto it.
|  A layer of Dacron goes down next, stapled into the same cardboard strips, then trimmed close. A layer of Dacron goes down next, stapled into the same cardboard strips, then trimmed close.
|
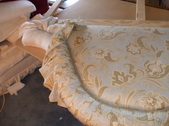
 Décor fabric came next. This is "Rustic Retreat" by Waverly, and was stapled onto same cardboard, pulling taut. Unfortunately, I was so anxious to get to the 'pretty' part, I didn't realize that it had a distinct direction, until it was too late. Oh well... Décor fabric came next. This is "Rustic Retreat" by Waverly, and was stapled onto same cardboard, pulling taut. Unfortunately, I was so anxious to get to the 'pretty' part, I didn't realize that it had a distinct direction, until it was too late. Oh well...
|  Contrasting fabric was bias cut, and covered 1/2" cording. I chose the fabric because it resembled burlap and should relatively match my burlap bedskirts from Ballards. It also was stapled to same cardboard. Contrasting fabric was bias cut, and covered 1/2" cording. I chose the fabric because it resembled burlap and should relatively match my burlap bedskirts from Ballards. It also was stapled to same cardboard.
|  Gathering enough panels was a guessing game. "We" kept laying them along the perimeter, until we had what looked like enough. Gathering enough panels was a guessing game. "We" kept laying them along the perimeter, until we had what looked like enough.
|  The panels were stapled along the piping. Next came the 2" thick border foam. The panels were stapled along the piping. Next came the 2" thick border foam.
|
 Dacron was then added to that, and after smoothing and more staples, we were left with a nice rounded edge. Dacron was then added to that, and after smoothing and more staples, we were left with a nice rounded edge.
|  Here was a fun finishing step. Lupe pulled the gathers over the edge and steamed the pleats in place with an iron. Here was a fun finishing step. Lupe pulled the gathers over the edge and steamed the pleats in place with an iron.
|  Pleats were stapled to the back side. Pleats were stapled to the back side.
|  Excess fabric on the back was trimmed, and we're almost done! Excess fabric on the back was trimmed, and we're almost done!
|
 |  We covered the bottom front and legs with no foam, but we used half the thickness of our batting to still add a softened look. We covered the bottom front and legs with no foam, but we used half the thickness of our batting to still add a softened look.
| 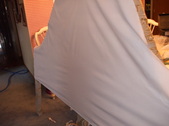 I bought a twin-sized sheet for the backing. One long edge was aligned with the bottom of the headboard and it was cut close to the curve of the top. I bought a twin-sized sheet for the backing. One long edge was aligned with the bottom of the headboard and it was cut close to the curve of the top.
|  The edge was turned under and stapled. Literally, a few thousand staples went into this project. The edge was turned under and stapled. Literally, a few thousand staples went into this project.
|
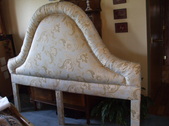 Done! Proof that you don't have to hire a professional to have something that turns out great! Done! Proof that you don't have to hire a professional to have something that turns out great!
Note: This project evolved over the course of several months, and was actually put away for the Holidays--definitely not a quick DIY, but fun!
Thank you, Lupe!
|  |  |  LOVESEAT PROJECT LOVESEAT PROJECT
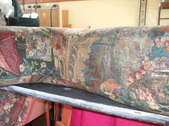
My friend spied a neglected loveseat, left outside to the elements. She fell in love with the front apron and legs and saw potential. You can see why the owner was happy to see it go. Ewwwwww!
|
 We started taking pictures of all sides and angles, trying to capture placement of pleats, etc.. We started taking pictures of all sides and angles, trying to capture placement of pleats, etc..
|  While this tapestry fabric was probably pretty in its day, the pattern is so busy that picking up details, like pleats, is difficult. While this tapestry fabric was probably pretty in its day, the pattern is so busy that picking up details, like pleats, is difficult.
|  You notice that she is in the garage until she's undressed. You notice that she is in the garage until she's undressed.
|  Cushions with pleats and piping.... Cushions with pleats and piping....
|
 ..."ears"... ..."ears"...
|  ...and zippers ...and zippers
|  She used to have nail heads, even though they were not individual. She used to have nail heads, even though they were not individual.
|  Pretty little oak legs Pretty little oak legs
|
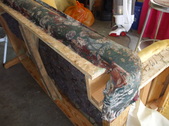
 |  |  This framework looks like it was a pallet project, with questionable quality wood. Many brads and staples missed their mark. This framework looks like it was a pallet project, with questionable quality wood. Many brads and staples missed their mark.
|  After the fabric was off, we added more wood, screws and glue. After the fabric was off, we added more wood, screws and glue.
|
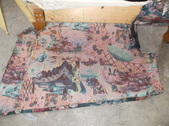 Fabric pieces came off in reverse order and labeled. Fabric pieces came off in reverse order and labeled.
|  |  |  |
 |  |  |  |
