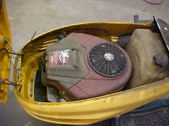
 I've been planning this build for several years. Did a little research and found what size motor was needed and started keeping my eyes open for a deal. Finally this mower was listed on craigslist and snatched it up. I've been planning this build for several years. Did a little research and found what size motor was needed and started keeping my eyes open for a deal. Finally this mower was listed on craigslist and snatched it up.
|  You'll be dealing with a vertical shaft motor as opposed to horizontal but to me, it's not a big deal. This one was extremely nice and with the advent of hydrostatic transmissions now, you can find some bigger motors on smaller mowers. You'll be dealing with a vertical shaft motor as opposed to horizontal but to me, it's not a big deal. This one was extremely nice and with the advent of hydrostatic transmissions now, you can find some bigger motors on smaller mowers.
|  25 HP is more than I need for a 28 GPM pump but my thinking was with the way they label motors anymore, 25 HP today isn't what it used to be! Plus the fact if it wears some and the power decreases, I still have plenty to do what I want and it is not stressed 25 HP is more than I need for a 28 GPM pump but my thinking was with the way they label motors anymore, 25 HP today isn't what it used to be! Plus the fact if it wears some and the power decreases, I still have plenty to do what I want and it is not stressed
|  Only had 271 hours on it and got the mower for $325.00. Guy was moving and had to go. Found it on Craigslist. A big plus is you get a lot of extra stuff with a rider. I'll use this hour meter along with cables and such which will be nice. Only had 271 hours on it and got the mower for $325.00. Guy was moving and had to go. Found it on Craigslist. A big plus is you get a lot of extra stuff with a rider. I'll use this hour meter along with cables and such which will be nice.
|
 Ready to dig in! Ideally if you had a mower like this allready you could have a bunch of spare parts for your own. I'll sell the stuff off and you can basically get most, if not all, your money back. The electric clutch on this goes for $325.00. hydros are up there and decks are easy to resell in the Spring. Ready to dig in! Ideally if you had a mower like this allready you could have a bunch of spare parts for your own. I'll sell the stuff off and you can basically get most, if not all, your money back. The electric clutch on this goes for $325.00. hydros are up there and decks are easy to resell in the Spring.
|  Less than a hour it was down to the motor. I didn't just rip stuff off as I labeled some of the safety stuff so when I go to clean up the wiring I know what to delete....hopefully! Less than a hour it was down to the motor. I didn't just rip stuff off as I labeled some of the safety stuff so when I go to clean up the wiring I know what to delete....hopefully!
(Side note) ended up selling all that I didn't want for $125.00 so I have $200.00 in the power plant and extras. Could have gotten more if I waited till the Spring but wanted it out of the way.
|  Electric clutch was easy to get off with impact as it's just 1 bolt. The pressed on pulley was a bear! Ended up welding to bolts with the heads cut off to the outside of it. Then ran that through a 1/2" plate and tightened the nuts. Old school trick but never failed me yet! No damage to the crank and you don't beat on it that way. Electric clutch was easy to get off with impact as it's just 1 bolt. The pressed on pulley was a bear! Ended up welding to bolts with the heads cut off to the outside of it. Then ran that through a 1/2" plate and tightened the nuts. Old school trick but never failed me yet! No damage to the crank and you don't beat on it that way.
|  As you can see I tried the standard 3 jaw puller first and it was obvious that wasn't going to get it off. put washers to get more movement. I then loosened up and put a socket on the shaft and pulled it the rest of the way off. As you can see I tried the standard 3 jaw puller first and it was obvious that wasn't going to get it off. put washers to get more movement. I then loosened up and put a socket on the shaft and pulled it the rest of the way off.
|
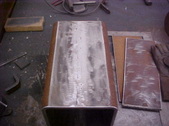
 Here is the tank I'm using for the hydraulic fluid. Very nice and made out of 3/16" steel. It was a stand alone unit with a 5HP electric motor(Taken off here}. Pump was a 15GPM at 1500 PSI and is adjustable. Here is the tank I'm using for the hydraulic fluid. Very nice and made out of 3/16" steel. It was a stand alone unit with a 5HP electric motor(Taken off here}. Pump was a 15GPM at 1500 PSI and is adjustable.
|  Already has a screened fill point, full length baffle to isolate inlet and outlet, Level/temp gauge, access covers on both ends and boltable feet. 18" X 14" X 3' figures out to 33 gallon capicity which will be nice for cooling. Already has a screened fill point, full length baffle to isolate inlet and outlet, Level/temp gauge, access covers on both ends and boltable feet. 18" X 14" X 3' figures out to 33 gallon capicity which will be nice for cooling.
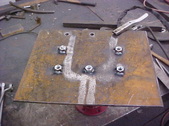
|  Removed the pump and elbow to get ready to clean the top up. From the other pic you can see 2 1 1/2 square blocks mounted to a 3/4" thick plate. Used a 9 inch angle grinder to flush out the welds. Plate had threaded holes so I just bottomed them out and one side popped. Removed the pump and elbow to get ready to clean the top up. From the other pic you can see 2 1 1/2 square blocks mounted to a 3/4" thick plate. Used a 9 inch angle grinder to flush out the welds. Plate had threaded holes so I just bottomed them out and one side popped.
|  One corner was too tight for 9 inch so I went to the small grinder. Hit the welds with a chisel and put a prybar under and it hinged, braking what was left of the end weld. They went a little overboard on attachment of this. One corner was too tight for 9 inch so I went to the small grinder. Hit the welds with a chisel and put a prybar under and it hinged, braking what was left of the end weld. They went a little overboard on attachment of this.
|
 Ground what was left of the welds flush. Gouged a few areas and will fill those with the MIG. Ground what was left of the welds flush. Gouged a few areas and will fill those with the MIG.
|  Here it is all filled with weld and ground flush. Here it is all filled with weld and ground flush.
|  Here you can see the fluid level indicator and screened, large mouth fill on the left side. Here you can see the fluid level indicator and screened, large mouth fill on the left side.
|  Both ends have a domed 12 inch access hole to clean or work on the inside. Full length center divider is 3/16" plate as well and fluid circulates to other side around the domed covers and 45 degree cutout on the bottom. Both ends have a domed 12 inch access hole to clean or work on the inside. Full length center divider is 3/16" plate as well and fluid circulates to other side around the domed covers and 45 degree cutout on the bottom.
|
 Close up of the cut out on the bottom of the divider. I don't think this will break! Close up of the cut out on the bottom of the divider. I don't think this will break!
|  Pump that was on the tank when I got it. A little too small for what I want. Pump that was on the tank when I got it. A little too small for what I want.
|  Went to the local scrap yard and lucked out. Happy I didn't have to buy this new. Beam weighs over 900 lb. They had just the box beam I was looking for. 6" X 8" X 1/2" thick, Picked up some heavy plates and misc there too. Went to the local scrap yard and lucked out. Happy I didn't have to buy this new. Beam weighs over 900 lb. They had just the box beam I was looking for. 6" X 8" X 1/2" thick, Picked up some heavy plates and misc there too.
|  I had them cut the box to 11' and took the rest as well. I'm using the shorter piece to make up the slide for the end of the cylinder. It will be a box beam on a box beam. Did this with all the splitters we have and it is bullet proof. Clamped a straight edge and cut it with the Plasma cutter. I had them cut the box to 11' and took the rest as well. I'm using the shorter piece to make up the slide for the end of the cylinder. It will be a box beam on a box beam. Did this with all the splitters we have and it is bullet proof. Clamped a straight edge and cut it with the Plasma cutter.
|
 Slide will be about 16" long so I cut a length to 32" Then sliced the length so there is 4 inches from the inside edge to the cut. 2 pieces will total 8 inches so it will fit over the main rail. I'll use 2 pieces of 1/2" plate on both sides of the beam to make the other part of the box snug. Slide will be about 16" long so I cut a length to 32" Then sliced the length so there is 4 inches from the inside edge to the cut. 2 pieces will total 8 inches so it will fit over the main rail. I'll use 2 pieces of 1/2" plate on both sides of the beam to make the other part of the box snug.
|  Cleaned up the inside while it was easy to get to and cleaned the inside edge to be welded. I cut on an angle as I'm going to gouge out so I full full penetration. Probably have 3 passes of weld on it. Cleaned up the inside while it was easy to get to and cleaned the inside edge to be welded. I cut on an angle as I'm going to gouge out so I full full penetration. Probably have 3 passes of weld on it.
|  Put it on the beam and put some thin shims on the edges, clamped it so I can tack it up. You have to have some clearance as the steel will move sometimes and you'll get it locked on the beam if you don't use shims. Put it on the beam and put some thin shims on the edges, clamped it so I can tack it up. You have to have some clearance as the steel will move sometimes and you'll get it locked on the beam if you don't use shims.
|  Tacked it up and tested it for clearance and it was fine. Used the angle grinder and gouged a groove a little over half way through. This is the first pass weld. Notice I put a copper strip under the weld area. This keeps the weld from sticking to the lower beam and the weld doesn't stick to the copper. Tacked it up and tested it for clearance and it was fine. Used the angle grinder and gouged a groove a little over half way through. This is the first pass weld. Notice I put a copper strip under the weld area. This keeps the weld from sticking to the lower beam and the weld doesn't stick to the copper.
|
 Here you can see I've gotten pretty much full penetration on the 1/2" steel. Here you can see I've gotten pretty much full penetration on the 1/2" steel.
|  Second pass and heat lines look pretty good. Second pass and heat lines look pretty good.
|  End view of second pass. I'll run a light 3rd pass as I'm going to grind it all flush and put fish plates on both side of the joint the full length. End view of second pass. I'll run a light 3rd pass as I'm going to grind it all flush and put fish plates on both side of the joint the full length.
|  Inside view of the weld showing penetration. Not real pretty but I'll run a bead over this too and grind it all down as it had to be smooth to slide easy. Inside view of the weld showing penetration. Not real pretty but I'll run a bead over this too and grind it all down as it had to be smooth to slide easy.
|
 Cleaned up the ends and smoothed the edges. You're looking down the inside of the reconnected box where the weld is. Cleaned up the ends and smoothed the edges. You're looking down the inside of the reconnected box where the weld is.
|  Ground the welds on the outside flush but there wasn't too much to do. Cut out some plates out of 3/8" steel to weld on for more strength and distribute the stress. Ground the welds on the outside flush but there wasn't too much to do. Cut out some plates out of 3/8" steel to weld on for more strength and distribute the stress.
|  Ground some reliefs on both side of the steel on the ends so weld would lay pretty flush. Clamped it down for tacks. Ground some reliefs on both side of the steel on the ends so weld would lay pretty flush. Clamped it down for tacks.
|  End weld completed End weld completed
|
 Did the other side the same and welded the entire length so Box section of the slide is done. Did the other side the same and welded the entire length so Box section of the slide is done.
|  Should be plenty strong now as side walls are 7/8" thick. Should be plenty strong now as side walls are 7/8" thick.
|  I'm using a boom hoist with winch on the end of the splitter to lift the big ones. Did some layout and got my measurements for the log tongs. I cut the riser and welded it on. It will double as a strengthening point for the back plate. I'm going overkill here as in time I may go with a bigger cylinder. I'm using a boom hoist with winch on the end of the splitter to lift the big ones. Did some layout and got my measurements for the log tongs. I cut the riser and welded it on. It will double as a strengthening point for the back plate. I'm going overkill here as in time I may go with a bigger cylinder.
|  Upper view of riser. Needed 4 more inches for clearance on the tongs so used a 1 inch spacer and welded it in. In the inside of the riser box, I welded a 3/4" plate for more straight line strength. Also welded inside the box as you can see. These will be completely closed in so I drilled weep holes prior to putting all this on so condensation doesn't get trapped. Upper view of riser. Needed 4 more inches for clearance on the tongs so used a 1 inch spacer and welded it in. In the inside of the riser box, I welded a 3/4" plate for more straight line strength. Also welded inside the box as you can see. These will be completely closed in so I drilled weep holes prior to putting all this on so condensation doesn't get trapped.
|
 Welded the backing plate on. I'll be doing a lot of welding and reinforcing on it to ensure it won't be going anywhere! Welded the backing plate on. I'll be doing a lot of welding and reinforcing on it to ensure it won't be going anywhere!
|  Cut out a 3/8" plate that will reinforce the top edge of the backing plate and serve as a mount spot for the lifting boom. My plan calls for 5 of the mounting holes to be boxed in, so I welded nuts there. Cut out a 3/8" plate that will reinforce the top edge of the backing plate and serve as a mount spot for the lifting boom. My plan calls for 5 of the mounting holes to be boxed in, so I welded nuts there.
|  Top plate welded on and put on the first reinforcement plate. basically I'm going to have a box the same size as the top plate till I'm done. Outrigger arms will be attached to the box so it has to have some strength. Top plate welded on and put on the first reinforcement plate. basically I'm going to have a box the same size as the top plate till I'm done. Outrigger arms will be attached to the box so it has to have some strength.
|  All the parts came in so let the fun begin! I ordered all my stuff from P & J Commercial Products (877-775-4839) They build splitters to order or will sell you the parts you need. Super nice to deal with and they know their stuff. All the parts came in so let the fun begin! I ordered all my stuff from P & J Commercial Products (877-775-4839) They build splitters to order or will sell you the parts you need. Super nice to deal with and they know their stuff.
|
