 It has a self contained hydraulic system so you have no hookups. Just hook the unit up and PTO and that is it. Dual hydraulic motors on the feed rollers and they are variable speed if you have a smaller tractor and run bigger diameter stuff. It has a self contained hydraulic system so you have no hookups. Just hook the unit up and PTO and that is it. Dual hydraulic motors on the feed rollers and they are variable speed if you have a smaller tractor and run bigger diameter stuff.
|  Greasable bearings and access panels to get to the knives make it nice. Overall the quality of the machine is better than I expected. Greasable bearings and access panels to get to the knives make it nice. Overall the quality of the machine is better than I expected.
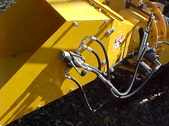
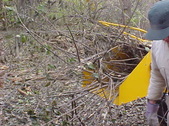
|  Chip chute is completely adjustable and lockable. Has a flap on the top to direct chips too which is nice. You do have to get pretty close if your using a trailer but I've completely filled a 10 ' x 12' x 3' trailer with it and it wasn't a big deal. You could put an extension on the chute without too much work but the extra weight may work on the welds here. Chip chute is completely adjustable and lockable. Has a flap on the top to direct chips too which is nice. You do have to get pretty close if your using a trailer but I've completely filled a 10 ' x 12' x 3' trailer with it and it wasn't a big deal. You could put an extension on the chute without too much work but the extra weight may work on the welds here.
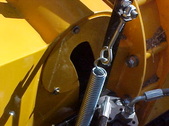
|  This is the forward and reverse lever. I took off the bar that is supposed to be on the top of the feed chute. When the unit would bounce a little it would shut the feed roller off. I'm sure it is a safety feature but I'll take responsibility for my actions. It's easily reachable for panic stops this way for me still. It could use a little better design as it's too much weight for the valve body to hold. This is the forward and reverse lever. I took off the bar that is supposed to be on the top of the feed chute. When the unit would bounce a little it would shut the feed roller off. I'm sure it is a safety feature but I'll take responsibility for my actions. It's easily reachable for panic stops this way for me still. It could use a little better design as it's too much weight for the valve body to hold.
|
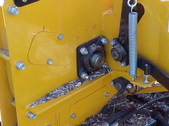
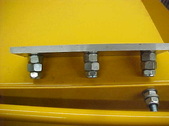
 This is something I'm going to change. I assembled according to manufacture and they showed nuts in with standard bolts. Stuff does snag up some as they have a lot of extra thread sticking out. I'm sure it's another safety thing as to not snag yourself on the outside of the macione. I'm going to pick up some short carriage bolts and have the heads in. This is something I'm going to change. I assembled according to manufacture and they showed nuts in with standard bolts. Stuff does snag up some as they have a lot of extra thread sticking out. I'm sure it's another safety thing as to not snag yourself on the outside of the macione. I'm going to pick up some short carriage bolts and have the heads in.
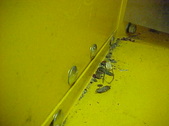
|  This is where the feed roller pivots. After running it for a few hours I noticed the roller casting was rubbing on the radiused slot. It wore into the casting some and found that the adjustment was WAY off. Don't know why they missed that but is fine now. Don't take things for granted and COMPLETELY check it over before running. This is where the feed roller pivots. After running it for a few hours I noticed the roller casting was rubbing on the radiused slot. It wore into the casting some and found that the adjustment was WAY off. Don't know why they missed that but is fine now. Don't take things for granted and COMPLETELY check it over before running.
| 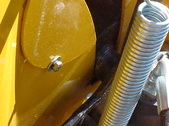 Trying to show the wear on the casting here. Trying to show the wear on the casting here.
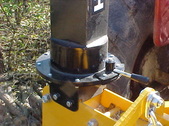
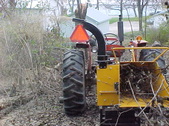
| 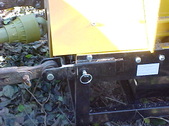 3 point hook up is adjustable and I didn't even have to cut the drive shaft for my application. They have all the specs in the manual with easy to follow instructions. 3 point hook up is adjustable and I didn't even have to cut the drive shaft for my application. They have all the specs in the manual with easy to follow instructions.
|
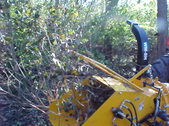
 Air intake to keep the chips flying a plug free. Haven't had a plug yet. Air intake to keep the chips flying a plug free. Haven't had a plug yet.
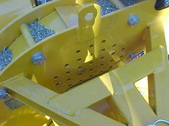
| 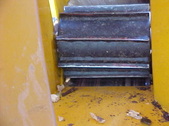 Fed rollers are pretty aggressive and have sharp edges. This has about 20 hours of use on it here. Fed rollers are pretty aggressive and have sharp edges. This has about 20 hours of use on it here.
|  This is the speed adjustment for the feed roller. Just a simple screw valve. I'm running it wide open and no problems even with feeding some test, big stuff. For the most part I'm 3 inch and under but I am running a tractor with around 60 PTO HP. This is the speed adjustment for the feed roller. Just a simple screw valve. I'm running it wide open and no problems even with feeding some test, big stuff. For the most part I'm 3 inch and under but I am running a tractor with around 60 PTO HP.
| 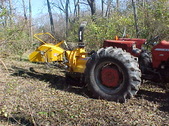 Ready to start cleaning the driveways. Ready to start cleaning the driveways.
|
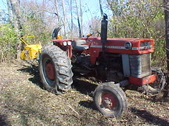 I'm using a smaller MF 175 for the chipper. Seems to be plenty for the chipper. I'm using a smaller MF 175 for the chipper. Seems to be plenty for the chipper.
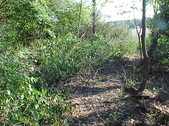
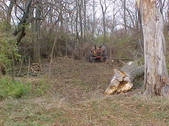
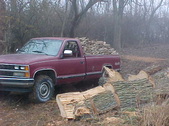
|  Wanted to get some driveways back though the hillside behind my house. when I was a kid it was pasture and you could drive between the trees. Wanted to get some driveways back though the hillside behind my house. when I was a kid it was pasture and you could drive between the trees.
|  Not now as Honeysuckle has invaded our area and made it impassable. I used the backhoe and cleared the driveways and threw the uprooted tress and honeysuckle to the sides. Not now as Honeysuckle has invaded our area and made it impassable. I used the backhoe and cleared the driveways and threw the uprooted tress and honeysuckle to the sides.
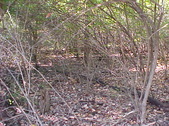
|  After that was all done went back through and cut all the brush and windrowed it back in the center of the driveway. Cut most everything 2 inch and bigger for the stove. After that was all done went back through and cut all the brush and windrowed it back in the center of the driveway. Cut most everything 2 inch and bigger for the stove.
|
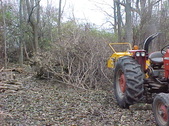
 All toll it's probably about a 1/4 mile in length. I'll chip all the brush and blow it off to the side. Didn't want to leave the brush to rot as it will just compound the problem. Lots of ash trees in here that are dead now from ash bore beetle so I want to get the wood out. All toll it's probably about a 1/4 mile in length. I'll chip all the brush and blow it off to the side. Didn't want to leave the brush to rot as it will just compound the problem. Lots of ash trees in here that are dead now from ash bore beetle so I want to get the wood out.
|  Chipper should make quick work of the brush as it's all green and soft. I cut/clipped all the root balls off to save some wear on the chipper knives(no dirt) Chipper should make quick work of the brush as it's all green and soft. I cut/clipped all the root balls off to save some wear on the chipper knives(no dirt)
|  For those of you that don't have honeysuckle this is what it does. Grows fast and creates a canopy that blocks all the light so the grass dies out. after a while you can actually walk under the canopy. Only thing worse for use is if it was Multiflors Rose. For those of you that don't have honeysuckle this is what it does. Grows fast and creates a canopy that blocks all the light so the grass dies out. after a while you can actually walk under the canopy. Only thing worse for use is if it was Multiflors Rose.
|  Gets so thick the deer won't even try it. It does pull out easy though. Gets so thick the deer won't even try it. It does pull out easy though.
|
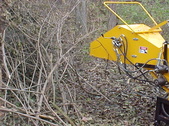
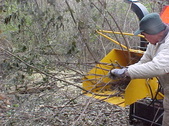
 I was working by myself here and tried to get some action shots. Once it starts pulling it in it normally will always pull it through. I've had a few VERY odd pieces that were over4 inches in diameter that caught as they were 90 degree bends but that is acceptable to me. I'm really impressed with what the feed rollers do break up and pull through. A VERY pleasant surprise there. I was working by myself here and tried to get some action shots. Once it starts pulling it in it normally will always pull it through. I've had a few VERY odd pieces that were over4 inches in diameter that caught as they were 90 degree bends but that is acceptable to me. I'm really impressed with what the feed rollers do break up and pull through. A VERY pleasant surprise there.
| 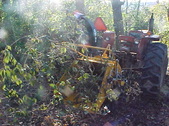 It is happiest if you can constantly feed it and with one guy it keeps you moving. Easier with 2 people to do. If you put the next round of limbs UNDER the ones nearly done it forces it to squeeze the brush down and is non stop. Basically this way you don't have to reach the feed roller. it'll do the work for you. It is happiest if you can constantly feed it and with one guy it keeps you moving. Easier with 2 people to do. If you put the next round of limbs UNDER the ones nearly done it forces it to squeeze the brush down and is non stop. Basically this way you don't have to reach the feed roller. it'll do the work for you.
|  started on this section of driveway this morning. It was pretty thick through this area and was by myself. Brush was pretty solid from the base of the tree snag that fell. started on this section of driveway this morning. It was pretty thick through this area and was by myself. Brush was pretty solid from the base of the tree snag that fell.
|  Hard to show the scale of this pile but would easily fill a full size truck bed. I was surprised that it chips the stuff pretty fine so it packs more per load when hauling away. Hard to show the scale of this pile but would easily fill a full size truck bed. I was surprised that it chips the stuff pretty fine so it packs more per load when hauling away.
|
 I just keep backing up the line so I don't have to drag it very far. Goes pretty quick. I just keep backing up the line so I don't have to drag it very far. Goes pretty quick.
|  This stuff is long and stringy so it feeds really well. Basically it keeps chipping constantly. This stuff is long and stringy so it feeds really well. Basically it keeps chipping constantly.
| 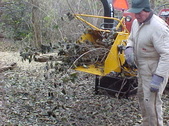 Dad showed up to help and we really started moving. You can keep the feed chute like that and it just keeps pulling it all in. Dad showed up to help and we really started moving. You can keep the feed chute like that and it just keeps pulling it all in.
|  Very little, if any trimming is needed as it'll pull it in. Sharp 90's on bigger stuff should be trimmed but you can see what needs to be trimmed before you start. Just a common sense thing. Very little, if any trimming is needed as it'll pull it in. Sharp 90's on bigger stuff should be trimmed but you can see what needs to be trimmed before you start. Just a common sense thing.
|
 This thing is pretty hungry! This thing is pretty hungry!
|  Just blowing this stuff on the ground so it's cleaned up. Honeysuckle isn't worth too much for anything. Just blowing this stuff on the ground so it's cleaned up. Honeysuckle isn't worth too much for anything.
|  About 2 1/2 hours and this section of drive is done. would have taken a lot longer to burn and it always seems like the brush is in the wrong spot if you throw it to the side. About 2 1/2 hours and this section of drive is done. would have taken a lot longer to burn and it always seems like the brush is in the wrong spot if you throw it to the side.
| 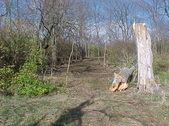 Makes for a nice drive to get the dead and fallen trees out. Makes for a nice drive to get the dead and fallen trees out.
|
 Had my first plug up the other day and I had noticed some longer strings were starting to get thrown out. When I took the chute off to unplug the strings were what caused the problem so I decided to look at the knives to see if adjustment was needed. The knives themselves were not bad but I flipped them anyway. When I got to the adjustment knife it was a royal pain to get out. They use recessed allen bolts and they fill up with stuff and hard to get to. Had my first plug up the other day and I had noticed some longer strings were starting to get thrown out. When I took the chute off to unplug the strings were what caused the problem so I decided to look at the knives to see if adjustment was needed. The knives themselves were not bad but I flipped them anyway. When I got to the adjustment knife it was a royal pain to get out. They use recessed allen bolts and they fill up with stuff and hard to get to.
| 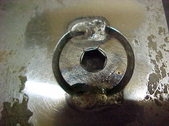 I said, "NEVER AGAIN!" They should at least use recessed carriage like are used on field cultivator shoes on farm tillage equipment. I TIG welded tacks and that works fine as well. No clearence issues by doing this. The only downside would be with sharpening if you wanted to completely sink it in to hold. Not a problem for me as I have a surface grinder with holding devices. I said, "NEVER AGAIN!" They should at least use recessed carriage like are used on field cultivator shoes on farm tillage equipment. I TIG welded tacks and that works fine as well. No clearence issues by doing this. The only downside would be with sharpening if you wanted to completely sink it in to hold. Not a problem for me as I have a surface grinder with holding devices.
|  To hold them nice and flat for welding, I used some 1/2" nuts for spacers and snugged them up. I then tacked them down. VERY little heat and it's so isolated it won't hurt the temper of the knives. To hold them nice and flat for welding, I used some 1/2" nuts for spacers and snugged them up. I then tacked them down. VERY little heat and it's so isolated it won't hurt the temper of the knives.
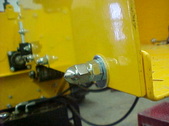
|  They want .020 - .030 gap between the knives. I used a couple pieces of .025 wire taped to the knife. Worked well. BE SURE to cycle the flywheel around to BOTH knives as one on mine was closer than the other. Might save you a BAD situation. They want .020 - .030 gap between the knives. I used a couple pieces of .025 wire taped to the knife. Worked well. BE SURE to cycle the flywheel around to BOTH knives as one on mine was closer than the other. Might save you a BAD situation.
|
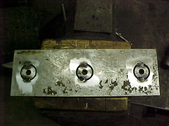
 Got some 3/8" carriage bolts for the chute intake as well. This will let the stuff feed a lot easier too. Got some 3/8" carriage bolts for the chute intake as well. This will let the stuff feed a lot easier too.
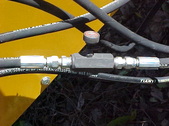
|  On the bolt at the end of the chute I put an acorn nut on the outside. It's about the only one you might snag yourself on. You could cut them down or get shorter ones but this will work for me. On the bolt at the end of the chute I put an acorn nut on the outside. It's about the only one you might snag yourself on. You could cut them down or get shorter ones but this will work for me.
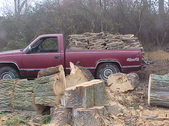
|  These picture are of a truckload of honeysuckle. Ended up having quite a few loads. I'll burn this in the shop stove as once dry, it's what I call "woof wood" as it burns fast and makes quick heat. These picture are of a truckload of honeysuckle. Ended up having quite a few loads. I'll burn this in the shop stove as once dry, it's what I call "woof wood" as it burns fast and makes quick heat.
|  |
