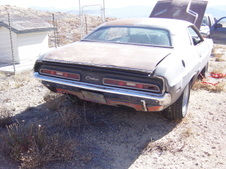
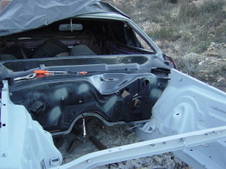
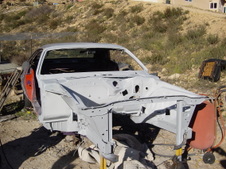
 As delivered. The Hood, roof, Driver's side floor, Trunk floor, trunk lid, lower 1/4s & fenders will be replaced. This car sat outside for 8 or 9 years with no window in the drivers door. As delivered. The Hood, roof, Driver's side floor, Trunk floor, trunk lid, lower 1/4s & fenders will be replaced. This car sat outside for 8 or 9 years with no window in the drivers door.
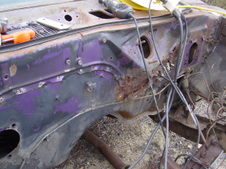
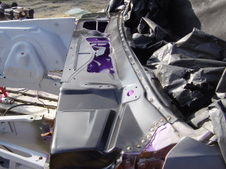
| 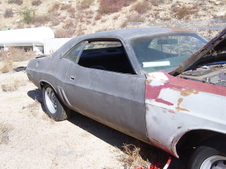 This side doesn't look too bad. This side doesn't look too bad.
When you open the picture you can click on "original" size for a large view.
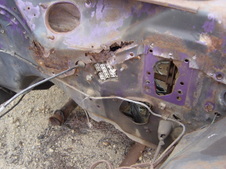
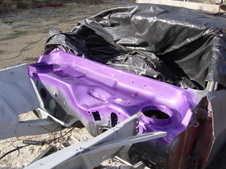
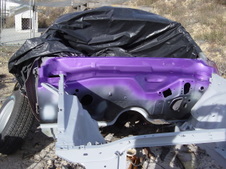
|  Trunk lid is really bad, lets water into the trunk. Im sure the trunk floor will need to be replaced too. Trunk lid is really bad, lets water into the trunk. Im sure the trunk floor will need to be replaced too.
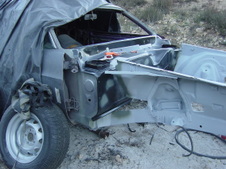
| 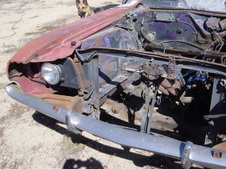 Right front Right front
|
 Left front Left front
|  Fender tag codes: Fender tag codes:
R26 V5X 26 EN2
N41 N42 N85 N95 N98
G36 H31 J25 J54 M21 N23
V1X U B51 C16 C55 G11
FC7 M6X9 000 607 050912
E55 D21 JS23 H1B XXXXXX
E55=340 4 BBL
D21=HD 4 Spd Trans
N41= Dual exhaust
FC7=Plum Crazy
R26= AM/Cassette
|  Update: Here is my reproduction fender tag, completely accurate to the original. Update: Here is my reproduction fender tag, completely accurate to the original.
| 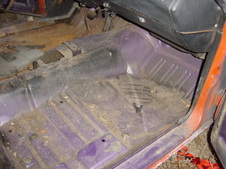 Passenger side floor looks good. Passenger side floor looks good.
|
 Driver side floor has serious rust. There are several holes and the metal is paper thin in spots. Driver side floor has serious rust. There are several holes and the metal is paper thin in spots.
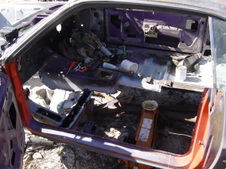
|  Rallye dash and steering wheel with no cracks! 92,575 original miles. Rallye dash and steering wheel with no cracks! 92,575 original miles.
|  Serious rust under the wiper cowl. Seems solid underneath. Will remove the wiper cowl and see. Serious rust under the wiper cowl. Seems solid underneath. Will remove the wiper cowl and see.
|  Drilling out the spot welds to remove the wiper cowl. Drilling out the spot welds to remove the wiper cowl.
|
 Hmm, rust all the way through. I may have to patch a small piece of the firewall. Hmm, rust all the way through. I may have to patch a small piece of the firewall.
|  Wow, this thing is rotten from one end to the other! I made some holes just by scrubbing the loose rust with a wire brush. No way can this be sandblasted clean. Wow, this thing is rotten from one end to the other! I made some holes just by scrubbing the loose rust with a wire brush. No way can this be sandblasted clean.
|  I decided to remove and replace the entire firewall. I drilled out the 200 or so spot welds with a spot weld cutter. I bought a quality spot weld cutter and it easily lasted the entire time. I've bought cheap (Chinese) ones before that didn't last for 6 spot welds. I decided to remove and replace the entire firewall. I drilled out the 200 or so spot welds with a spot weld cutter. I bought a quality spot weld cutter and it easily lasted the entire time. I've bought cheap (Chinese) ones before that didn't last for 6 spot welds.
|  I sandblasted, acid washed and etch primed the fender wells. The K frame and suspension have been removed, blasted, painted and rebuilt with poly bushings. I used paint remover and a putty knife to remove the undercoating before sandblasting. I sandblasted, acid washed and etch primed the fender wells. The K frame and suspension have been removed, blasted, painted and rebuilt with poly bushings. I used paint remover and a putty knife to remove the undercoating before sandblasting.
|
 Actually got the firewall out in one piece! And it really wasn't that hard of a job. The American bit cut like butter. Actually got the firewall out in one piece! And it really wasn't that hard of a job. The American bit cut like butter.
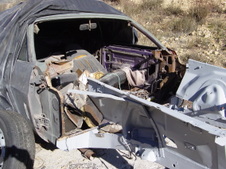
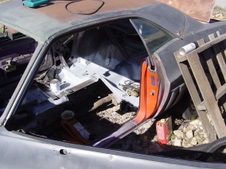
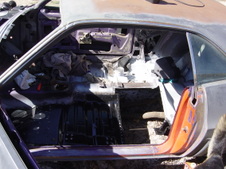
|  The leading edge of the floor pan is readily visible. No dash, steering, brakes, windshield, or firewall! The leading edge of the floor pan is readily visible. No dash, steering, brakes, windshield, or firewall!
|  The Auto Metal Direct "AMD" firewall fits pretty good; it only needed some slight massaging at the upper corners. The Wiper cowl will cover the upper 1/3 of the firewall so I used polyurethane sealant around the vent intakes. I will prime and paint the upper firewall and bottom of wiper cowl (Plum Crazy) before the wiper cowl is spot welded on. The Auto Metal Direct "AMD" firewall fits pretty good; it only needed some slight massaging at the upper corners. The Wiper cowl will cover the upper 1/3 of the firewall so I used polyurethane sealant around the vent intakes. I will prime and paint the upper firewall and bottom of wiper cowl (Plum Crazy) before the wiper cowl is spot welded on.
|  I will be using a modern sound deadening material (like E-Dead) on the inside of the firewall, so I have welded up the retaining clip holes, which held on the old style fiberglass insulation. That will make the engine compartment look much better! I will be using a modern sound deadening material (like E-Dead) on the inside of the firewall, so I have welded up the retaining clip holes, which held on the old style fiberglass insulation. That will make the engine compartment look much better!
|
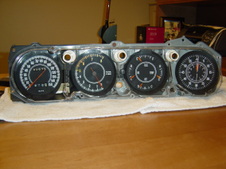 I have since upgraded the tach with an R/T Engineering kit; I installed a quartz movement in the clock, both were easy to do; I installed a new 5 volt gauge regulator. I had Redline Gauge Works replace the Ammeter with a Volt meter, and check everything (They did a good job). I polished the plastic with buffing compound and a new microfiber cloth...Looks great. I have since upgraded the tach with an R/T Engineering kit; I installed a quartz movement in the clock, both were easy to do; I installed a new 5 volt gauge regulator. I had Redline Gauge Works replace the Ammeter with a Volt meter, and check everything (They did a good job). I polished the plastic with buffing compound and a new microfiber cloth...Looks great.
|  Mock up of wiper cowl and windshield to test the fit. Mock up of wiper cowl and windshield to test the fit.
| 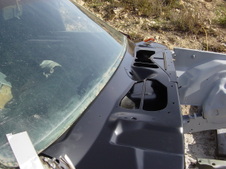 The windshield fits well. The windshield fits well.
|  Looks good, Cant wait to paint the rest of the front end. Looks good, Cant wait to paint the rest of the front end.
|
 The purple area will be mostly hidden once I weld on the wiper cowl, but no way will it rust again. The purple area will be mostly hidden once I weld on the wiper cowl, but no way will it rust again.
|  Apparently the bottom of the cowl was left bare metal by the factory; I can find no evidence of paint underneath. Apparently the bottom of the cowl was left bare metal by the factory; I can find no evidence of paint underneath.
|  This should last a long time. This should last a long time.
|  AMD Wiper Cowl welded in. The hidden areas, left bare by the factory, are painted. AMD Wiper Cowl welded in. The hidden areas, left bare by the factory, are painted.
|
 Fit was very good; just need a little light grinding on the welds. Fit was very good; just need a little light grinding on the welds.
| 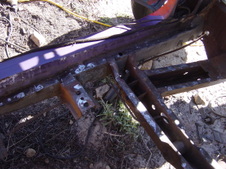 The driver's side rusty floor pan has been removed. The rocker and cross supports are in great shape. They will be cleaned and painted before the new floor goes in. The driver's side rusty floor pan has been removed. The rocker and cross supports are in great shape. They will be cleaned and painted before the new floor goes in.
|  Another view of the rocker and supports. The edge of the rusty rear floor pan is visible. It is the next to go. Another view of the rocker and supports. The edge of the rusty rear floor pan is visible. It is the next to go.
|  The inside of the floor supports have been sand blasted, acid washed and painted to prevent rust. The inside of the floor supports have been sand blasted, acid washed and painted to prevent rust.
|
 The rusty rear foot well pan has been removed. The backseat pan has been sandblasted, acid washed and primed with an etching primer to prevent rust. The rusty rear foot well pan has been removed. The backseat pan has been sandblasted, acid washed and primed with an etching primer to prevent rust.
|  The front pan is welded into place. The fit of the pan was very good, the contours on the factory trans tunnel lined up with the floor pan almost exactly. The front pan is welded into place. The fit of the pan was very good, the contours on the factory trans tunnel lined up with the floor pan almost exactly.
|  The rear foot well pan is in, it also fit very well. I had to add a patch to cover a 1/4 inch gap where I cut too much off the original trans tunnel. The rear foot well pan is in, it also fit very well. I had to add a patch to cover a 1/4 inch gap where I cut too much off the original trans tunnel.
| 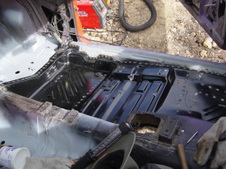 Another view. The gap b/t the front and rear pan is caused by a raised flange on the front pan. They are plug welded together flat. The gap gets filled with seam sealer. The car is now solid except for the trunk pan. Another view. The gap b/t the front and rear pan is caused by a raised flange on the front pan. They are plug welded together flat. The gap gets filled with seam sealer. The car is now solid except for the trunk pan.
|
 Firewall bodywork done and sprayed with primer. I also sandblasted & primed the entire windshield channel and A-pillars. Firewall bodywork done and sprayed with primer. I also sandblasted & primed the entire windshield channel and A-pillars.
| 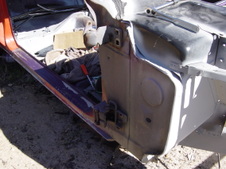 Door pillar & jamb, before. Door pillar & jamb, before.
|  Door jamb, pillar, and rocker sandblasted and primed. Same on the driver's side. Door jamb, pillar, and rocker sandblasted and primed. Same on the driver's side.
|  Door hinges and a few other parts disassembled and ready for blasting. The door hinges were very easy to rebuild with new pins and bushings with a kit from "Help" parts. All four hinges were less than $20. Door hinges and a few other parts disassembled and ready for blasting. The door hinges were very easy to rebuild with new pins and bushings with a kit from "Help" parts. All four hinges were less than $20.
Do not buy new or rebuilt hinges before you try to rebuild your own. if they are really bad "Mopar Leo" on the E-body forums does outstanding rebuilds.
|
