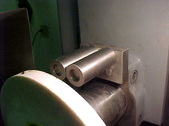
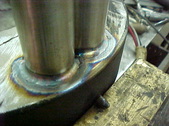
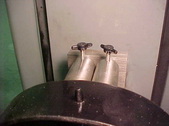
 Here is the grinder. The original wheel guard was very bulky so i made up a new one and used the orignal mounting system. It was just a pinch collar that went on the spindle. The original spindle bearings went out and it took a while till I found another good one. They can cost over $1000.00 to rebuild and the original was an open cooled version. I didn't want to put any money in to one of those and that is why I got another. Spent less than a rebuild but still about 3 times what I paid for the whole machine to start with. When I put the pinch style guard on I could here the spindles sound change. I decided to have it mount to the machine to prevent any issues from that so here we go. Here is the grinder. The original wheel guard was very bulky so i made up a new one and used the orignal mounting system. It was just a pinch collar that went on the spindle. The original spindle bearings went out and it took a while till I found another good one. They can cost over $1000.00 to rebuild and the original was an open cooled version. I didn't want to put any money in to one of those and that is why I got another. Spent less than a rebuild but still about 3 times what I paid for the whole machine to start with. When I put the pinch style guard on I could here the spindles sound change. I decided to have it mount to the machine to prevent any issues from that so here we go.
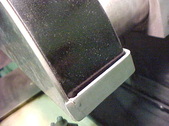
| 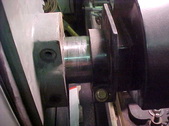 Here you can see the pinch collar. I really didn't care for it anyway as it hangs low and sometimes gets in the way. It can cause problems with the workpiece and you can't use the wheels to the paper sometimes. Here you can see the pinch collar. I really didn't care for it anyway as it hangs low and sometimes gets in the way. It can cause problems with the workpiece and you can't use the wheels to the paper sometimes.
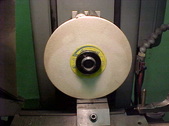
| 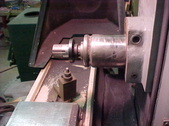 I want to make it adjustable too as the spindle can slide in and out for running different parts. All the wheel guard off here. I want to make it adjustable too as the spindle can slide in and out for running different parts. All the wheel guard off here.
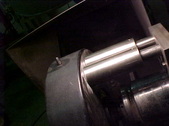
| 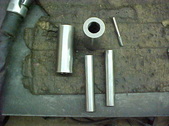 I got some round stock and decided to use these as the adjustment. I'll make it big to start and I can always cut it down if needed. hard to add though! I drilled and reamed some 1 .125 stainless to a .625 hole. Cut 2 lengths of .625 stainless to slide inside. I'm using stainless as rust will never be an issue then and I want them to have a smooth slide. I got some round stock and decided to use these as the adjustment. I'll make it big to start and I can always cut it down if needed. hard to add though! I drilled and reamed some 1 .125 stainless to a .625 hole. Cut 2 lengths of .625 stainless to slide inside. I'm using stainless as rust will never be an issue then and I want them to have a smooth slide.
|
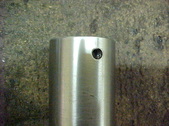 I drilled and tapped them with a 10-32 so I can use a socket head cap screw with a wing cap to hold it in place. I drilled and tapped them with a 10-32 so I can use a socket head cap screw with a wing cap to hold it in place.
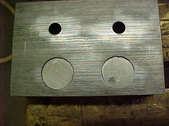
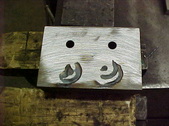
| 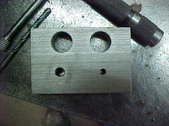 For the mount I got some .750 thick stainless and cut it 3.00 x 2.00. Drilled and reamed the .625 holes and I'll TOG the rods on this side. Laid out my mount hole locations and transferred to the plate. I drilled both holes and then went to finish on one side. I'll show you a trick and why I do this. For the mount I got some .750 thick stainless and cut it 3.00 x 2.00. Drilled and reamed the .625 holes and I'll TOG the rods on this side. Laid out my mount hole locations and transferred to the plate. I drilled both holes and then went to finish on one side. I'll show you a trick and why I do this.
|  I have to drill and tap into the machine. Got ahead of myself with the pic so act like the second hole to right isn't there ;) I mark the left hole with a center punch. Then drill and tap it to a 1/4-20 thread. I have to drill and tap into the machine. Got ahead of myself with the pic so act like the second hole to right isn't there ;) I mark the left hole with a center punch. Then drill and tap it to a 1/4-20 thread.
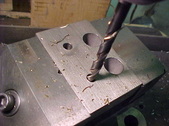
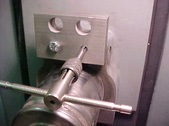
|  I then mount the plate and use a digital level. You can use a normal level or straight edge. This allows you to get a straight/[perfect location. Tighten the bolt down and you have a ready made drill guide. Keeps your hole true and in the right location. I use the plate on the first hole as well to keep the hand held drill straight. this is cast iron so it drills and taps like butter. I then mount the plate and use a digital level. You can use a normal level or straight edge. This allows you to get a straight/[perfect location. Tighten the bolt down and you have a ready made drill guide. Keeps your hole true and in the right location. I use the plate on the first hole as well to keep the hand held drill straight. this is cast iron so it drills and taps like butter.
|
 I do all the plate holes on the drill press to keep them a true 90 degrees to the back side. Here I've taken the plate off and redrilling the second hole to finish size. I do all the plate holes on the drill press to keep them a true 90 degrees to the back side. Here I've taken the plate off and redrilling the second hole to finish size.
|  Mount it on again and now it acts as a guide to tap it straight. Cheating again! Mount it on again and now it acts as a guide to tap it straight. Cheating again!
|  This makes aligning holes a snap. This makes aligning holes a snap.
|  Now I'll TIG weld the rods in place. Snug fit so no filler rod needed. Now I'll TIG weld the rods in place. Snug fit so no filler rod needed.
|
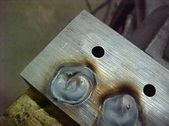 Weld a circle and done. Weld a circle and done.
| 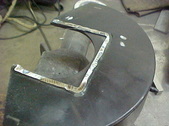 Cut the original mount off the shroud I had made earlier and now I'll smooth it to flush. New I shouldn't have welded it all the way around! ;) Cut the original mount off the shroud I had made earlier and now I'll smooth it to flush. New I shouldn't have welded it all the way around! ;)
| 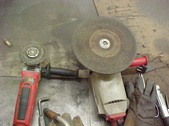 I use a little angle grinder to rough it real close then finish with a 9 inch with a new, flat wheel. I use a little angle grinder to rough it real close then finish with a 9 inch with a new, flat wheel.
|  Made quick work of that and have a nice flat surface again. Made quick work of that and have a nice flat surface again.
|
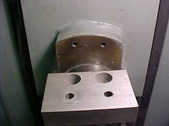
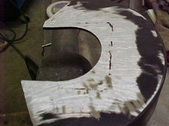
 Ghost flattened the back of the bracket but basically very little stock removal here. Ghost flattened the back of the bracket but basically very little stock removal here.
|  Mounted the bracket and slide the collars over it. Now I'll get the guard into position for Tack welding and I'll use another trick here to get it perfectly centered. Mounted the bracket and slide the collars over it. Now I'll get the guard into position for Tack welding and I'll use another trick here to get it perfectly centered.
|  I made the guard bigger than most as I had gotten a bunch of 8 inch wheels at an auction. Most guards will only clear 7 inch so they went real cheap as in give away. I mount the wheel then crank it down on to something so it is snug. there is cardboard i=under the wheel. I made the guard bigger than most as I had gotten a bunch of 8 inch wheels at an auction. Most guards will only clear 7 inch so they went real cheap as in give away. I mount the wheel then crank it down on to something so it is snug. there is cardboard i=under the wheel.
|  I then put a .250 spacer on the top of the wheel and a .250 bolt on each side. this gets the gap even. I then put a .250 spacer on the top of the wheel and a .250 bolt on each side. this gets the gap even.
|
 I then lightly clamp the guard to the wheel with a C clamp on each side. this keeps it all even and true. I slide the collars out and then can tack it with the TIG welder the guard. No spatter with the TIG so no damage to the chuck. I then lightly clamp the guard to the wheel with a C clamp on each side. this keeps it all even and true. I slide the collars out and then can tack it with the TIG welder the guard. No spatter with the TIG so no damage to the chuck.
|  After tacking I bench weld the collars home. After tacking I bench weld the collars home.
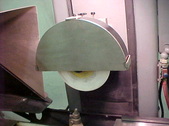
| 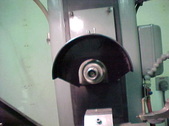 A little coat of paint and good as new. A little coat of paint and good as new.
|  Here you can see how it works. Here you can see how it works.
|
 Out of Wing caps and need a shorter screw so that will be next. Out of Wing caps and need a shorter screw so that will be next.
|  These little wing nut poly caps are nice. They just press onto a standard socket head cap screw and make it easy to snug up. These little wing nut poly caps are nice. They just press onto a standard socket head cap screw and make it easy to snug up.
| 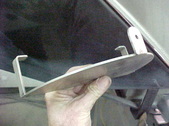 This is my slip on wheel guard I made up before. On and off in seconds and if it is in the way I can just leave it off. Nice to have the option. This is my slip on wheel guard I made up before. On and off in seconds and if it is in the way I can just leave it off. Nice to have the option.
|  All you do is bring it down from the top and the t arms on the outer edge hold it up against the back of the guard, essentially trapping it there. All you do is bring it down from the top and the t arms on the outer edge hold it up against the back of the guard, essentially trapping it there.
|
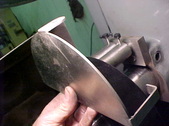
 A rounded pin then keeps it from rolling off. Simple and quick. A rounded pin then keeps it from rolling off. Simple and quick.
|  Here's a close up of the arm and how it works. Here's a close up of the arm and how it works.
|  All done now and much better to me than what they had as standard. All done now and much better to me than what they had as standard.
| 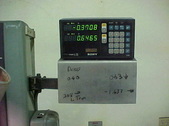 I got this readout off of Ebay. It was for a mill so it doesn't have the .0001 scales which are more expensive. This one has .0002 resolution on the downfeed and .0005 on the infeed. I've done this long enough to have the feel for a .0001 or less so this is fine. I got this readout off of Ebay. It was for a mill so it doesn't have the .0001 scales which are more expensive. This one has .0002 resolution on the downfeed and .0005 on the infeed. I've done this long enough to have the feel for a .0001 or less so this is fine.
|
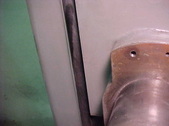
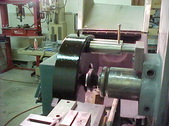
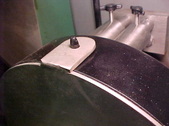
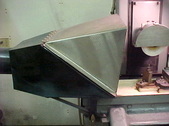 Added a suction system too. The chute is made of stainless sheet I bent after making a pattern from cardboard. I wanted to be able to move out of the way for certain things as well. Added a suction system too. The chute is made of stainless sheet I bent after making a pattern from cardboard. I wanted to be able to move out of the way for certain things as well.
| 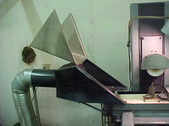 Self resting if access or odd project is being worked on. I used a piano type hinge for strength. Self resting if access or odd project is being worked on. I used a piano type hinge for strength.
|  Hinge does a great job and the whole thing is easy to clean. Hinge does a great job and the whole thing is easy to clean.
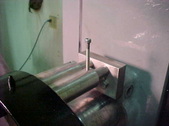
| 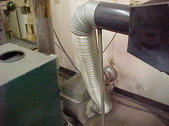 For suction I used an old furnace squirrel cage fan and some flexible ducting, When I built the shop I ran a chimney flue and another pipe for exhaust. I have several accesses for it in the shop to tie different stuff into it to get the dust and fumes away. For suction I used an old furnace squirrel cage fan and some flexible ducting, When I built the shop I ran a chimney flue and another pipe for exhaust. I have several accesses for it in the shop to tie different stuff into it to get the dust and fumes away.
|
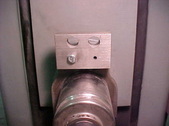
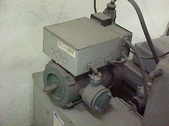 Most all this industrial stuff is 3 phase. Made up a little phase converter for the grinder as you don't need to run a 10HP converter to just run this. Bigger converter is on the lower right. Most all this industrial stuff is 3 phase. Made up a little phase converter for the grinder as you don't need to run a 10HP converter to just run this. Bigger converter is on the lower right.
| |
