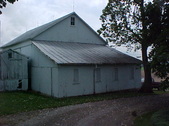
 here it is at the start. Needs paint bad, Spouting doesn't have enough fall and rotted off in spots, doors need new rollers and track, lightning protection system is non functional and loose, bad boards in spots. here it is at the start. Needs paint bad, Spouting doesn't have enough fall and rotted off in spots, doors need new rollers and track, lightning protection system is non functional and loose, bad boards in spots.
| 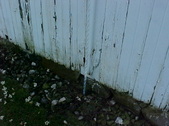 Rods were rotted off at the ground and even some spots on the barn. Rods were rotted off at the ground and even some spots on the barn.
|  Copper wrapped iron. Iron was rusted in two as shown here in several places. Copper wrapped iron. Iron was rusted in two as shown here in several places.
|  New door track and rollers on. Also had to redo the approach into the barns as it was rotted away. Pressure treated used there. Everything was tied back together and is nice now. New door track and rollers on. Also had to redo the approach into the barns as it was rotted away. Pressure treated used there. Everything was tied back together and is nice now.
|
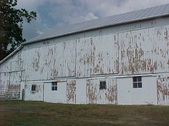
 Little building will get torn down as it's not worth saving. Going to paint the silo as well. Little building will get torn down as it's not worth saving. Going to paint the silo as well.
|  Got the new lightning rods and wires installed. The lift came in REAL handy for that one. Painted the section shown here first along with the top half of the silo. Then we pressure washed the roofs, then painted those, Reason being is to keep overspray to a minimum. Got the new lightning rods and wires installed. The lift came in REAL handy for that one. Painted the section shown here first along with the top half of the silo. Then we pressure washed the roofs, then painted those, Reason being is to keep overspray to a minimum.
|  When we prep a surface we first get all the boards attached/replaced if needed, do the repairs, pressure wash, hand scrap and wire brush completely, then pressure wash again. Extra steps that commercial guys don't do but it does make it last a lot longer. It looks a heck of a lot better to when your done. Just LOTS of labor. When we prep a surface we first get all the boards attached/replaced if needed, do the repairs, pressure wash, hand scrap and wire brush completely, then pressure wash again. Extra steps that commercial guys don't do but it does make it last a lot longer. It looks a heck of a lot better to when your done. Just LOTS of labor.
|  Makes for a thick layer of paint chips on the ground but eliminates adhesion problems. Makes for a thick layer of paint chips on the ground but eliminates adhesion problems.
|
 Front side ready for primer coat. Grandpa had the Open section at the ground filled in with cement block and rolling doors. Paint is still really good on the block as you can see. Front side ready for primer coat. Grandpa had the Open section at the ground filled in with cement block and rolling doors. Paint is still really good on the block as you can see.
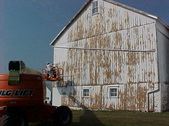
|  I would NOT attempt this project without a lift. I'm spoiled forever now as we use this thing a lot now. I would NOT attempt this project without a lift. I'm spoiled forever now as we use this thing a lot now.
|  Close to 40 ft at the peek and I can get the whole side in this position by just moving the basket around. Doing the final pressure washing here. Close to 40 ft at the peek and I can get the whole side in this position by just moving the basket around. Doing the final pressure washing here.
|  It will take several days to dry out completely. We'll put the primer on then. It will take several days to dry out completely. We'll put the primer on then.
|
 FINALLY ready for primer. FINALLY ready for primer.
|  Rewashed the bottom half of the silo too. Rewashed the bottom half of the silo too.
|  Took basically a whole day to wash it again. We used about 3500 gallons of water to do roof, silo and barn sides. Took basically a whole day to wash it again. We used about 3500 gallons of water to do roof, silo and barn sides.
|  Putting the primer on here. Nice to finally get it going the other way looks wise. Putting the primer on here. Nice to finally get it going the other way looks wise.
|
 Started about 8 AM and finished just before 5 PM. Did break for lunch for about an hour. Started about 8 AM and finished just before 5 PM. Did break for lunch for about an hour.
|  This side really used a lot of paint as it was mostly bare and very dry. Paint ought to lock in very well. This side really used a lot of paint as it was mostly bare and very dry. Paint ought to lock in very well.
|  Used about 35 gallons of primer to get it done. We'll put the finish coat on tomorrow. Used about 35 gallons of primer to get it done. We'll put the finish coat on tomorrow.
|  Started at 7 AM and finished spraying about 3 PM. Started at 7 AM and finished spraying about 3 PM.
|
 Final coat on and looks a l LOT better. Final coat on and looks a l LOT better.
|  Used just over 30 gallons of paint and we painted a lot more area than we did with the primer. Bottom half of the silo, block and rocks were not primed. Wood was sealed so it covered and sprayed a lot faster. Used just over 30 gallons of paint and we painted a lot more area than we did with the primer. Bottom half of the silo, block and rocks were not primed. Wood was sealed so it covered and sprayed a lot faster.
|  Front all done now. I'll get some gravel to smooth up the driveway next. Front all done now. I'll get some gravel to smooth up the driveway next.
|  Had a 20 ton load of gravel hauled in and spread it all out. Had a 20 ton load of gravel hauled in and spread it all out.
|
 I just had him dump it in a pile at the point of the V where the driveway splits. Power lines trees and off camber makes it so they can't gate it very well. I just had him dump it in a pile at the point of the V where the driveway splits. Power lines trees and off camber makes it so they can't gate it very well.
|  I use the backhoe to spread it out and rough grade. Then go to the box grader. It's a good combination and makes short work of it. I use the backhoe to spread it out and rough grade. Then go to the box grader. It's a good combination and makes short work of it.
|  This has a side slope on it and big trucks don't care for that when dumping. I know I didn't when I drove them. This has a side slope on it and big trucks don't care for that when dumping. I know I didn't when I drove them.
|  Including a little handwork, took less than 2 hours to do. Including a little handwork, took less than 2 hours to do.
|
 Should be good to go for a few years. Should be good to go for a few years.
|  Earlier we had replaced the beams under the doors as they were rotted in spots. Used Pressure treated 8" X 8's this time. Put a little gravel here as well to make getting in and out easier. Earlier we had replaced the beams under the doors as they were rotted in spots. Used Pressure treated 8" X 8's this time. Put a little gravel here as well to make getting in and out easier.
|  Put new tracks on as well, it sure is a lot nicer as we use these quite a bit. Put new tracks on as well, it sure is a lot nicer as we use these quite a bit.
|  Here's the old backhoe. Bucket does a real nice job as you can grade both ways with the right position Here's the old backhoe. Bucket does a real nice job as you can grade both ways with the right position
|
 Box grader on the 175 makes quick work on the finish. Box grader on the 175 makes quick work on the finish.
|  Some views of the place. Some views of the place.
|  |  |
 |  |  This is another barn at Moms rental. Didn't get any before pics but here we just finished putting the new roof on after tearing off the old. We tore off in smaller sections. added new screw boards where needed and renailed any loose ones. This is another barn at Moms rental. Didn't get any before pics but here we just finished putting the new roof on after tearing off the old. We tore off in smaller sections. added new screw boards where needed and renailed any loose ones.
| 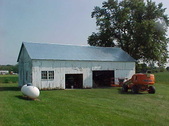 Next is to do some cleaning and straightening of the sides. Once that is done we're going to reside in metal. Wood siding on the barn was whatever they had and in kinda bad shape in spots. Probably reside it next year. Next is to do some cleaning and straightening of the sides. Once that is done we're going to reside in metal. Wood siding on the barn was whatever they had and in kinda bad shape in spots. Probably reside it next year.
|
