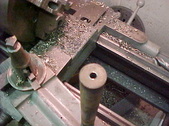
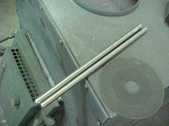
 I'll start with making the center shafts. Grabbed some 1.125" round stock for the collar that will be attached to the top sections. Center drilled, then .375 and then to the finish size of .750". Had to use a long drill as there is some length here. I'll start with making the center shafts. Grabbed some 1.125" round stock for the collar that will be attached to the top sections. Center drilled, then .375 and then to the finish size of .750". Had to use a long drill as there is some length here.
|  Here is how far it was in there. I want a shoulder so I didn't drill all the way through. Just chucked to drill to desired length, then bottom it out. Had to do a lot of plunges as no where for the chips to go. You have to drag them out or you'll bind the drill up and can even break it if you go too far. Here is how far it was in there. I want a shoulder so I didn't drill all the way through. Just chucked to drill to desired length, then bottom it out. Had to do a lot of plunges as no where for the chips to go. You have to drag them out or you'll bind the drill up and can even break it if you go too far.
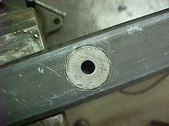
|  On the other end I drilled a .3125 hole. I'm going to use this as an attachment point and to put some drag on it so it doesn't freewheel. On the other end I drilled a .3125 hole. I'm going to use this as an attachment point and to put some drag on it so it doesn't freewheel.
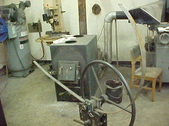
| 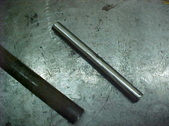 Cleaned up a section of .750" round stock for the bottom half. Cleaned up a section of .750" round stock for the bottom half.
|
 I drilled and tapped one end for a .3125 bolt. I drilled and tapped one end for a .3125 bolt.
|  Here you can see my plan. I'm using an old die spring on top of the .750" shaft. The bolt will pull it down on the spring and create some drag. I can adjust the drag by how tight the bolt is. Here you can see my plan. I'm using an old die spring on top of the .750" shaft. The bolt will pull it down on the spring and create some drag. I can adjust the drag by how tight the bolt is.
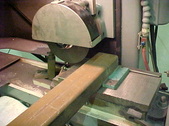
|  For the bottom feet I'm making a simple cross out of 1.500" box tubing. Making a 30" spread. Cutting them up here with the chop saw. For the bottom feet I'm making a simple cross out of 1.500" box tubing. Making a 30" spread. Cutting them up here with the chop saw.
|  One 30" and two pieces 14.25". One 30" and two pieces 14.25".
|
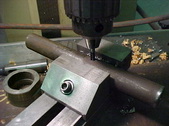
 Before welding them on I'll go ahead and drill a .750" hole on the drill press. This will keep the shaft nice and straight for welding. Before welding them on I'll go ahead and drill a .750" hole on the drill press. This will keep the shaft nice and straight for welding.
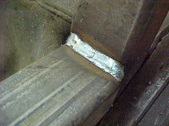
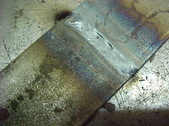
|  Pressed the shaft in and TIG welded the bottom flush. Pressed the shaft in and TIG welded the bottom flush.
|  Pressed the shaft in and TIG welded it flush on the bottom. Pressed the shaft in and TIG welded it flush on the bottom.
|  Flipped it over and welded the top side. Flipped it over and welded the top side.
|
 Now I'm welding the box tubing together with the MIG welder after tacking it all and double checking squareness and such. Now I'm welding the box tubing together with the MIG welder after tacking it all and double checking squareness and such.
|  All welded up and it's not going anywhere! All welded up and it's not going anywhere!
|  here is another visual of how it works. Some may wonder how I'm going to keep the bolt from threading in or out. I could use locktight but I have another way of doing it. here is another visual of how it works. Some may wonder how I'm going to keep the bolt from threading in or out. I could use locktight but I have another way of doing it.
|  Sand! Since it is a blind hole all you have to do is put enough sand in it till it bottom out. The tension on the threads will lock it in position and won't spin on or off. Simple and cheap. Sand! Since it is a blind hole all you have to do is put enough sand in it till it bottom out. The tension on the threads will lock it in position and won't spin on or off. Simple and cheap.
|
 Before doing the upper collar I decided to add a grease Zerk to keep everything turning smooth and not wearing out. Before doing the upper collar I decided to add a grease Zerk to keep everything turning smooth and not wearing out.
|  Cut out another round of box tubing for the top and drilled a 1.063 hole as I had that drill bit on hand. I wanted to keep a little meat on the sides anyway. I'll just turn the shaft collar till it fits. Cut out another round of box tubing for the top and drilled a 1.063 hole as I had that drill bit on hand. I wanted to keep a little meat on the sides anyway. I'll just turn the shaft collar till it fits.
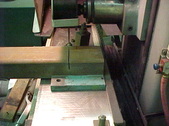
|  Turned it back the thickness of the box tubing, 1.500" and basically turned it to a press fit. Turned it back the thickness of the box tubing, 1.500" and basically turned it to a press fit.
|  Pushed it in with an arbor press and its self aligning to weld. Pushed it in with an arbor press and its self aligning to weld.
|
 Just TIG welded it with no filler rod, Just cranked it up for good penetration and it lays flush. Just TIG welded it with no filler rod, Just cranked it up for good penetration and it lays flush.
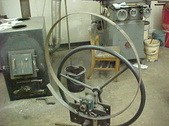
|  Finish welded it all and now I need an outer ring. This is needed to keep the wire from catching. Something the factory made ones don't do. I've pulled a lot of wire building fence over the years and it's very annoying when it does that because you have to walk back if your alone on the job. Finish welded it all and now I need an outer ring. This is needed to keep the wire from catching. Something the factory made ones don't do. I've pulled a lot of wire building fence over the years and it's very annoying when it does that because you have to walk back if your alone on the job.
|  Had some 1.500" strap on the metal pile but it was too short. Grabbed another one and welded it back. I need about 8.5' to make the circle. Had some 1.500" strap on the metal pile but it was too short. Grabbed another one and welded it back. I need about 8.5' to make the circle.
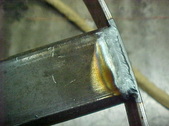
|  TIG welded it too as it lays flush and would give me fits when using the ring roller. TIG welded it too as it lays flush and would give me fits when using the ring roller.
|
 Got out the ring roller and snugged it in. Then went one pump and it started forming the ring. This is .125 thick so it's like butter to it. Got out the ring roller and snugged it in. Then went one pump and it started forming the ring. This is .125 thick so it's like butter to it.
|  A total of 3 pumps and less than 5 minutes of time from start to finish. A total of 3 pumps and less than 5 minutes of time from start to finish.
| 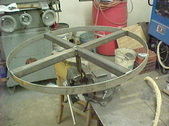 Cut one end off and tacked welded it in the middle of the tube section. Then pulled it tight to the next till they all were on. Then cut the excess off to mate up to the other edge. Cut one end off and tacked welded it in the middle of the tube section. Then pulled it tight to the next till they all were on. Then cut the excess off to mate up to the other edge.
|  Makes it nice and smooth and wire won't catch on anything. Makes it nice and smooth and wire won't catch on anything.
|
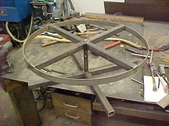 Welded everything up and now I need to make up the slides to hold the spools or to size them if you will. So far so good. Welded everything up and now I need to make up the slides to hold the spools or to size them if you will. So far so good.
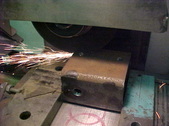
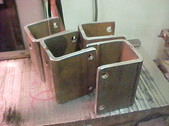
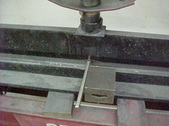
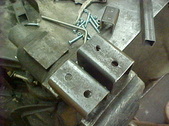
|  Now I need to make adjustable slides to hold the spool of wire in place or to wind around. I got some rectangular tubing that will slip over the 1 1/2" bob. here I'm cutting the short lengths on the surface grinder using a cut off wheel. Set it on the chuck, turn magnet on and cut halfway through. Now I need to make adjustable slides to hold the spool of wire in place or to wind around. I got some rectangular tubing that will slip over the 1 1/2" bob. here I'm cutting the short lengths on the surface grinder using a cut off wheel. Set it on the chuck, turn magnet on and cut halfway through.
|  Flip it over and do the same. Gives you exactly the same size pieces with nice cuts. Very little to deburr. Flip it over and do the same. Gives you exactly the same size pieces with nice cuts. Very little to deburr.
|  While it's still a box I'll drill 5/16" holes for the slid bolts. While it's still a box I'll drill 5/16" holes for the slid bolts.
|
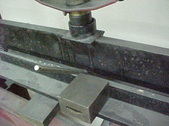
 Here I'm using the surface grinder to cut open the box. It now becomes a C channel. Cut one side and flip and repeat. Here I'm using the surface grinder to cut open the box. It now becomes a C channel. Cut one side and flip and repeat.
|  Few minutes on the belt sander deburring and round the corners. Few minutes on the belt sander deburring and round the corners.
|  Used 7/16" stainless for holding rods. I cut 4 to length and rounded one end. Used 7/16" stainless for holding rods. I cut 4 to length and rounded one end.
|  Need a bend in these so marked them all and went to the press. Slide it in and use a chunk to square and start pumping it down Need a bend in these so marked them all and went to the press. Slide it in and use a chunk to square and start pumping it down
|
 doesn't take long and makes for a nice bend. I don't want a full 90 degrees so I stop short. Creates a funnel type thing for the wire. doesn't take long and makes for a nice bend. I don't want a full 90 degrees so I stop short. Creates a funnel type thing for the wire.
| 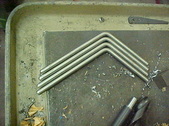 All of those bent the same and took less than 5 minutes. All of those bent the same and took less than 5 minutes.
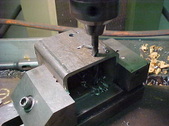
|  I drilled 2 holes in each one. One was drilled and tapped with 1/2" course thread and the other was reamed to 7/16" I drilled 2 holes in each one. One was drilled and tapped with 1/2" course thread and the other was reamed to 7/16"
| 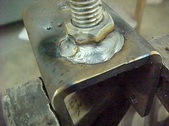 I run a nut onto a bolt then snug the nut to the box beam. Self aligning that way and gives you more strength as the box steel is threaded too. welding the nuts on here. This will lock them in place when adjusted to the desire size. I run a nut onto a bolt then snug the nut to the box beam. Self aligning that way and gives you more strength as the box steel is threaded too. welding the nuts on here. This will lock them in place when adjusted to the desire size.
|
