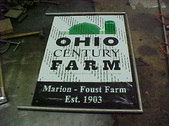
 Here is the sign as received. It is in 2 pieces and is aluminum, .050 thick. Has 4 holes punched 1 inch in which is nice. Protective tape will come off when final assembled. Here is the sign as received. It is in 2 pieces and is aluminum, .050 thick. Has 4 holes punched 1 inch in which is nice. Protective tape will come off when final assembled.
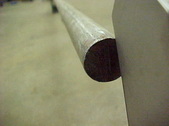
| 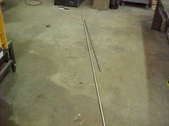 I had some .750 stainless bar stock here so that will be the framework. No issues with it and don't have to paint. I had some .750 stainless bar stock here so that will be the framework. No issues with it and don't have to paint.
| 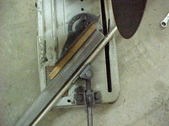 Needed 90 degree bends on the corners. Thought about bending but decided to just cut 45's and TIG weld it. When using a chop saw I step the stock out with spacers behind it. Needed 90 degree bends on the corners. Thought about bending but decided to just cut 45's and TIG weld it. When using a chop saw I step the stock out with spacers behind it.
|  Reason for that is so the blade hits in the center on the top. This keeps your blade true and it won't push away from the cut line. Reason for that is so the blade hits in the center on the top. This keeps your blade true and it won't push away from the cut line.
|
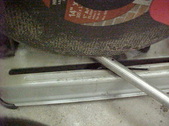
 Another trick when cutting 45 degrees and want them to be true to each other. Once you have it ready to cut, use a marker or dye chem and scribe a straight line. I have a digital protractor and scribe the line at 90 degrees. Another trick when cutting 45 degrees and want them to be true to each other. Once you have it ready to cut, use a marker or dye chem and scribe a straight line. I have a digital protractor and scribe the line at 90 degrees.
|  Once the cut is made, you flip the bar over and line your cut mark up. Then twist till it's 90 degrees again and recheck cut mark. Easy way to cheat to get them all on the same centerline. Once the cut is made, you flip the bar over and line your cut mark up. Then twist till it's 90 degrees again and recheck cut mark. Easy way to cheat to get them all on the same centerline.
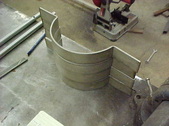
|  Cuts made and threw it together to get a look see. I cut them so I'd have a .500 gap around the outside. Left the ends long as I can final cut those later. So far so good. Cuts made and threw it together to get a look see. I cut them so I'd have a .500 gap around the outside. Left the ends long as I can final cut those later. So far so good.
|  To attach the sign, I'm using the same round stock. Did the Math and needed six 2.375" pieces. I cut them on the surface grinder. Makes cleaning cuts and I can cut to within a .001" To attach the sign, I'm using the same round stock. Did the Math and needed six 2.375" pieces. I cut them on the surface grinder. Makes cleaning cuts and I can cut to within a .001"
|
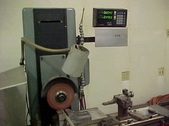 Digital readout make this part a cake walk. Digital readout make this part a cake walk.
| 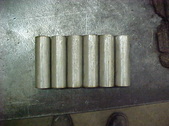 6 pieces cut and I'll completely true them to size by grinding the ends to the same length. That will make what I have in mind even easier. I have to drill/tap several holes and do some rounding and grinding. 6 pieces cut and I'll completely true them to size by grinding the ends to the same length. That will make what I have in mind even easier. I have to drill/tap several holes and do some rounding and grinding.
|  Surface ground all the lengths exactly the same. I then figured out where the hole needed to be and ground a locating flat. I started a slot using a wider cut off wheel 90 degrees and central to the part and flat. Surface ground all the lengths exactly the same. I then figured out where the hole needed to be and ground a locating flat. I started a slot using a wider cut off wheel 90 degrees and central to the part and flat.
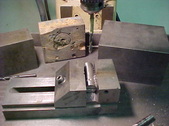
| 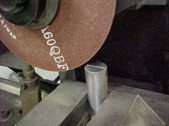 The cut off wheel is about .015 wider than the sign, quick and easy. The reason I'm just starting it, is I plan to round the ends. Once that is done it is hard to get it central as it want to wander. Cutting it all the way down now effects the hole drilling. I actually cut it in a V block but just wanted to show the wheel and part. The cut off wheel is about .015 wider than the sign, quick and easy. The reason I'm just starting it, is I plan to round the ends. Once that is done it is hard to get it central as it want to wander. Cutting it all the way down now effects the hole drilling. I actually cut it in a V block but just wanted to show the wheel and part.
|
 Drilled and tapped the opposite ends on them all with a 1/4 - 20 thread Drilled and tapped the opposite ends on them all with a 1/4 - 20 thread
|  Indicate the locating flat in so the hole is 90 degrees. Indicate the locating flat in so the hole is 90 degrees.
|  When you have a small ground flat like this. It makes eye balling a center punch mark easy. Tells you where center is and takes the guess work out of it. When you have a small ground flat like this. It makes eye balling a center punch mark easy. Tells you where center is and takes the guess work out of it.
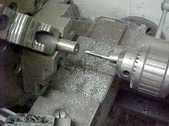
|  No mill so off to the drill presses. Spot, drill for thread, thread, co bore 1/2 way through with 1/4" and then cobore again for socket head cap screw so it will be basically flush. No mill so off to the drill presses. Spot, drill for thread, thread, co bore 1/2 way through with 1/4" and then cobore again for socket head cap screw so it will be basically flush.
|
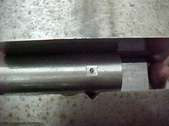
 Everything is done here with the holes and threading. Everything is done here with the holes and threading.
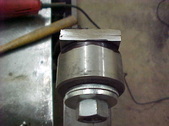
| 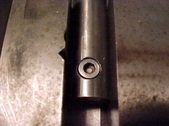 Screw lays in there nice and smooth. Screw lays in there nice and smooth.
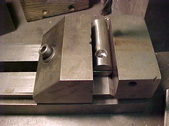
|  I ground the ends with a .375 radius to make a nice detail. I then round a .375 radius the other way so that it will lock onto the main framework, giving it a flush look if you will. Next was to finish the slot for the sign. They are all done here. I ground the ends with a .375 radius to make a nice detail. I then round a .375 radius the other way so that it will lock onto the main framework, giving it a flush look if you will. Next was to finish the slot for the sign. They are all done here.
|  I ground a normal drill to make a step drill. I ground a normal drill to make a step drill.
|
 This is what makes the flat bottom and the step makes it self aligning once the initial hole is drilled. This is what makes the flat bottom and the step makes it self aligning once the initial hole is drilled.
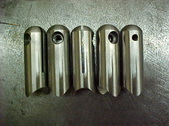
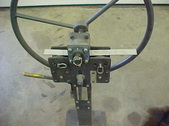
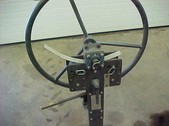
| 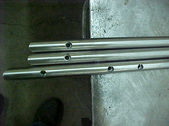 All the frame work round are done now with holes in place. All the frame work round are done now with holes in place.
|  Since the holes are in the same line, I simply bolt them together for the final lengths of the top and bottom. Since the holes are in the same line, I simply bolt them together for the final lengths of the top and bottom.
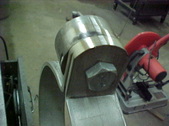
| 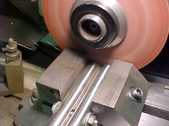 Cut them both at once on the surface grinder. Cut them both at once on the surface grinder.
|
 Very nice cuts with this and you can make coins with very little waste. Very nice cuts with this and you can make coins with very little waste.
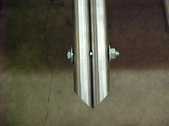
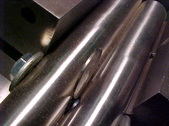
| 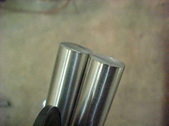 Basically dead straight and a perfect pair. Basically dead straight and a perfect pair.
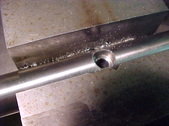
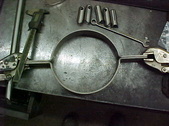
|  Next is the bands to attach it. I'm mounting it to an existing electric pole and I need some bands to match it. 7 inch diameter and got my lengths needed and marked the bend lines. Using the roll bender for this. Next is the bands to attach it. I'm mounting it to an existing electric pole and I need some bands to match it. 7 inch diameter and got my lengths needed and marked the bend lines. Using the roll bender for this.
|  VERY easy to do and makes quick work of it. Just pump the jack and roll it through. VERY easy to do and makes quick work of it. Just pump the jack and roll it through.
|
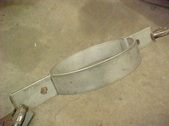
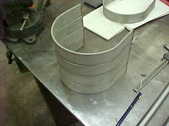 A 4 done with a spare for the middle. It'll be a little different. You can see how this bender makes things the same. A 4 done with a spare for the middle. It'll be a little different. You can see how this bender makes things the same.
|  Very uniform and for small projects like this it is nice to have. Very uniform and for small projects like this it is nice to have.
| 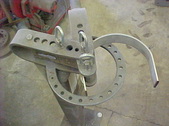 Marked the lines for the ears and put it in the compact bender. This will go quick as well with no heat. Using 3/16 x 1 1/2" strap. Marked the lines for the ears and put it in the compact bender. This will go quick as well with no heat. Using 3/16 x 1 1/2" strap.
|  Swing the handle and watch where the end lines up with the screw holes. That will make them all the same as well. Swing the handle and watch where the end lines up with the screw holes. That will make them all the same as well.
|
 All done and all the same. All done and all the same.
|  Have a little waste on the ends but the roll bender has to have that. I'll now drill the holes. Have a little waste on the ends but the roll bender has to have that. I'll now drill the holes.
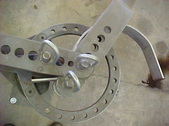
|  Clamp a pair together so they line up when assembled. Cheat when you can! Clamp a pair together so they line up when assembled. Cheat when you can!
|  Holes done and now I'll cut the extra off. Using 1/2" bolts to draw them together. Holes done and now I'll cut the extra off. Using 1/2" bolts to draw them together.
|
 Clamped them down together while they were bolted and cut to final length. Clamped them down together while they were bolted and cut to final length.
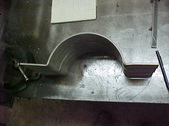
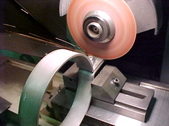
|  Here's a trick to rounding corners and keeping them uniform. Bolt a bushing through the hole and pull it up tight. Now you have a guide to work to. Here's a trick to rounding corners and keeping them uniform. Bolt a bushing through the hole and pull it up tight. Now you have a guide to work to.
|  After roughing in with the angle grinder, I finish it up with a belt sander. After roughing in with the angle grinder, I finish it up with a belt sander.
| 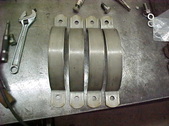 Brackets are all done. Brackets are all done.
|
