 Started out with an idea in my head so I gathered up some materials. An old 60's taillight and some manufacturer emblems from some junked cars. I get more as I find them. I did buy some stainless brake line too. If you know me, I always have to have stainless on stuff! Started out with an idea in my head so I gathered up some materials. An old 60's taillight and some manufacturer emblems from some junked cars. I get more as I find them. I did buy some stainless brake line too. If you know me, I always have to have stainless on stuff!
|  The Caddy emblem will make a nice top. The Caddy emblem will make a nice top.
|  Some .375 stainless strap will be used for tubing holders. A friend layout out the holes and outline on a CNC mill and then I drilled the holes to .250, the diameter of the tubing. Some .375 stainless strap will be used for tubing holders. A friend layout out the holes and outline on a CNC mill and then I drilled the holes to .250, the diameter of the tubing.
| 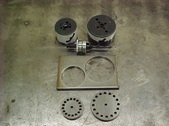 I then cut them out using a normal hole saw. Lots of oil, slow speed and constantly cleaning it and blowing air is the key to doing it. Try to force it and let the heat build up and you're done, you've work hardened it and scrapped the hole saw. I then cut them out using a normal hole saw. Lots of oil, slow speed and constantly cleaning it and blowing air is the key to doing it. Try to force it and let the heat build up and you're done, you've work hardened it and scrapped the hole saw.
|
 Where the tubing goes into the small disc I wanted to create the illusion of it bolting in. The bolt circle is too close so I had to trim the nuts down. Did the math and figured the center line and ground the angles on 2 sides. This will make sense later. I will drill the threads out to .250 so the tubing will just slide through. Where the tubing goes into the small disc I wanted to create the illusion of it bolting in. The bolt circle is too close so I had to trim the nuts down. Did the math and figured the center line and ground the angles on 2 sides. This will make sense later. I will drill the threads out to .250 so the tubing will just slide through.
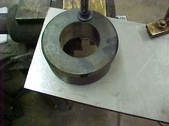
| 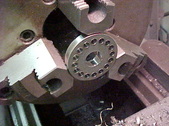 Chucked the small disc in the lathe and stair step drilled it to .750, the center tube size. Chucked the small disc in the lathe and stair step drilled it to .750, the center tube size.
|  Got a hard face DA sander and hit both sides with 150 grit. Then I used a soft pad with 500 grit. This will get it close for polishing. Next is to grind the edge smooth and put on a couple radii. Got a hard face DA sander and hit both sides with 150 grit. Then I used a soft pad with 500 grit. This will get it close for polishing. Next is to grind the edge smooth and put on a couple radii.
|  I made up a bushing to fit inside the .750 hole and drilled a .250 hole into that. This will allow me to spin grind the outer edge and put the radii on there too. I made up a bushing to fit inside the .750 hole and drilled a .250 hole into that. This will allow me to spin grind the outer edge and put the radii on there too.
|
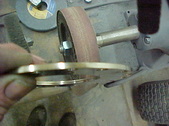
 I'll be spinning this in a Harig fixture on the surface grinder. here you can see the set up. Bushing is thinner than the disc and all that is needed are step washers to hold the disc when the bolt is tightened. I'll be spinning this in a Harig fixture on the surface grinder. here you can see the set up. Bushing is thinner than the disc and all that is needed are step washers to hold the disc when the bolt is tightened.
|  The washers used. The washers used.
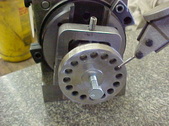
|  Now I just knock it all central so as little stock as possible is taken off. Now I just knock it all central so as little stock as possible is taken off.
|  Once tightened up I spin it will infeeding into a dressed wheel. Makes a great finish that requires a lot less sanding for polish. Once tightened up I spin it will infeeding into a dressed wheel. Makes a great finish that requires a lot less sanding for polish.
|
 I then dressed a .075 radius on both sides of the same wheel. this way I don't have to take the part off the mount. I then dressed a .075 radius on both sides of the same wheel. this way I don't have to take the part off the mount.
|  This part is done and I'll polish it later when all the other parts are done and it works. This part is done and I'll polish it later when all the other parts are done and it works.
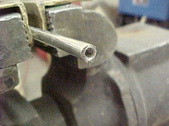
|  Next up is to make the pieces to connect the 2 round discs. It will basically hang it in the air and make a nice waterfall effect.... at least that is the hope! I'm using stainless tubing/brake line for this. Used a wire for a rough guess of the length and cut them all using a tubing cutter. Next up is to make the pieces to connect the 2 round discs. It will basically hang it in the air and make a nice waterfall effect.... at least that is the hope! I'm using stainless tubing/brake line for this. Used a wire for a rough guess of the length and cut them all using a tubing cutter.
|  The inner diameter(ID) gets a lip when cutting with the tubing cutter and it has enough bite that I can thread it. I use a tap in a drill and make quick work of that. The inner diameter(ID) gets a lip when cutting with the tubing cutter and it has enough bite that I can thread it. I use a tap in a drill and make quick work of that.
|
 You can see here it should be enough to hold it together. You can see here it should be enough to hold it together.
|  I wanted a bigger radius bend and wanted something that would repeat. I ended using a V belt pulley I had laying around and rigged it up in the compact bender. Put a bushing on the end and threaded a screw in. This will make the bends repeat as it holds it in the same position, not allowing it to move. I wanted a bigger radius bend and wanted something that would repeat. I ended using a V belt pulley I had laying around and rigged it up in the compact bender. Put a bushing on the end and threaded a screw in. This will make the bends repeat as it holds it in the same position, not allowing it to move.
|  I take them all a little past 180 degrees and the pulley keeps it from having any kinks. The tape you see is my high tech marker of when to stop so they will all have the same shape. I take them all a little past 180 degrees and the pulley keeps it from having any kinks. The tape you see is my high tech marker of when to stop so they will all have the same shape.
|  Got them all bent and ready for a trial fit to see if it all works. Got them all bent and ready for a trial fit to see if it all works.
|
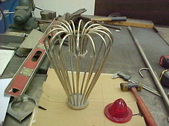 Success! Kind of like a jigsaw puzzle and you have to think ahead on how to attach everything AND still be able to assemble it. Success! Kind of like a jigsaw puzzle and you have to think ahead on how to attach everything AND still be able to assemble it.
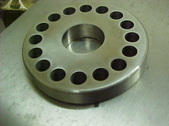
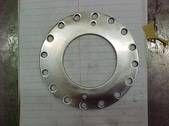
|  With just the 2 discs it will not hold it all in place. The tubing would move around . I need a mount for the taillight to trap it on the inside so I'll try to kill 2 birds with one stone here. I took the disc and traced the holes. This gives me a pattern to make any size I want by just connecting the dots. Now I have a pattern to make the mount. With just the 2 discs it will not hold it all in place. The tubing would move around . I need a mount for the taillight to trap it on the inside so I'll try to kill 2 birds with one stone here. I took the disc and traced the holes. This gives me a pattern to make any size I want by just connecting the dots. Now I have a pattern to make the mount.
|  Drilled a center hole and drilled it along with the 2 holes to mount the taillight. I then center punched the slip through holes for the tubing with normal bolts holding the pattern. Here I am center drilling all the holes. Drilled a center hole and drilled it along with the 2 holes to mount the taillight. I then center punched the slip through holes for the tubing with normal bolts holding the pattern. Here I am center drilling all the holes.
|  Holes are done but they will have to be angles later. I'll do that free hand after it is cut out. Holes are done but they will have to be angles later. I'll do that free hand after it is cut out.
|
 Used a hole saw for the center hole. LOTS of oil and slow speed. Used a hole saw for the center hole. LOTS of oil and slow speed.
|  To cut the outer diameter I get a large round that is a .500 INCH smaller than I want. I use this as a guide to cut it out with the plasma cutter. To cut the outer diameter I get a large round that is a .500 INCH smaller than I want. I use this as a guide to cut it out with the plasma cutter.
|  Once cut I use a belt sander to true it up and smooth. Once cut I use a belt sander to true it up and smooth.
|  I took it real close to the holes. I took it real close to the holes.
|
 Ready to polish it out now. I use a die grinder with a soft pad. Standard sticky back sandpaper is used and cutter with scissors. Ready to polish it out now. I use a die grinder with a soft pad. Standard sticky back sandpaper is used and cutter with scissors.
|  I'll start with 80 grit and work my way down. I'll start with 80 grit and work my way down.
|  Drilling will leave a burr so you have to try to do it even or you'll get waves in the finish. Drilling will leave a burr so you have to try to do it even or you'll get waves in the finish.
|  I use a belt on an expansion wheel for the edge. Worked my way down to 600 grit here. I use a belt on an expansion wheel for the edge. Worked my way down to 600 grit here.
|
 Ready for hand sanding on the edge. Ready for hand sanding on the edge.
|  From 80 grit I went to 150 grit. Then 600 grit. From there it is hand sanding to 2000 grit. From 80 grit I went to 150 grit. Then 600 grit. From there it is hand sanding to 2000 grit.
|  Then off to the buffer till it was mirror finish. Then off to the buffer till it was mirror finish.
| 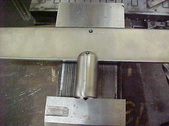 Skip some steps here but this will give you the idea on how I did the attachment screws for the lettering. I ground a slot in a round the same thickness as the lettering plate. I then clamped it tight in a vise and drill/tapped it. I did this BEFORE the radius was spun on the round. This is an after the fact visual. Skip some steps here but this will give you the idea on how I did the attachment screws for the lettering. I ground a slot in a round the same thickness as the lettering plate. I then clamped it tight in a vise and drill/tapped it. I did this BEFORE the radius was spun on the round. This is an after the fact visual.
|
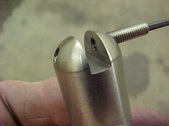 Close up of how it works. Makes for a clean attachment. Close up of how it works. Makes for a clean attachment.
|  I spun the radius in the Harig fixture. I dressed the radius size I wanted into a grinding wheel. I spun the radius in the Harig fixture. I dressed the radius size I wanted into a grinding wheel.
|  With that done I'll work out the top Caddy emblem attachment. I want it to work like it does on a car. Have a spring in there that will let it move around but hold it upright. This will take some doing to make it all hidden. I start by drill some round stock. I hold it in a collet to prevent marring. Use a straight edge to touch off the drill as the depth is critical to make it work right. With that done I'll work out the top Caddy emblem attachment. I want it to work like it does on a car. Have a spring in there that will let it move around but hold it upright. This will take some doing to make it all hidden. I start by drill some round stock. I hold it in a collet to prevent marring. Use a straight edge to touch off the drill as the depth is critical to make it work right.
|  I zero out and go in the thickness of the straight edge and rezero. Now I know where I'm at. I zero out and go in the thickness of the straight edge and rezero. Now I know where I'm at.
|
