 These first photos were taken when I went to look at the truck in Richmond, Indiana. It had obviously been sitting for quite a while. These first photos were taken when I went to look at the truck in Richmond, Indiana. It had obviously been sitting for quite a while.
|  It was used as a logging truck to drag logs in the woods according to the owner. He saw it sitting in the woods and asked if they wanted to sell and they agreed on a price. It was used as a logging truck to drag logs in the woods according to the owner. He saw it sitting in the woods and asked if they wanted to sell and they agreed on a price.
|  Had a LOT of mods done to it and very rough. I was looking for combat rims and took a chance that a few may be okay. It has the main body of the MU2 winch as well. Had a LOT of mods done to it and very rough. I was looking for combat rims and took a chance that a few may be okay. It has the main body of the MU2 winch as well.
|  Motor was siezed and not original to the truck Motor was siezed and not original to the truck
|
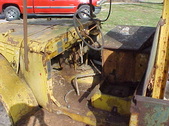 Had a toolbox bolted in on the passenger side and drivers seat was just a plastic school chair. Had a toolbox bolted in on the passenger side and drivers seat was just a plastic school chair.
|  Owner said it did run when he got it but had since got stuck. At least it looked like the hood was shut. Owner said it did run when he got it but had since got stuck. At least it looked like the hood was shut.
|  This rim should be okay. This rim should be okay.
|  You can see the comfortable seat there in the bed. No "Rich Corithian Leather"! LOL Does have a spare. You can see the comfortable seat there in the bed. No "Rich Corithian Leather"! LOL Does have a spare.
|
 Lift boom was all welded in. Lift boom was all welded in.
|  Hopefully another good rim. Hopefully another good rim.
|  Always interesting to see what people add to these trucks. Always interesting to see what people add to these trucks.
|  Guessing this one is junk. Guessing this one is junk.
|
 Maybe good? Maybe good?
|  Tag is still there. Tag is still there.
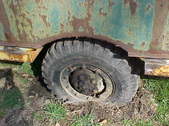
|  This tire looks to have been replaced right before they stopped using it. This tire looks to have been replaced right before they stopped using it.
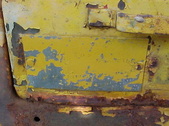
|  Lots of welding to the frame and it has a lot of rust. Lots of welding to the frame and it has a lot of rust.
|
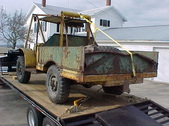
 Got it home as I took a couple of my spares and changed them before loading. Glad I have a winch on the trailer as it made it easy to drag it on. Truck was stuck in gear but owner got it out just before we got there. Got it home as I took a couple of my spares and changed them before loading. Glad I have a winch on the trailer as it made it easy to drag it on. Truck was stuck in gear but owner got it out just before we got there.
|  I did have it chained down pretty good. Dad went along with me and it took about 3 hrs of total time. I had a 3/4" 4 ft breaker bare and 1/2" cordless impact along with other tools. When we had it loaded the owner looked at me and said," I can tell this isn't your first rodeo". LOL It did go extremely well and quick. I did have it chained down pretty good. Dad went along with me and it took about 3 hrs of total time. I had a 3/4" 4 ft breaker bare and 1/2" cordless impact along with other tools. When we had it loaded the owner looked at me and said," I can tell this isn't your first rodeo". LOL It did go extremely well and quick.
|  |  |
 |  |  Plan is to roll it off the trailer and push it in the shop to work on it. That and to see what is really there. Plan is to roll it off the trailer and push it in the shop to work on it. That and to see what is really there.
|  Highly optioned truck as it has the overhead fuel tank along with the deluxe barn roof with OROPS Highly optioned truck as it has the overhead fuel tank along with the deluxe barn roof with OROPS
|
 Close up of a miner fender dings. Close up of a miner fender dings.
|  |  They had rigged up their own power steering conversion. This just amazes me. Study the pics and hold your jaw as it is going to drop. They had rigged up their own power steering conversion. This just amazes me. Study the pics and hold your jaw as it is going to drop.
|  |
 |  |  I pulled the plugs and started soaking them. Got underneath and took the flywheel cover off and worked the ring gear with a prybar. It broke loose! Went 3 revolutions till it got easier. Starter had the sheetmetal band rusted off so I pulled it all apart and cleaned it and made a new band. Put the juice to it and it spun! Reinstalled on the truck and spun the motor with the plugs out. 4 dead cylinders, one good, one weak (40PSI). I hoped just stuck valves. Kept lubing and oiling and finally got 4 cylinders to have good compression. Made a tool to push the valves down and after some fighting I got them to release. I then pulled the carb and tore it down. Made a new top gasket and put a new fuel line on. After some cranking it actually ran. Some tuning and it idles pretty good. Has an exhaust leak. Power steering actually works and hadn't leaked. I ended up driving the thing around. I pulled the plugs and started soaking them. Got underneath and took the flywheel cover off and worked the ring gear with a prybar. It broke loose! Went 3 revolutions till it got easier. Starter had the sheetmetal band rusted off so I pulled it all apart and cleaned it and made a new band. Put the juice to it and it spun! Reinstalled on the truck and spun the motor with the plugs out. 4 dead cylinders, one good, one weak (40PSI). I hoped just stuck valves. Kept lubing and oiling and finally got 4 cylinders to have good compression. Made a tool to push the valves down and after some fighting I got them to release. I then pulled the carb and tore it down. Made a new top gasket and put a new fuel line on. After some cranking it actually ran. Some tuning and it idles pretty good. Has an exhaust leak. Power steering actually works and hadn't leaked. I ended up driving the thing around.
|  Think I'll try to get the winch fixed so it is usable. All the brake, lever and yokes were missing. They had it locked in and just used the lever in the cab to operate it. these 2 bolts on the winch case are sheared off flush so we'll start there. I pulled the pieces off another truck to copy. Think I'll try to get the winch fixed so it is usable. All the brake, lever and yokes were missing. They had it locked in and just used the lever in the cab to operate it. these 2 bolts on the winch case are sheared off flush so we'll start there. I pulled the pieces off another truck to copy.
|
 They've welded a lot of the winch together so I'll have to see what I can do to get the drum off. I want to drill those bolts to try to get them out. The less I have to do the better. They've welded a lot of the winch together so I'll have to see what I can do to get the drum off. I want to drill those bolts to try to get them out. The less I have to do the better.
|  My plan is to 4 bolts on the left side drum bracket off and pull it off. Then, on the other side, take the 2 bolts(front and rear) closest to the winch drum off. Then loosen the outside 2 bolts and that should allow the gear case to rock upwards so I can pull the drum off. The grill will probably have to come out too. My plan is to 4 bolts on the left side drum bracket off and pull it off. Then, on the other side, take the 2 bolts(front and rear) closest to the winch drum off. Then loosen the outside 2 bolts and that should allow the gear case to rock upwards so I can pull the drum off. The grill will probably have to come out too.
|  Here you can see how it worked. the driveshaft is still attached but it allows just enough movement to let the drum clear the framerail. Here you can see how it worked. the driveshaft is still attached but it allows just enough movement to let the drum clear the framerail.
|  Now I have some space to work in. Now I have some space to work in.
|
 Now for the bolts. I ground the surface flat so I can center punch them better. Now for the bolts. I ground the surface flat so I can center punch them better.
|  I like using an automatic center punch to start. It allows you to get pretty accurate to start a dimple. I like using an automatic center punch to start. It allows you to get pretty accurate to start a dimple.
|  Once I hit it a few times I go to a normal center punch and make them bigger so the drill has a good dimple to start from. Once I hit it a few times I go to a normal center punch and make them bigger so the drill has a good dimple to start from.
|  Bad picture but they drilled nice. Feeling good as they aren't very deep and there is a big void behind them. Bad picture but they drilled nice. Feeling good as they aren't very deep and there is a big void behind them.
|
