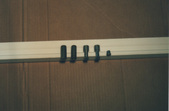
 Up first were the ends that go on the wiper arms. They have a lot going on with them machining wise and drilled all the holes first. I then matched the shape to them. These were all ground on a tang again, See a pattern here??? Original in the center. Up first were the ends that go on the wiper arms. They have a lot going on with them machining wise and drilled all the holes first. I then matched the shape to them. These were all ground on a tang again, See a pattern here??? Original in the center.
|  Took a while and sanded them out/polished. Took a while and sanded them out/polished.
|  I wouldn't call these a starter project! I wouldn't call these a starter project!
|  Ground out a rivet and installed it. I will have to find another arm as the other one I have has been.... modified. Ground out a rivet and installed it. I will have to find another arm as the other one I have has been.... modified.
|
 Found one and you can see I pressed in a brass sleeve like originals. Found one and you can see I pressed in a brass sleeve like originals.
|  The cab pieces were next. Made them the same way by grinding it all out. The cab pieces were next. Made them the same way by grinding it all out.
|  First piece on the cab is angled so I did that on the end and kept the flat surface on the tang end. I milled out the locating slot earlier drill a blind hole, then ran it into the center using a carbide burr on a die grinder. First piece on the cab is angled so I did that on the end and kept the flat surface on the tang end. I milled out the locating slot earlier drill a blind hole, then ran it into the center using a carbide burr on a die grinder.
| 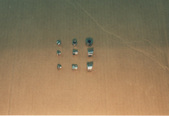 I was able to buy stainless wiper nuts/acorns but the threaded motor nuts I had to make too. Here are all 3 different pieces for both sides. I was able to buy stainless wiper nuts/acorns but the threaded motor nuts I had to make too. Here are all 3 different pieces for both sides.
|
 Here I am tapping the wiper motor nut prior to grinding on my old 1800's lathe. I updated it with a self centering chuck and digital depth readout. Here I am tapping the wiper motor nut prior to grinding on my old 1800's lathe. I updated it with a self centering chuck and digital depth readout.
| 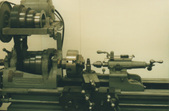 The readout is a quill readout for a mill modified to fit. Makes it nice for doing repeatable depth drilling. The readout is a quill readout for a mill modified to fit. Makes it nice for doing repeatable depth drilling.
|  Close up showing readout. Simply attaches to the shaft via a hose clamp and takes seconds to take off. Close up showing readout. Simply attaches to the shaft via a hose clamp and takes seconds to take off.
| 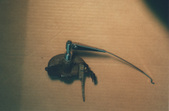 Finished and all together. Finished and all together.
|
