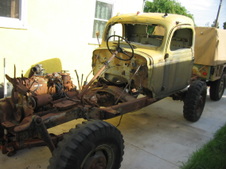
 Backing it into the driveway. Next step, control the bees that have a hive in the gas tank. Backing it into the driveway. Next step, control the bees that have a hive in the gas tank.
I later decided to sell off the carryall parts, and pursue a civvy FFPW build.
|  Lift gate OK, tailgate may be OE skin, but is gutted, and skin NFG. Tailgate hinges are salvageable. Lift gate OK, tailgate may be OE skin, but is gutted, and skin NFG. Tailgate hinges are salvageable.
|  Left side has a couple of brackets welded on, need removal. Left side has a couple of brackets welded on, need removal.
Boy, I sure wish that was red primer...
|  " Valuable parts" inside. Rear seats may be appropo, front seats are correct. " Valuable parts" inside. Rear seats may be appropo, front seats are correct.
|
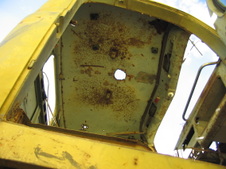
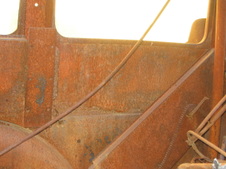 There is a bit of rust in the intermediate panel. There is a bit of rust in the intermediate panel.
|  Weld seam up the cowl and across. Plus, heading under the widnshield, top of dash is a separate piece dfrom wither firewall or dash. Weld seam up the cowl and across. Plus, heading under the widnshield, top of dash is a separate piece dfrom wither firewall or dash.
|  An electric fuel pump! An electric fuel pump!
| 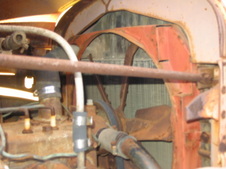 Fan, shroud, etc look good. Radiator is fubar on front. Engine did turn 180° with a hand crank. Fan, shroud, etc look good. Radiator is fubar on front. Engine did turn 180° with a hand crank.
|
 Radiator damage. "DODGE" in fine shape. Winch bumper with extensions. PTO and shaft in there some where, front u-joint hack sawed to remove winch. A-frame brackets will unbolt. Radiator damage. "DODGE" in fine shape. Winch bumper with extensions. PTO and shaft in there some where, front u-joint hack sawed to remove winch. A-frame brackets will unbolt.
|  Hydro-vac mounted to front fender, necessitating hacking up the hood. Otherwise hood was good, center hinge nice too. Hydro-vac mounted to front fender, necessitating hacking up the hood. Otherwise hood was good, center hinge nice too.
|  Vent filter for hydra-vac I guess? Vent filter for hydra-vac I guess?
|  Dash with a coupkle gauges added. Note the overlap at the top. Dash with a coupkle gauges added. Note the overlap at the top.
|
 Cross bows for top. Rusted away. But there are a few steel spacer 'knobs' that mounted the top plywood left. Cross bows for top. Rusted away. But there are a few steel spacer 'knobs' that mounted the top plywood left.
|  Seat frame parts, maybe for back seats, haven't jig saw puzzled them yet. Seat frame parts, maybe for back seats, haven't jig saw puzzled them yet.
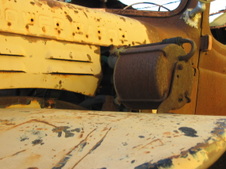
|  A little bin on the inside of the 'stretch' panel. It has a wiper access cover and a filler neck w/ cap in side. Note the bullet holes. A little bin on the inside of the 'stretch' panel. It has a wiper access cover and a filler neck w/ cap in side. Note the bullet holes.
|  Rear Shocks! I am SHOCKED! Rear Shocks! I am SHOCKED!
|
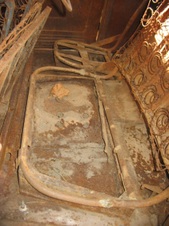 Seat frames that were in it at time of purchase. Seat frames that were in it at time of purchase.
|  Passenger side frame, has supprt straps welded in. Pivot under front looks stock? Back folds pretty high, to make room for cushions when folded forward? I havn't freed up the front pivots yet. Passenger side frame, has supprt straps welded in. Pivot under front looks stock? Back folds pretty high, to make room for cushions when folded forward? I havn't freed up the front pivots yet.
| 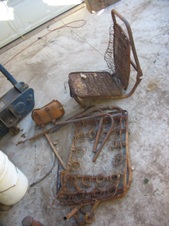 Additional seat parts that were lose in the back at time of purchase. Single seat has longer tube legs than the seat that is in the truck.Jeep wagon maybe? Additional seat parts that were lose in the back at time of purchase. Single seat has longer tube legs than the seat that is in the truck.Jeep wagon maybe?
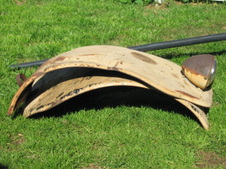
| 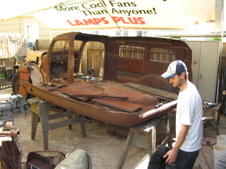 I've cut the sides loose, here we've laid the left side down. Next, carry it into the back yard for storage. I've cut the sides loose, here we've laid the left side down. Next, carry it into the back yard for storage.
|
 Temp ply wood chunks used as floor boards. Temp ply wood chunks used as floor boards.
| 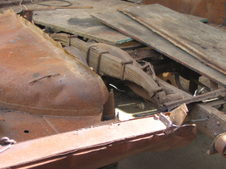 The heat from the back tires burning took ALL of the temper out of the springs. Plus, rear axle housing sagged, needs new springs and rear axle. The heat from the back tires burning took ALL of the temper out of the springs. Plus, rear axle housing sagged, needs new springs and rear axle.
| 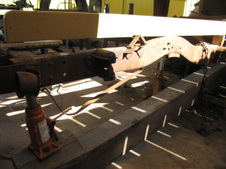 Frame sagged from the heat of the rear tires burning. Pic shows the 6x8, chain and jack used in attempt to straighten frame. It did work, but a whole rolling chassis seemed the better way to get all the parts I need. Frame sagged from the heat of the rear tires burning. Pic shows the 6x8, chain and jack used in attempt to straighten frame. It did work, but a whole rolling chassis seemed the better way to get all the parts I need.
|  Better pic of using a timber to unbend frame. Weight of body during the fire sagged the frame about 3 inches at the rear corners. Better pic of using a timber to unbend frame. Weight of body during the fire sagged the frame about 3 inches at the rear corners.
|
 Most of this pile is the parts I will keep. The engine does turn over, tranny is later synchro 3&4. Most of this pile is the parts I will keep. The engine does turn over, tranny is later synchro 3&4.
|  Front fenders, no rust through. I'll need one more headlight. Front fenders, no rust through. I'll need one more headlight.
|  Carryall body parts. PW running boards are repairable. "Cab' door frames may be used to make the stretched carryall a four-door. But I will use another cab from a pick-up for the front section. Carryall body parts. PW running boards are repairable. "Cab' door frames may be used to make the stretched carryall a four-door. But I will use another cab from a pick-up for the front section.
| 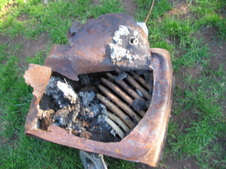 Bee's nest inside gas tank. Tank rotted out. Bee's nest inside gas tank. Tank rotted out.
|
 I decided to build it into a pick-up truck. So I sold all the carry all specific parts and purchased another chassis and a cab. I decided to build it into a pick-up truck. So I sold all the carry all specific parts and purchased another chassis and a cab.
| 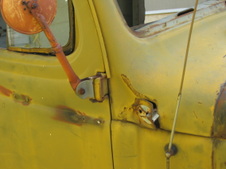 Cab is rust free. But has many holes that need repair. This is where the cowl light ripped the cowl... Cab is rust free. But has many holes that need repair. This is where the cowl light ripped the cowl...
|  Hole in dash to suit the M37 instrument panel. Looks to have been done with an ax or over-sized can opener? Hole in dash to suit the M37 instrument panel. Looks to have been done with an ax or over-sized can opener?
|  "Sun Roof", a hole the size of a fist. "Sun Roof", a hole the size of a fist.
|
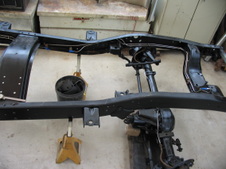
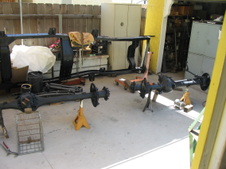 Frame has been sandblasted, see"shop built tools" album for my 'tent'. Axles in epoxy primer, ready for finish satin Urethane. Frame has been sandblasted, see"shop built tools" album for my 'tent'. Axles in epoxy primer, ready for finish satin Urethane.
| 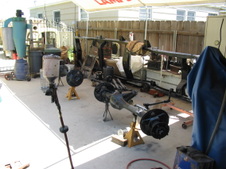 Dust collector in the background, a pallet of springs and shock, mounts, u-bolt etc too. Dust collector in the background, a pallet of springs and shock, mounts, u-bolt etc too.
| 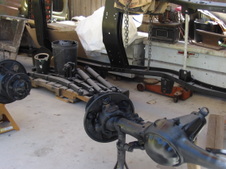 Pallet of suspension parts, all ready to bolt on. Ought to have a rolling chassis later this week. Pallet of suspension parts, all ready to bolt on. Ought to have a rolling chassis later this week.
|  Stainless steel brake and fuel lines. Stainless steel brake and fuel lines.
Two junctions with positions for brake light switches. I hop I guessed the right spots to put them, I THINK I know where the hydroboost will end up...
|
 |  Aft section of lines. I did the whole fuel line in two pieces, coupled in the middle. The extreme ends are chamfered to accept clamped on hoses. Much flexibility that way. Aft section of lines. I did the whole fuel line in two pieces, coupled in the middle. The extreme ends are chamfered to accept clamped on hoses. Much flexibility that way.
| 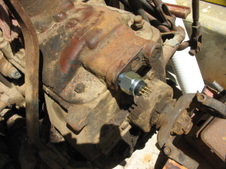 back up light switch install. NP420. #S290Z in 'BWD' brand, NS11 in SMP. back up light switch install. NP420. #S290Z in 'BWD' brand, NS11 in SMP.
Torqueflite neutral safety and back up light switch, 1963-1990.
Simple knock out the end plug, thread hole for 3/4x16 thread, and screw switch in.
| 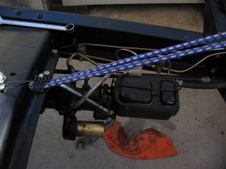 Underfloor hydroboost install. Underfloor hydroboost install.
Looks like I need a new pic?
|
