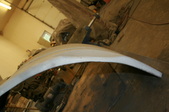
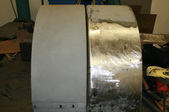
 Here you can see a comparison between the right and left sides. I'll use the driver's side as a guide. Here you can see a comparison between the right and left sides. I'll use the driver's side as a guide.
|  You can see the mounting surface sides are the same and follow the same curve. You can see the mounting surface sides are the same and follow the same curve.
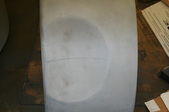
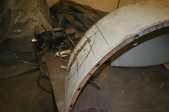
|  Where the dimple is it distorts the curve. On these fenders there is a heavy wire rolled into the lip edge which makes it pretty hard to move around. Where the dimple is it distorts the curve. On these fenders there is a heavy wire rolled into the lip edge which makes it pretty hard to move around.
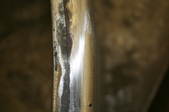
| 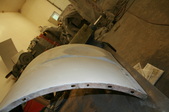 This view shows the difference in the outer edge. This view shows the difference in the outer edge.
|
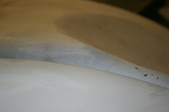 Close up shows how much. Close up shows how much.
|  Cardboard to the rescue again! Made a template of the drivers sides curve for reference. Cardboard to the rescue again! Made a template of the drivers sides curve for reference.
|  When laid on the passenger side you can see what I'm up against. When laid on the passenger side you can see what I'm up against.
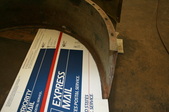
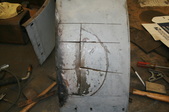
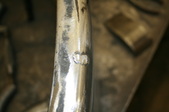
|  Probably took Dodge a fraction of a second to do this. I think it's going to take a little longer to get it out! Probably took Dodge a fraction of a second to do this. I think it's going to take a little longer to get it out!
|
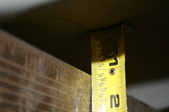 1 1/8 deep here. 1 1/8 deep here.
| 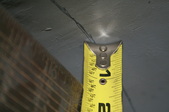 Even a little deeper at the center. Even a little deeper at the center.
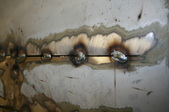
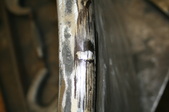
|  After dollying it for some time I couldn't get it to come out without major distortion. I decided to make relief cuts and weld back together. Might have been easier just to cut the thing out but you still have the edge to straighten. I used a cut off wheel in a normal electric handsaw. After dollying it for some time I couldn't get it to come out without major distortion. I decided to make relief cuts and weld back together. Might have been easier just to cut the thing out but you still have the edge to straighten. I used a cut off wheel in a normal electric handsaw.
|  With the reliefs it moved a lot easier. I used a body hammer and dolly with on and off where needed. With the reliefs it moved a lot easier. I used a body hammer and dolly with on and off where needed.
|
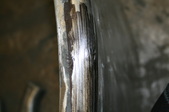
 Started tacking with MIG when it was right. I used some leveling clamps to hold metal flush. They work fairly well but not exact so you have to watch them closely. You can see the difference in the gap on how much stretching was needed in this area. Started tacking with MIG when it was right. I used some leveling clamps to hold metal flush. They work fairly well but not exact so you have to watch them closely. You can see the difference in the gap on how much stretching was needed in this area.
| 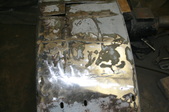 MIG welded very small sections to prevent heat warpage. Basically welds just a little bigger than a tack. Here is the first cut line welded completely and ground down. MIG welded very small sections to prevent heat warpage. Basically welds just a little bigger than a tack. Here is the first cut line welded completely and ground down.
|  I use steel straight edge before welding to sight under neath for light. Once welded and ground down with 9 inch angle grinder I spray with a light coat of paint and go over with a body file or flat metal file, It'll show you the high and lows to tap in/out. I use steel straight edge before welding to sight under neath for light. Once welded and ground down with 9 inch angle grinder I spray with a light coat of paint and go over with a body file or flat metal file, It'll show you the high and lows to tap in/out.
|  Moving on to the next one. Moving on to the next one.
|
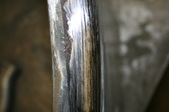
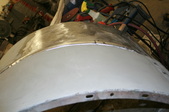
 Here it is all welded and ground down. Pretty close but still needs to be final dollyed. I figured I'd wait till I got the edge right as it might warp a little from that. Here it is all welded and ground down. Pretty close but still needs to be final dollyed. I figured I'd wait till I got the edge right as it might warp a little from that.
|  Edge is close but has some small dimples, here is a way to get them out and use basically no filler. Edge is close but has some small dimples, here is a way to get them out and use basically no filler.
|  This is where one of the slices was and has been welded. I use this blending method at work and we blend metal that is in size, (.0002 of inch total tolerance) and do not undersize it so I think it will work here! This is where one of the slices was and has been welded. I use this blending method at work and we blend metal that is in size, (.0002 of inch total tolerance) and do not undersize it so I think it will work here!
|  Start by lightly running a fine, straight mill file over the area to fine highs and lows. Tap the highs down lows up and repeat. Start by lightly running a fine, straight mill file over the area to fine highs and lows. Tap the highs down lows up and repeat.
|
 Closer Closer
|  All the dents gone on the roll lip and this is just filed. All the dents gone on the roll lip and this is just filed.
|  Hit it with some sand paper on a Durablock and you can see how this works. Hit it with some sand paper on a Durablock and you can see how this works.
|  Real close and ready for final work. Real close and ready for final work.
|
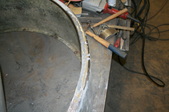
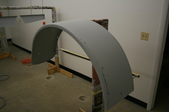
 You can see how the outer edges now have the same curve. You can see how the outer edges now have the same curve.
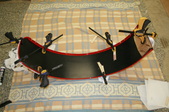
| 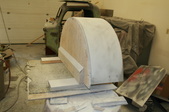 For final tapping and sanding I made a holder out of 2X4's and some OSB. Fender mount holes are bolted to the OSB which is just a little lower than inner lip. This allows block sanding with Durablocks. For final tapping and sanding I made a holder out of 2X4's and some OSB. Fender mount holes are bolted to the OSB which is just a little lower than inner lip. This allows block sanding with Durablocks.
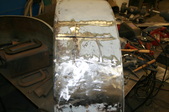
|  After all the metalwork was as good as I could get i lightly sandbalsted the whole fender and sprayed Slicksand over the whole thing. Slicksand is a heavy filler primer that sets up fasts and dries rock hard. The best stuff I have found. I use a wipe on dry guide coat once dry and start saning with 150 grit. It shows any problems you may have. You can barely see the ghosting here. It was pretty flat and very close to perfect. After all the metalwork was as good as I could get i lightly sandbalsted the whole fender and sprayed Slicksand over the whole thing. Slicksand is a heavy filler primer that sets up fasts and dries rock hard. The best stuff I have found. I use a wipe on dry guide coat once dry and start saning with 150 grit. It shows any problems you may have. You can barely see the ghosting here. It was pretty flat and very close to perfect.
| 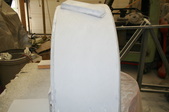 Fender ready for epoxy primer Fender ready for epoxy primer
|
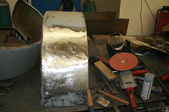
 After applying a sandable primer and reblocking it's ready for topcoat. I'm using base/clear and I spray 1 coat of sealer primer(epoxy), 3 coats of color base and 3 coats of clear. There was no sanding between any of this process and all sprayed the same day. Made up another hanger so all surface could be painted. After applying a sandable primer and reblocking it's ready for topcoat. I'm using base/clear and I spray 1 coat of sealer primer(epoxy), 3 coats of color base and 3 coats of clear. There was no sanding between any of this process and all sprayed the same day. Made up another hanger so all surface could be painted.
|  Base and clear on. Base and clear on.
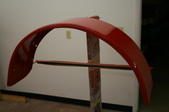
| 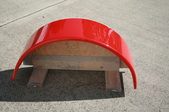 Put it back on the working holder and cut and buffed it out. Looks just a little different! Put it back on the working holder and cut and buffed it out. Looks just a little different!
| 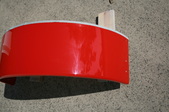 No waves now and relief is long gone. No waves now and relief is long gone.
|
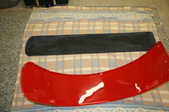 The tires I'm going to run are a very open lug. I needed to come up with something to prevent an outer ding if a stone was thrown at speed. I decided to try black poly. I cut it out to lay on the inside. The tires I'm going to run are a very open lug. I needed to come up with something to prevent an outer ding if a stone was thrown at speed. I decided to try black poly. I cut it out to lay on the inside.
|  I drilled the holes where the rivets were and filed them square with the fenders as I'm using stainless carriage bolts in their place. I tried several different glues and the best I found was normal silicon sealer. Spread a layer on and clamped it all down. For a working truck this might be bad as it could trap water if not completely sealed but It'll work in this application. I drilled the holes where the rivets were and filed them square with the fenders as I'm using stainless carriage bolts in their place. I tried several different glues and the best I found was normal silicon sealer. Spread a layer on and clamped it all down. For a working truck this might be bad as it could trap water if not completely sealed but It'll work in this application.
| |
