 Nearly complete externally, needs windows installed Nearly complete externally, needs windows installed
|  Pic #1, proof of concept. Note the dents, the donor was a wreck. Pic #1, proof of concept. Note the dents, the donor was a wreck.
|  This is the layout of the Pilot House pickups, 49-53 years. This is the layout of the Pilot House pickups, 49-53 years.
|  This is the layout I will use, it makes the cab 8" longer. My goal is to get an extra bit of leg room for my 6'3" body. This is the layout I will use, it makes the cab 8" longer. My goal is to get an extra bit of leg room for my 6'3" body.
|  First trial fit, parts clamped together, our model posed on a chunk of fire wood. Seat needs padding, otherwise feels right. First trial fit, parts clamped together, our model posed on a chunk of fire wood. Seat needs padding, otherwise feels right.
|
 Sawn down just behind door pillar and straight across floor. Sawn down just behind door pillar and straight across floor.
|  Inside view, red lettering in roof area is the canopy, a recycled vinyl bill board. Inside view, red lettering in roof area is the canopy, a recycled vinyl bill board.
|  All major components tacked together, including the door skin used as a patch panel. One door made both sides, and had the creases to line up with those in the body. All major components tacked together, including the door skin used as a patch panel. One door made both sides, and had the creases to line up with those in the body.
| 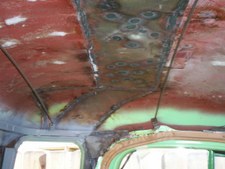 Inside of the roof. You can see the layout of the cut, keeping the patches at the high/wide part, seams crimped into the edges of the patches, the 110% weld penetration, the wire bows in place to hold the 'hung ceiling', square tube shoulder harness 'hoop' from door jamb to door jamb. That hoop will also be a convenient place to glue the edge of the fabric 'hung ceiling'. Inside of the roof. You can see the layout of the cut, keeping the patches at the high/wide part, seams crimped into the edges of the patches, the 110% weld penetration, the wire bows in place to hold the 'hung ceiling', square tube shoulder harness 'hoop' from door jamb to door jamb. That hoop will also be a convenient place to glue the edge of the fabric 'hung ceiling'.
|  Seat back tips forward. Donor was a Sonoma/S-10. Seat back tips forward. Donor was a Sonoma/S-10.
|
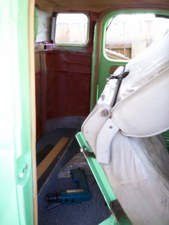 It's hinge mounted for maximum access to the underseat storage. It's hinge mounted for maximum access to the underseat storage.
|  Blue/Gray carpet, and the 12 ga divider/ floor gusset / seat support. Blue/Gray carpet, and the 12 ga divider/ floor gusset / seat support.
|  Bondo, all hand file boarded or cheese grater to this point, plus a brushed-on coat of Poly-fill, brush on Bondo. Darn, no pics of the lirttle tuck I took in the top of the window frame, or the fact that the cab was tortured to fit the frame corner below the window. It was NOT a bolt-in modification. Bondo, all hand file boarded or cheese grater to this point, plus a brushed-on coat of Poly-fill, brush on Bondo. Darn, no pics of the lirttle tuck I took in the top of the window frame, or the fact that the cab was tortured to fit the frame corner below the window. It was NOT a bolt-in modification.
Later, a coat of Poly-fill was sprayed.
|  My second attempt at a fabric headliner. I'm learnin, I'm learnin... My second attempt at a fabric headliner. I'm learnin, I'm learnin...
Oh yeah, it needed a light mount frame, plasma'd out of 16 ga.
|  Use up the left over primer in the gun. Final was a coat of the red, "Rust Destroyer", oil based primer. Use up the left over primer in the gun. Final was a coat of the red, "Rust Destroyer", oil based primer.
|
 Spare tire mount. Four holes are to the same old holes, the front of the bracet was cut off and rebent, welded back on, now is bolted to the head board bolt holes, plus a couple more. Spare tire mount. Four holes are to the same old holes, the front of the bracet was cut off and rebent, welded back on, now is bolted to the head board bolt holes, plus a couple more.
I used stainless bolts through out the bed, looks like I need some stainless rod for the through rod.
| 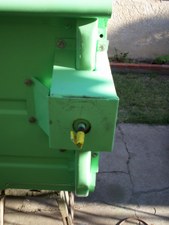 Spare tire bracket again. Yellow tape is left as a flag. It worked ont heis project, I never did stab myself in the back with the stud. Spare tire bracket again. Yellow tape is left as a flag. It worked ont heis project, I never did stab myself in the back with the stud.
|  Interior, complete, one corner window shoehorned in. Walls are lined with vinyl on waterproof backer board. Interior, complete, one corner window shoehorned in. Walls are lined with vinyl on waterproof backer board.
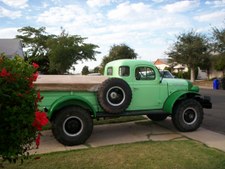
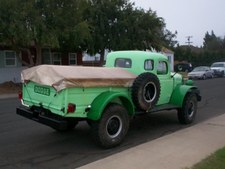
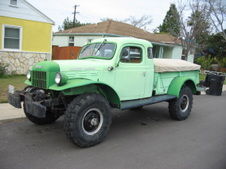
| 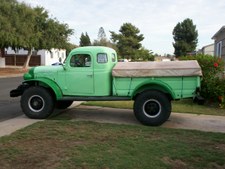 Completed truck, left rear Completed truck, left rear
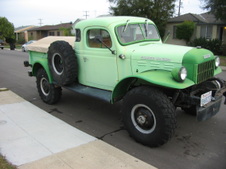
|  Right front, "after" pic. Right front, "after" pic.
|
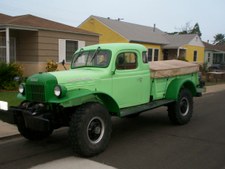
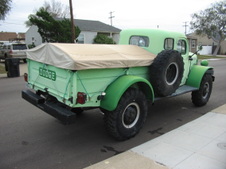
 Completed project. Spare retained in original location. Completed project. Spare retained in original location.
| 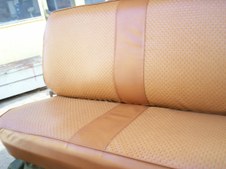 Remember that tattered gray seat from pic #11? Here it is after Chris upholstered it in a two-tone, "basket weave leather" vinyl. Plus I added some soft foam over the OE foam, to disguise the semi-bucket look of the Sonoma seat. Given time, I think it will all smooth in. Vinyl shrinks, foam compresses... But boy it sure rides nicer than those old coil springs ! Remember that tattered gray seat from pic #11? Here it is after Chris upholstered it in a two-tone, "basket weave leather" vinyl. Plus I added some soft foam over the OE foam, to disguise the semi-bucket look of the Sonoma seat. Given time, I think it will all smooth in. Vinyl shrinks, foam compresses... But boy it sure rides nicer than those old coil springs !
|  Seat installed. I was afraid the darker seat wouldn't go with the lightewr beige used for the cab lining. Silly me. Seat installed. I was afraid the darker seat wouldn't go with the lightewr beige used for the cab lining. Silly me.
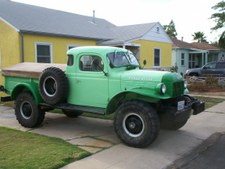
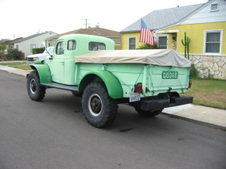
|  Early morning pic, taken before the San Diego sun burned through the overcast. Early morning pic, taken before the San Diego sun burned through the overcast.
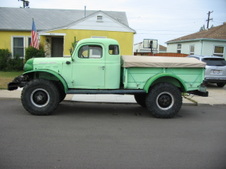
|  Finished pic, taken before the sun burned through the overcast. Finished pic, taken before the sun burned through the overcast.
See the "DODGE" on the tailgate?
That's the end!
|
 Detail of roof seam trim. Detail of roof seam trim.
|  |  |  |  |
 | |
