 My plan is to try to make an Eagle like covering over the top of the engine with the wings coming down to the valve covers. Going to use 1/4" stainless rod so I can easily polish it out. Trick will be to make it easily removable and use existing holes for mounts. My plan is to try to make an Eagle like covering over the top of the engine with the wings coming down to the valve covers. Going to use 1/4" stainless rod so I can easily polish it out. Trick will be to make it easily removable and use existing holes for mounts.
|  Pulled 2 long lengths of 1/4" rod I got at the scrap yard and a leftover piece of large round from another project cut off tang. This was the left from making the blackout light covers that I'm using for turn signals on the truck. Pulled 2 long lengths of 1/4" rod I got at the scrap yard and a leftover piece of large round from another project cut off tang. This was the left from making the blackout light covers that I'm using for turn signals on the truck.
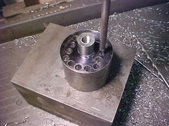
|  I'm planning on using this piece for the Eagles head. I'll have the rods feed into the back of it and whittle the head using old school methods. I need something to hold it so here I've drilled it and tap it to a 3/8" - 16 thread. I'm planning on using this piece for the Eagles head. I'll have the rods feed into the back of it and whittle the head using old school methods. I need something to hold it so here I've drilled it and tap it to a 3/8" - 16 thread.
|  Need the faces true for drilling and layout. I'll get the smaller diameter consistant as well. I have something planned for it as well if it works out. Need the faces true for drilling and layout. I'll get the smaller diameter consistant as well. I have something planned for it as well if it works out.
|
 One end done. This way I can lay all the holes out. I have to start with this piece to find out how many holes/rods I can work with. This will set the pace for the rest of the pieces due to space limits. One end done. This way I can lay all the holes out. I have to start with this piece to find out how many holes/rods I can work with. This will set the pace for the rest of the pieces due to space limits.
|  I then flipped it over and faced the other side so drilling will be easy. I don't have a mill so this will be old school free hand on the drill press. I then flipped it over and faced the other side so drilling will be easy. I don't have a mill so this will be old school free hand on the drill press.
|  Scribed a line .202 from the edge around the diameter. This will give me enough wall on the top. I then scribed 2 vertical lines. I'll shave the sides down eventually. Scribed a line .202 from the edge around the diameter. This will give me enough wall on the top. I then scribed 2 vertical lines. I'll shave the sides down eventually.
|  Wanted some wall between the rods entry so decided on a .350 centerline as it worked out to the corner. Just used the calipers to scribe them out. Wanted some wall between the rods entry so decided on a .350 centerline as it worked out to the corner. Just used the calipers to scribe them out.
|
 Then I used an automatic centerpunch to mark them for drilling. Then I used an automatic centerpunch to mark them for drilling.
|  I drill then all to the same depth(about .625) and then I reamed them to size. I drill then all to the same depth(about .625) and then I reamed them to size.
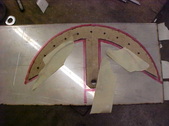
|  For the front mount I have an existing bolt hole for the Intake in the center of it. I will use this to bolt to. I decided to make a Mopar like emblem for the bracket. Used the tools shown to lay it on a cereal box. I'll cut it out to test fit and then make an aluminum template for mock up. If everything looks like it'll work, I'll then make it out of stainless. I've marked the 11 holes uniformly around with them getting more space, like a body would be. For the front mount I have an existing bolt hole for the Intake in the center of it. I will use this to bolt to. I decided to make a Mopar like emblem for the bracket. Used the tools shown to lay it on a cereal box. I'll cut it out to test fit and then make an aluminum template for mock up. If everything looks like it'll work, I'll then make it out of stainless. I've marked the 11 holes uniformly around with them getting more space, like a body would be.
|  Everything cleared but set a little high so I took some of the bottom. Looks less like the emblem but function trumps the form here. Traced it to a scrap of aluminum and drill the holes. Everything cleared but set a little high so I took some of the bottom. Looks less like the emblem but function trumps the form here. Traced it to a scrap of aluminum and drill the holes.
|
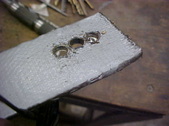
 For the back I'm using a thick piece of black poly. This will be the used piece if everything works out. I'm going to let it just sit on top of the intake and I ground the slot .400 deep to lock it in position. Rods will come through this and splay out, forming a tail like feature. I'll round the top edge later but wanted to get the holes drilled. For the back I'm using a thick piece of black poly. This will be the used piece if everything works out. I'm going to let it just sit on top of the intake and I ground the slot .400 deep to lock it in position. Rods will come through this and splay out, forming a tail like feature. I'll round the top edge later but wanted to get the holes drilled.
|  Here is the first rod holding spacers in place. With 11 rods I'll have 5 for the body and 3 rods on each side for the wings. I may add more fill rods later for the wings but that remains to be seen. I'm more of a do it as you go person as you have to be flexible with ideas sometimes. Here is the first rod holding spacers in place. With 11 rods I'll have 5 for the body and 3 rods on each side for the wings. I may add more fill rods later for the wings but that remains to be seen. I'm more of a do it as you go person as you have to be flexible with ideas sometimes.
|  Cut 5 rods to about 2 ft. that way I'll have extra but will still fit in there. I can final trim later. Cut 5 rods to about 2 ft. that way I'll have extra but will still fit in there. I can final trim later.
|  So far so good. I'll have to do some bending to get the rods into the head piece but happy with it so far. So far so good. I'll have to do some bending to get the rods into the head piece but happy with it so far.
|
 Went ahead and pulled it all off for fitting. Going to try to just tap them in the head piece first. If that works I won't have to bend them and the curves will be more uniform. Here we go. Went ahead and pulled it all off for fitting. Going to try to just tap them in the head piece first. If that works I won't have to bend them and the curves will be more uniform. Here we go.
|  Success!! My aluminum pattern is kind of flismy but since this looks like it will work, I'll start making the real bracket now. Success!! My aluminum pattern is kind of flismy but since this looks like it will work, I'll start making the real bracket now.
|  Got a flat of stainless about .100 thick. I put tape on the bottom to help with any scratching on the bottom. I get my stainless from the local scrap yard and buy it by the pound. It does have some scratches and such already but I don't want to add any more. Got a flat of stainless about .100 thick. I put tape on the bottom to help with any scratching on the bottom. I get my stainless from the local scrap yard and buy it by the pound. It does have some scratches and such already but I don't want to add any more.
|  Taped the pattern on and traced it with a marker. I want the curve a little wider so I'll cut to the outside. the upright has to be that wide for clearance so I'll cut to the inside of the line. Centerpunched the hole locations and I'll drill them first. Taped the pattern on and traced it with a marker. I want the curve a little wider so I'll cut to the outside. the upright has to be that wide for clearance so I'll cut to the inside of the line. Centerpunched the hole locations and I'll drill them first.
|
 Holes to size and I'll cut it out on a bandsaw. Holes to size and I'll cut it out on a bandsaw.
|  There's a machined boss on the intake manifold not being used on one side so I need to make a flat mount to attach there. Other side has a similar one but the MAP sensor is on it. Both sides will be different but I'll do the easy one first. I make patterns by laying a piece of paper over it and rubbing with fingers. Marks everything at once. There's a machined boss on the intake manifold not being used on one side so I need to make a flat mount to attach there. Other side has a similar one but the MAP sensor is on it. Both sides will be different but I'll do the easy one first. I make patterns by laying a piece of paper over it and rubbing with fingers. Marks everything at once.
|  Now I have a life size pattern with no measuring. Just cut it out and go. Now I have a life size pattern with no measuring. Just cut it out and go.
|  Scrap bin yielded a polished piece close to size so I'll use it. I keep tape on the surface for protection. Scrap bin yielded a polished piece close to size so I'll use it. I keep tape on the surface for protection.
|
 Drill for the 2 mounting holes and a .250 hole in the center for a support rod for the wing. I'll use the same .250 rod and just TIG weld it on the back side once to length. Drill for the 2 mounting holes and a .250 hole in the center for a support rod for the wing. I'll use the same .250 rod and just TIG weld it on the back side once to length.
|  Used the surface grinder with a cut off wheel. Made quick work of it as I just move the handle in at this depth. Used the surface grinder with a cut off wheel. Made quick work of it as I just move the handle in at this depth.
|  Got the "loom" bracket cut out on the bandsaw and put the rubber firewall type grommets in. I had to offset the mount hole some for clearance. I'll smooth/true the edges later and polish it out once all the fitment is done. the smaller bracket is to size and I ground the rounded corners on. Got the "loom" bracket cut out on the bandsaw and put the rubber firewall type grommets in. I had to offset the mount hole some for clearance. I'll smooth/true the edges later and polish it out once all the fitment is done. the smaller bracket is to size and I ground the rounded corners on.
|  Here I'm bending the .250 rod for the wings. Using an old oak form and hardened forming punch I made previous to do it. Keeps the marring down. Here I'm bending the .250 rod for the wings. Using an old oak form and hardened forming punch I made previous to do it. Keeps the marring down.
|
 Once I get a bend that is right, I use a sliding T bevel to get the angle. That way I can make another with the same bend for the other side. Once I get a bend that is right, I use a sliding T bevel to get the angle. That way I can make another with the same bend for the other side.
|  I increased the length 1 inch as I worked out, along with making a bend with more of an angle. Was able to assemble it all and it looks good to me. I'll also do some bends on the tail section later. I increased the length 1 inch as I worked out, along with making a bend with more of an angle. Was able to assemble it all and it looks good to me. I'll also do some bends on the tail section later.
|  No clearance issues with it mounted on so I'll work on the side supports now. No clearance issues with it mounted on so I'll work on the side supports now.
|  Started by mounting the base plate down and I'll rough measure the support rod and cut it. Started by mounting the base plate down and I'll rough measure the support rod and cut it.
|
 Threaded the end for a hold down and will TIG weld a washer on the shaft to hold the poly sandwich clamp I have planned. Threaded the end for a hold down and will TIG weld a washer on the shaft to hold the poly sandwich clamp I have planned.
|  I had made the hole in the plate basically a press fit. this allows me to center the rod where I want it for welding. I'll tack one side and check/reinstall before final TIG welding. I had made the hole in the plate basically a press fit. this allows me to center the rod where I want it for welding. I'll tack one side and check/reinstall before final TIG welding.
|  Simply just welded a circle and it is home. Face it flat and we'll move to the next once installed. I did polish the plate and the rod on the end. Easier to get the blems out doing it that way. I'll finial polish when it is all done. Simply just welded a circle and it is home. Face it flat and we'll move to the next once installed. I did polish the plate and the rod on the end. Easier to get the blems out doing it that way. I'll finial polish when it is all done.
|  Everything checks okay and is centered. Everything checks okay and is centered.
|
 I'm going to use tape as a reference for a line and to mark the holes. Center will be straight and the outers will have an angle. I'm going to use tape as a reference for a line and to mark the holes. Center will be straight and the outers will have an angle.
|  Using machinable black poly for a rod separator/clamp/mount. I'll mark the holes and sandwich together and drill a slightly smaller hole to clamp the lines. this stuff is nice to work with and very strong. Using machinable black poly for a rod separator/clamp/mount. I'll mark the holes and sandwich together and drill a slightly smaller hole to clamp the lines. this stuff is nice to work with and very strong.
|  Need a collar to hold the poly up so a small leftover will work fine. I'm drilling a .250 hole here. I'll put a heavy countersink in after to give me a weld galley. I'll also surface grind the end, diameter and spin an angle for looks. I'll then cut it off and repeat for the other side. Need a collar to hold the poly up so a small leftover will work fine. I'm drilling a .250 hole here. I'll put a heavy countersink in after to give me a weld galley. I'll also surface grind the end, diameter and spin an angle for looks. I'll then cut it off and repeat for the other side.
|  I made both side and here they are polished out. It will be like a pedestal mount. I made both side and here they are polished out. It will be like a pedestal mount.
|
