 First pic of completed truck. First pic of completed truck.
|  |  After later work, modifying it into a five window extended cab. See my other album for my step-by-step. After later work, modifying it into a five window extended cab. See my other album for my step-by-step.
|  The "as found" condition The "as found" condition
|
 Original cab, rotted around rear window. Original cab, rotted around rear window.
|  Door, in need of repair, see later pic of that door in progress. Door, in need of repair, see later pic of that door in progress.
| 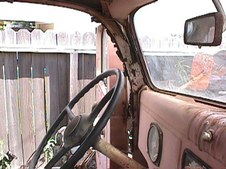 An inside view of the cab. Yes, it was pink EVERYWHERE. An inside view of the cab. Yes, it was pink EVERYWHERE.
|  Side in progress, after acid etch treatment. Side in progress, after acid etch treatment.
The extra hole in the bracket, at the apex of the 'L' is not original. Mics to 9mm...
|
 You can see I've welded up the bullet hole in the post pocket. Plus the condition of the sides: welds, riples, dents. And the pitting, requiring a skim coat of Bondo. You can see I've welded up the bullet hole in the post pocket. Plus the condition of the sides: welds, riples, dents. And the pitting, requiring a skim coat of Bondo.
|  Firewall, before. Firewall, before.
|  More of the mad welder's work. The pintle hook was all 1/2" iron welded to the bumper, I don't know what the bent frame was supposed to do. But I did leave the anchors for the A-frame, might come in handy some day. More of the mad welder's work. The pintle hook was all 1/2" iron welded to the bumper, I don't know what the bent frame was supposed to do. But I did leave the anchors for the A-frame, might come in handy some day.
|  Here's a template for the dome light. Here's a template for the dome light.
|
 Inside pink,pink,pink. Inside pink,pink,pink.
|  Gismo for compressing the LAV rims to get the Michelins off. Gismo for compressing the LAV rims to get the Michelins off.
|  Bottling some home brew. Need fuel to restore a truck. Bottling some home brew. Need fuel to restore a truck.
|  More cab rot. More cab rot.
|
 Bed parts, rotten oak boards. Cross members destined to see the sand blaster, as was the whole body and bed. Bed parts, rotten oak boards. Cross members destined to see the sand blaster, as was the whole body and bed.
| 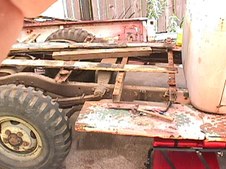 You can see how crusty the frame parts were. I used a rental pressure washer to blow the crap off, then an acid bath, then some more pressure blaster. You can see how crusty the frame parts were. I used a rental pressure washer to blow the crap off, then an acid bath, then some more pressure blaster.
| 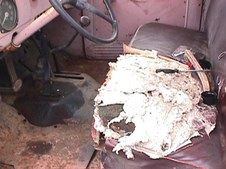 Torn up seat, later found the rear back frame too far gone to save. Much rusted away. Torn up seat, later found the rear back frame too far gone to save. Much rusted away.
|  Just about as disassembled as I felt necessary. Now to pressure blast, acid bath, pB again, red oil based primer, then black paint. Just about as disassembled as I felt necessary. Now to pressure blast, acid bath, pB again, red oil based primer, then black paint.
|
 That's the old water distribution tube left of the winch. Replaced with brass, still on the shelf at a local parts store. That's the old water distribution tube left of the winch. Replaced with brass, still on the shelf at a local parts store.
|  My favorite red, oil based primer, "Rust Destroyer" form Home Depot. My favorite red, oil based primer, "Rust Destroyer" form Home Depot.
|  A couple of the rusted part that were cut out and replaced. A couple of the rusted part that were cut out and replaced.
|  The passenger side door after replacing the rusted out section. The passenger side door after replacing the rusted out section.
|
 Left front fender, before and after. I should have know there was trouble under the bondo when I bougth the truck. The missing part had had a piece of car roof merely tack welded to the fender, inner bracket tack welded to it. A good bump and the fender would have come loose. Left front fender, before and after. I should have know there was trouble under the bondo when I bougth the truck. The missing part had had a piece of car roof merely tack welded to the fender, inner bracket tack welded to it. A good bump and the fender would have come loose.
| 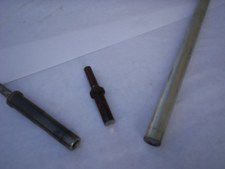 Riveting tools. The small ones go in an air hammer, the big one was used as a 'buck' to back up the head. The end had been ground to a concave to match the rivet heads. In use, heat the end of the rivet red hot, have you 90 year old help buck the head, drop the acetylene torch, pick up the air hammer and whack away. It usually took me two cycles of heat-n-whack. Riveting tools. The small ones go in an air hammer, the big one was used as a 'buck' to back up the head. The end had been ground to a concave to match the rivet heads. In use, heat the end of the rivet red hot, have you 90 year old help buck the head, drop the acetylene torch, pick up the air hammer and whack away. It usually took me two cycles of heat-n-whack.
|  A close up view of my hood hing repair. The gray part is the bracket that mounts to the radiator cover. Note how the repair pin is welded to the hood. That weld keeps the other half of the hood from sliding down and binding. A close up view of my hood hing repair. The gray part is the bracket that mounts to the radiator cover. Note how the repair pin is welded to the hood. That weld keeps the other half of the hood from sliding down and binding.
|  Plan for my hood repair pin. Plan for my hood repair pin.
|
 My 90 year old helper (Dad), and his two year old great-grand-helper. My 90 year old helper (Dad), and his two year old great-grand-helper.
|  Under floor power brake with dual circuit master. Under floor power brake with dual circuit master.
|  View of brakes, from pass side. View of brakes, from pass side.
|  Through-the-floor access to master reservoir. Access was covered by a hatch cut from s rusted away floorboard. Through-the-floor access to master reservoir. Access was covered by a hatch cut from s rusted away floorboard.
|
 My original iteration of an alternator mount. My original iteration of an alternator mount.
|  Headers durign construction. Headers durign construction.
|  Intake manifold being 'alpha fit', tube taped together. Intake manifold being 'alpha fit', tube taped together.
|  Headers complete, before painting. Headers complete, before painting.
|
 After painting with "Ceramic Header Paint." I though red would look good against the green truck. It did until I actually ran them, then the headers turned black from the heat. So much for "Ceramic" paint. After painting with "Ceramic Header Paint." I though red would look good against the green truck. It did until I actually ran them, then the headers turned black from the heat. So much for "Ceramic" paint.
|  Headers and intake with the original one bbl. Made NO improvement on the dyno. Running on the street at full speed in 3rd gear showed 2" vacuum, needs bigger carb. I went to a 2bbl Cart BDL form a 318. Much better full throttle, but haven't had it back on the dyno yet. Hoping for 65hp to the ground, feels like I made it. Headers and intake with the original one bbl. Made NO improvement on the dyno. Running on the street at full speed in 3rd gear showed 2" vacuum, needs bigger carb. I went to a 2bbl Cart BDL form a 318. Much better full throttle, but haven't had it back on the dyno yet. Hoping for 65hp to the ground, feels like I made it.
| 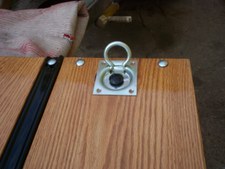 "Tie downs" are Stanley brand 'trap door pulls' from Home Depot. Powder coated black before final assembly. "Tie downs" are Stanley brand 'trap door pulls' from Home Depot. Powder coated black before final assembly.
|  New pick up tube added to my gas tank. Hole drilled into sending unit, bendabale steel tubing soldered in. Allows servicing of pick up, if it gets plugged up. New pick up tube added to my gas tank. Hole drilled into sending unit, bendabale steel tubing soldered in. Allows servicing of pick up, if it gets plugged up.
|
