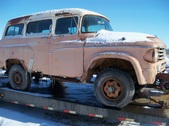
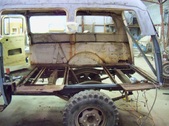
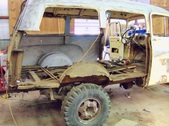
 1958 Town Wagon as it was when I hauled it back from the UP of Michigan the winter of 2012. 1958 Town Wagon as it was when I hauled it back from the UP of Michigan the winter of 2012.
| 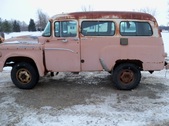 Drivers side. Front fender is rusted loose at the rear edge, Door is rotted as is the wheel arch which is typical. What looks like a dryer vent is a fresh air intake for a small gas engine generator??? All the windows are tinted which is a RARE option for a TW Drivers side. Front fender is rusted loose at the rear edge, Door is rotted as is the wheel arch which is typical. What looks like a dryer vent is a fresh air intake for a small gas engine generator??? All the windows are tinted which is a RARE option for a TW
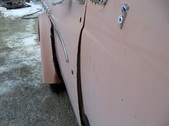
| 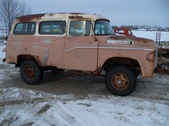 Much the same as the other side. Stainless trim and chrome grab handles, more options. Much the same as the other side. Stainless trim and chrome grab handles, more options.
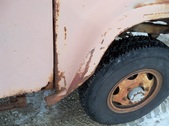
| 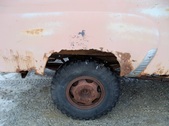 This is rusted away from the inner fender which is all to common on these trucks. This is rusted away from the inner fender which is all to common on these trucks.
|
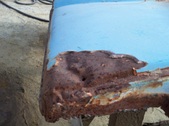
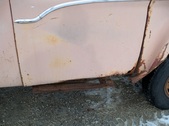 Door bottom and running board are gone due to rust. Both will be replaced. Door bottom and running board are gone due to rust. Both will be replaced.
|  Right front fender is mashed. Right front fender is mashed.
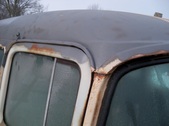
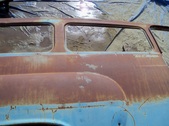
| 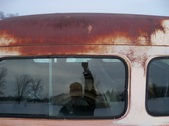 The entire roof has surface rust and rust through along the seam in places The entire roof has surface rust and rust through along the seam in places
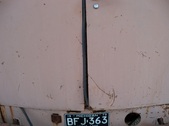
| 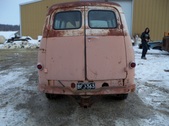 Rear doors need attention as does the lower valance and sill. Nasty hitch will be removed and extra hole welded shut on valance after straightening Rear doors need attention as does the lower valance and sill. Nasty hitch will be removed and extra hole welded shut on valance after straightening
|
 Sagging doors that won't close. This will change once we get into it Sagging doors that won't close. This will change once we get into it
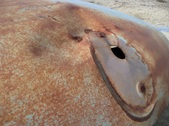
| 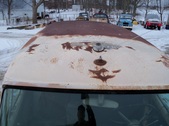 Roof has surface rust and holes from a factory roof mounted radio antenna and a CB antenna. The CB antenna was rusted through and will need a large patch welded in to repair it. The areas of the antennas was dented in as well. Roof has surface rust and holes from a factory roof mounted radio antenna and a CB antenna. The CB antenna was rusted through and will need a large patch welded in to repair it. The areas of the antennas was dented in as well.
| 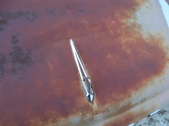 Looking down on the hood and dolphin fin another option. The hood is caved in and cracked so a replacement will take it's place. Looking down on the hood and dolphin fin another option. The hood is caved in and cracked so a replacement will take it's place.
| 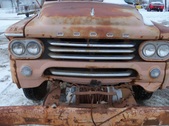 This is a high end truck with chromed grill bars and aluminum headlight trim. Also pictured is a rare dolphin fin hood ornament and the winch. The grill bars will be straightened and rechromed. This is a high end truck with chromed grill bars and aluminum headlight trim. Also pictured is a rare dolphin fin hood ornament and the winch. The grill bars will be straightened and rechromed.
|
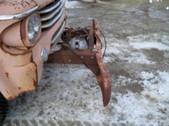 Side view of the winch and bumper. The bumper has been pulled forward which is unusual since most are found folded back from hitting something. I would imagine this was from being towed or pulling something. These are heavy bumpers but it doesn't take much to bend one. I may straighten it or replace it with a better one I have in stock. It will be saved either way. Side view of the winch and bumper. The bumper has been pulled forward which is unusual since most are found folded back from hitting something. I would imagine this was from being towed or pulling something. These are heavy bumpers but it doesn't take much to bend one. I may straighten it or replace it with a better one I have in stock. It will be saved either way.
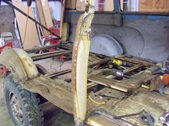
|  Drivers door and front fender are both hanging out here due to rust. The door jamb post is cracked just above the handle making the entire side flop in the breeze so to speak. Drivers door and front fender are both hanging out here due to rust. The door jamb post is cracked just above the handle making the entire side flop in the breeze so to speak.
| 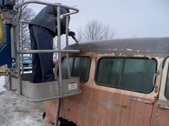 My son is using my dustless Blaster to remove all rust and paint. The Dustless Blaster uses compressed air, ground glass in water and an additive to prevent flash rusting. This is a very effective way to remove anything from the surface of metal and not damage the metal during the process. It leaves a 120 grit surface ready for primer. This was a major investment but has proved to be worth it in prepping the metal and time savings My son is using my dustless Blaster to remove all rust and paint. The Dustless Blaster uses compressed air, ground glass in water and an additive to prevent flash rusting. This is a very effective way to remove anything from the surface of metal and not damage the metal during the process. It leaves a 120 grit surface ready for primer. This was a major investment but has proved to be worth it in prepping the metal and time savings
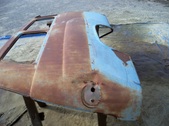
|  Here is the roof after the blasting nice and clean. I can do any body work and filler or prime as it is. Here is the roof after the blasting nice and clean. I can do any body work and filler or prime as it is.
|
 Passenger side of replacement body side from California. The tail light was punched in and it had damage at the edge behind the door. We have the drivers side as well which was in better shape. This truck would have been very hard to save had the owner not found these donor panels. Passenger side of replacement body side from California. The tail light was punched in and it had damage at the edge behind the door. We have the drivers side as well which was in better shape. This truck would have been very hard to save had the owner not found these donor panels.
|  Damaged area that will be straightened once it's prepped for the body Damaged area that will be straightened once it's prepped for the body
|  Lower front corner was hit and "repaired" poorly. Old school slide hammer and plenty of bondo was the down and dirty way to fix this area. Lower front corner was hit and "repaired" poorly. Old school slide hammer and plenty of bondo was the down and dirty way to fix this area.
|  Surface rust Surface rust
|
 More damage More damage
|  This was punched pretty good but it will come out This was punched pretty good but it will come out
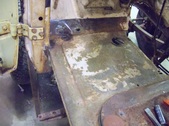
| 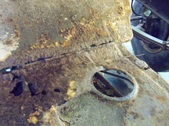 Driver side floor board that is rusted through, The large round hole is for the brake master cylinder access. Driver side floor board that is rusted through, The large round hole is for the brake master cylinder access.
|  Drivers side after cutting out the floor that was rusted. I used a donor floor from another cab to replace the bad section. This also has a power brake booster under the floor. Drivers side after cutting out the floor that was rusted. I used a donor floor from another cab to replace the bad section. This also has a power brake booster under the floor.
|
 The new floor pan all welded in place. This will be blasted to clean metal once the body comes off the frame. The new floor pan all welded in place. This will be blasted to clean metal once the body comes off the frame.
| 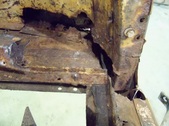 Right rear door jamb and a sill rotted away causing body to sag. This will be replaced with new metal Right rear door jamb and a sill rotted away causing body to sag. This will be replaced with new metal
|  Right rear door sill looking from above Right rear door sill looking from above
|  Left rear door sill with similar rust damage Left rear door sill with similar rust damage
|
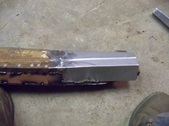 New extension I fabricated to replace the missing sheet metal. The small step was formed on my bead roller after a little trial and error New extension I fabricated to replace the missing sheet metal. The small step was formed on my bead roller after a little trial and error
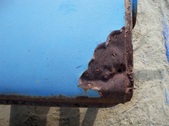
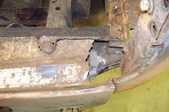
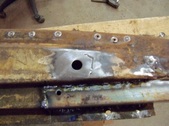
|  Looking at the rear of the door sill after removing the valance panel. This was completely rusted away and had to have new metal welded to close this hole Looking at the rear of the door sill after removing the valance panel. This was completely rusted away and had to have new metal welded to close this hole
|  Rear sill patched Rear sill patched
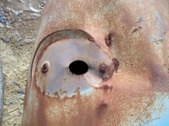
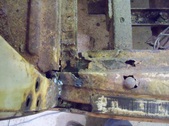
| 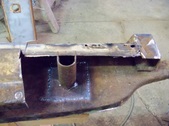 This is where the cab mount bolt passes through the sill. The bottom and top were rusted or missing due to rust This is where the cab mount bolt passes through the sill. The bottom and top were rusted or missing due to rust
|
 The top side of the left cab mount hole repaired with a large washer welded inplace The top side of the left cab mount hole repaired with a large washer welded inplace
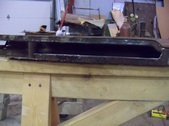
| 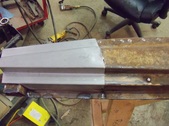 The new sill extension in place before welding The new sill extension in place before welding
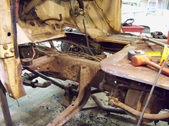
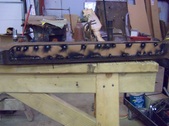
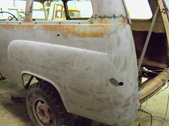
|  This is the passenger side with the body panel removed. Numerous spot welds had to be drilled out to get to this point This is the passenger side with the body panel removed. Numerous spot welds had to be drilled out to get to this point
|  The drivers side was removed first after careful measuring before the first cut was made. This is not for the faint at heart The drivers side was removed first after careful measuring before the first cut was made. This is not for the faint at heart
|
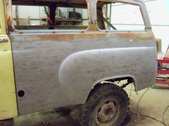 The new replacement panel from a another TW. This was blasted clean by my Dustless Blaster before any work was done. The fit was excellent The new replacement panel from a another TW. This was blasted clean by my Dustless Blaster before any work was done. The fit was excellent
|  Looking at the rear. Very little filler will be needed since we cut it at the windows openings. It took 3 of us 8 hours to get this far. Looking at the rear. Very little filler will be needed since we cut it at the windows openings. It took 3 of us 8 hours to get this far.
|  The door to body gap is excellent which does not happen often with these trucks even from the factory. The door to body gap is excellent which does not happen often with these trucks even from the factory.
|  Another shot of the right side. The front door jamb had been hit at some point in it's life so it to was replaced with a donor panel. The door gap is as good as the other side Another shot of the right side. The front door jamb had been hit at some point in it's life so it to was replaced with a donor panel. The door gap is as good as the other side
|
