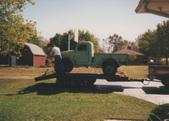
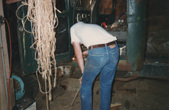
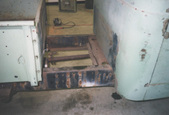
 This is is the truck as it arrived. I got it from a military dealer in Colorado and had it drop shipped at a local loading dock, hauled it home from there. It did run and moved on it's own but had the normal "brakes need work" label. I'm checking out that roomy 3 man cab! This is is the truck as it arrived. I got it from a military dealer in Colorado and had it drop shipped at a local loading dock, hauled it home from there. It did run and moved on it's own but had the normal "brakes need work" label. I'm checking out that roomy 3 man cab!
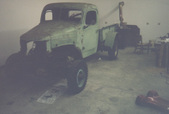
|  Amazing this thing is rust free but that brushed on paint job hides a lot of dents. Pretty complete but had a motor change out sometime in it's life. A lot of cobbled up stuff too and put it this way, I kept a fire extinguisher at the ready at ALL times when it was running. Amazing this thing is rust free but that brushed on paint job hides a lot of dents. Pretty complete but had a motor change out sometime in it's life. A lot of cobbled up stuff too and put it this way, I kept a fire extinguisher at the ready at ALL times when it was running.
|  I'm just glad I didn't have to haul this home from Colorado! I'm just glad I didn't have to haul this home from Colorado!
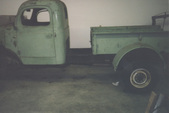
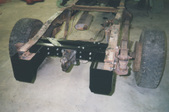
| 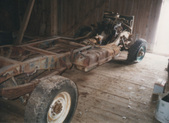 Here is the 1978 Chevy 1 ton that will be the frame and running gear. As stated earlier, I really wanted all Dodge but this thing fits so well. I got it from my former employer for the outrageous price of $20.00. He wanted $10.00 and all I had was a $20.00. When he started walking to the house I said just keep it! Here is the 1978 Chevy 1 ton that will be the frame and running gear. As stated earlier, I really wanted all Dodge but this thing fits so well. I got it from my former employer for the outrageous price of $20.00. He wanted $10.00 and all I had was a $20.00. When he started walking to the house I said just keep it!
|
 It was special ordered with the heavy dutiest parts available at the time. Dana 60 front and corporate 14 bolt rear with 10 1/2 inch ring gear. Factory 4:56 gears and I drove this truck for years for them. This was my shop at the time. A bank barn with wood floor. Note the air conditioning(snow coming in the door) It was special ordered with the heavy dutiest parts available at the time. Dana 60 front and corporate 14 bolt rear with 10 1/2 inch ring gear. Factory 4:56 gears and I drove this truck for years for them. This was my shop at the time. A bank barn with wood floor. Note the air conditioning(snow coming in the door)
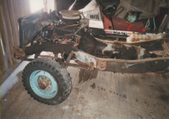
|  Prior to finding the WC I started out with a 61 WM300. I didn't think I'd ever find a WC40 and as soon as I had the cab on I found the WC40 in Colorado. Put the WM all back together and it will be a future, stocker, project. Prior to finding the WC I started out with a 61 WM300. I didn't think I'd ever find a WC40 and as soon as I had the cab on I found the WC40 in Colorado. Put the WM all back together and it will be a future, stocker, project.
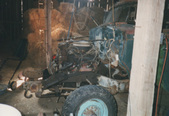
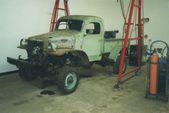
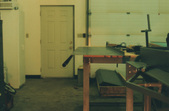
|  Me with a torch. This is when I decided I'd better build a shop to work in. I'd hang around hours making sure nothing was going to smolder up. While making the cab mounts, I must have put that cab on and off 50 times. Me with a torch. This is when I decided I'd better build a shop to work in. I'd hang around hours making sure nothing was going to smolder up. While making the cab mounts, I must have put that cab on and off 50 times.
| 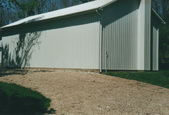 Took about a year of spare time and built this. It's 24' X 50' with 14' ceiling. 12' X 12' overhead door with concrete floor. MUCH better to say the least. Took about a year of spare time and built this. It's 24' X 50' with 14' ceiling. 12' X 12' overhead door with concrete floor. MUCH better to say the least.
|
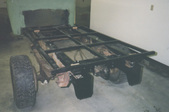
 Cab on with front end blocked in place as well. Bed laying on blocks trying to get the positioning and gaps right. This takes forever as one change can effect a bunch of stuff. Cab on with front end blocked in place as well. Bed laying on blocks trying to get the positioning and gaps right. This takes forever as one change can effect a bunch of stuff.
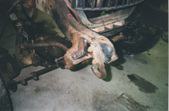
|  I need to take 13 1/2 inches out of the center of the frame. This is exactly the amount of straight in the frame so it worked out perfectly. I need to take 13 1/2 inches out of the center of the frame. This is exactly the amount of straight in the frame so it worked out perfectly.
|  Close up shows what I mean. Close up shows what I mean.
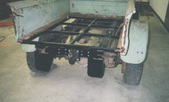
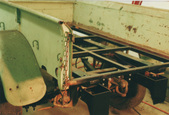
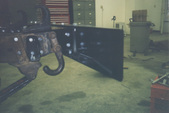
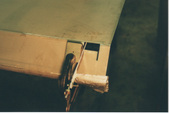
|  From here on, everything you see painted black I made from scratch. I took the rivets out of the rear cross member. ( Frame work and springs for how to) Made up a suitable, strong design for the pintle hook. I also made up the rear bumperettes from flat plate, copying the originals. From here on, everything you see painted black I made from scratch. I took the rivets out of the rear cross member. ( Frame work and springs for how to) Made up a suitable, strong design for the pintle hook. I also made up the rear bumperettes from flat plate, copying the originals.
|
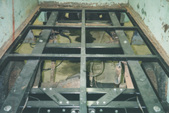
 The rear bed frame was made from box tubing and the frame runners were sculpted from larger box tubing. Cut the long swooping curves with a sawzall and laid flat plate in. Heated to bend it and welded it back into a tube. All corners rounded and smoothed. The rear bed frame was made from box tubing and the frame runners were sculpted from larger box tubing. Cut the long swooping curves with a sawzall and laid flat plate in. Heated to bend it and welded it back into a tube. All corners rounded and smoothed.
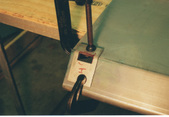
|  Put the bed back on for fitment check. I'm using 3/8" tread bright aluminum for the floor. Planning on new bedsides but these will serve as guides. Put the bed back on for fitment check. I'm using 3/8" tread bright aluminum for the floor. Planning on new bedsides but these will serve as guides.
|  Six bolts with rubber isolators hold it in place. Getting the fit and gaps right is crucial at this time. It takes a long time to get everything right but it pays off on final assembly. Six bolts with rubber isolators hold it in place. Getting the fit and gaps right is crucial at this time. It takes a long time to get everything right but it pays off on final assembly.
|  I debated on a wood floor but In decided against it. In picking a theme if you will, I thought the Tread Bright would go better and I'd use it in several places to tie it all together. I debated on a wood floor but In decided against it. In picking a theme if you will, I thought the Tread Bright would go better and I'd use it in several places to tie it all together.
|
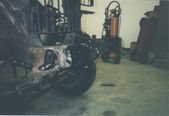
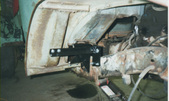
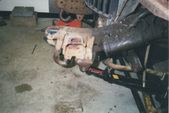 Up next is the front frame horns. I wanted to keep the Chevy hooks and add the Dodge hooks on the top as well. The bracket behind the hook is a front end mount for a large rubber washer. It would have to be changed to look right, Notice the frame end is rounded and the metal wraps around. I have to lengthen this and open it up as well. Up next is the front frame horns. I wanted to keep the Chevy hooks and add the Dodge hooks on the top as well. The bracket behind the hook is a front end mount for a large rubber washer. It would have to be changed to look right, Notice the frame end is rounded and the metal wraps around. I have to lengthen this and open it up as well.
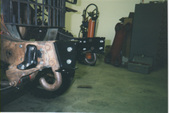
| 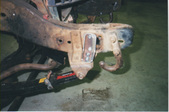 I took the mount and sliced it just off the edge. then brought the other edge in and rewelded it to make it look like the rear one. You have to have these and they must be stout as it's the spring perch support. Looks better to me now. I took the mount and sliced it just off the edge. then brought the other edge in and rewelded it to make it look like the rear one. You have to have these and they must be stout as it's the spring perch support. Looks better to me now.
|  From the front you can see the edge. Frame horns are next and notice their shape. From the front you can see the edge. Frame horns are next and notice their shape.
|  Bad pic but they are done here. I'm making my own bumper changing from the original C channel. I always thought it looked too small for the truck so I'll add some width to it. Bad pic but they are done here. I'm making my own bumper changing from the original C channel. I always thought it looked too small for the truck so I'll add some width to it.
|
 You can see it a little better here. Double gussets running both ways and give a lot of meat to the hook mounts. You can see it a little better here. Double gussets running both ways and give a lot of meat to the hook mounts.
| 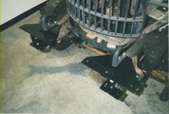 Top angle plates made and the act as strengthening points for the top hooks and bumper. Bumper will slide over both top and bottom brackets to make it look clean. Top angle plates made and the act as strengthening points for the top hooks and bumper. Bumper will slide over both top and bottom brackets to make it look clean.
|  Bumper made and on. It was made from a rounded box beam, I V cut it and bent the ends in and welded/ground smooth. Ends were cut on 45's and inlaid with the rounded edge so it looks the same all the way around the edges. Bumper made and on. It was made from a rounded box beam, I V cut it and bent the ends in and welded/ground smooth. Ends were cut on 45's and inlaid with the rounded edge so it looks the same all the way around the edges.
|  Hard to show but you can see where the V cut was, I left that weld for proof! Hard to show but you can see where the V cut was, I left that weld for proof!
|
 Cab and fender mount brackets done. I borrowed from the original design but due to different frame the sizes had to change. The Cab mounts were made from a single piece of 3/16" steel like originals. Heated and bent on itself, then welded. Cab and fender mount brackets done. I borrowed from the original design but due to different frame the sizes had to change. The Cab mounts were made from a single piece of 3/16" steel like originals. Heated and bent on itself, then welded.
| 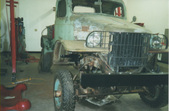 Beginning to take shape. The cab hood and front end gaps are very tricky on these. Lots of time and pulled hair on that part of this. Beginning to take shape. The cab hood and front end gaps are very tricky on these. Lots of time and pulled hair on that part of this.
|  I'm happy with all the gaps and wheel placement. Looks odd now though with small tires on it. I'm happy with all the gaps and wheel placement. Looks odd now though with small tires on it.
| 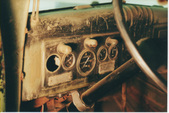 Here is what makes the WC 40 so uncommon and easily identifiable. They, along with the WC 41 were the only closed cabs that came with all round, standardized gauges, No 1939 - 1947 2wd's or 1946 - 1968 Dodge Power Wagons had them. You can see here that I have centered the steering column to the gauges. No modifications were done to the cab for this either. Here is what makes the WC 40 so uncommon and easily identifiable. They, along with the WC 41 were the only closed cabs that came with all round, standardized gauges, No 1939 - 1947 2wd's or 1946 - 1968 Dodge Power Wagons had them. You can see here that I have centered the steering column to the gauges. No modifications were done to the cab for this either.
|
 My door latch assemblies were real loose and you can see the gaps around the pin. I made up new shafts and installed them. My door latch assemblies were real loose and you can see the gaps around the pin. I made up new shafts and installed them.
| 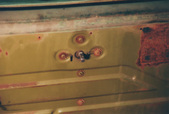 I actually ground them out using a surface grinder. They are nice and smooth now. I actually ground them out using a surface grinder. They are nice and smooth now.
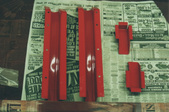
| 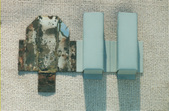 Starting on the bed next. I ordered new bedsides from Mack Products, 660-263-7444. I ordered them with no holes as the military beds are different from the 2wd's. They did the length,bottom 90 top 45 and round edge. I'd highly recommend them for your bed needs. I flattened an original center pocket and traced a pattern. Then bent a set up after cutting out. Starting on the bed next. I ordered new bedsides from Mack Products, 660-263-7444. I ordered them with no holes as the military beds are different from the 2wd's. They did the length,bottom 90 top 45 and round edge. I'd highly recommend them for your bed needs. I flattened an original center pocket and traced a pattern. Then bent a set up after cutting out.
|  Thinking ahead I finish painted the inside of the pocket as you can't get in there once attached. Thinking ahead I finish painted the inside of the pocket as you can't get in there once attached.
|
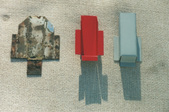
 I got 4 front pockets off of 2 different standard 2wd 1939 - 1947 Dodge trucks. the rears are always messed up it seems and can easily weld the holes shut on the fronts. I painted these inside as well. Militarys had a shelf , if you will, inside the pocket to hold thew bows up, That's the only difference between them and their 2wd cousins. I got 4 front pockets off of 2 different standard 2wd 1939 - 1947 Dodge trucks. the rears are always messed up it seems and can easily weld the holes shut on the fronts. I painted these inside as well. Militarys had a shelf , if you will, inside the pocket to hold thew bows up, That's the only difference between them and their 2wd cousins.
|  The bedsides arrived just before I was ready to go to work. I opened the well built crate and all looked fine as the tailgate and front panel were on top and I signed off. When I got home I took them out and both bedsides had been forked THROUGH the bottom and dented badly. I called the trucking company and couldn't get an answer.Later found out they went out of business. Feared the worse when I called Mack Products but they said it was their responsibility since they chose them, They sent new ones and picked up the old. THAT's what kind of a company they are and I give them my highest recommendation. Here I started the layout for the pocket holes. The bedsides arrived just before I was ready to go to work. I opened the well built crate and all looked fine as the tailgate and front panel were on top and I signed off. When I got home I took them out and both bedsides had been forked THROUGH the bottom and dented badly. I called the trucking company and couldn't get an answer.Later found out they went out of business. Feared the worse when I called Mack Products but they said it was their responsibility since they chose them, They sent new ones and picked up the old. THAT's what kind of a company they are and I give them my highest recommendation. Here I started the layout for the pocket holes.
|  I made up some guides to go on both sides of the pocket hole. I'll hold them in place with C clamps. once marked in the correct position. Military had a piece of the 45 bent metal bent down into the pockets where the standard truck did not. I wanted the detail so that is why I ordered them blank as opposed to trying to explain what I wanted. I made up some guides to go on both sides of the pocket hole. I'll hold them in place with C clamps. once marked in the correct position. Military had a piece of the 45 bent metal bent down into the pockets where the standard truck did not. I wanted the detail so that is why I ordered them blank as opposed to trying to explain what I wanted.
|  Drilled a hole and roughed them in. Then I switched to a hand file and inked the patterns edges. If I hit ink on both sides patterns I knew it was straight and flush. Just worked my way around. I had drilled 2 upper corners to start the rounded edge. Touched up with a round file there. Drilled a hole and roughed them in. Then I switched to a hand file and inked the patterns edges. If I hit ink on both sides patterns I knew it was straight and flush. Just worked my way around. I had drilled 2 upper corners to start the rounded edge. Touched up with a round file there.
|
 Flap slot was a little over an 1/8 inch wide. I cheated and modified a hacksaw with multiple blades and did it all at once. End of slot was rounded with round file again. Flap slot was a little over an 1/8 inch wide. I cheated and modified a hacksaw with multiple blades and did it all at once. End of slot was rounded with round file again.
|  I used a hardened block on the edge to serve as a guide and keep it straight. Yes, I cheat a lot! I used a hardened block on the edge to serve as a guide and keep it straight. Yes, I cheat a lot!
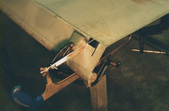
|  Now to bend the tab nice and even. I clamped it down on the table first. I pushed the tab slightly down with a block of oak so I could get a set of Vise Grips with metal angled shoes to bend it evenly. Now to bend the tab nice and even. I clamped it down on the table first. I pushed the tab slightly down with a block of oak so I could get a set of Vise Grips with metal angled shoes to bend it evenly.
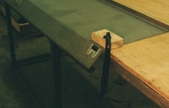
|  Then clamped a steel backer on the 45 and put 2 knife edged pieces on the tab held with a Vise Grip. Keeps it all straight and gives me more leverage as well. Then clamped a steel backer on the 45 and put 2 knife edged pieces on the tab held with a Vise Grip. Keeps it all straight and gives me more leverage as well.
|
