1
I had seen a video on YouTube about making small guitar amps from old radios, record players or anything that had a vacuum tube amplifier in it. I bought three old portable record players on EbAY, rather cheap. The first one had no salvageable parts as far as the amplifier went. The case was in nice shape, so I gutted it and began using that as a basis for the project. I had to move, and never got around to completing it. So I picked up where I left off.
| 
2
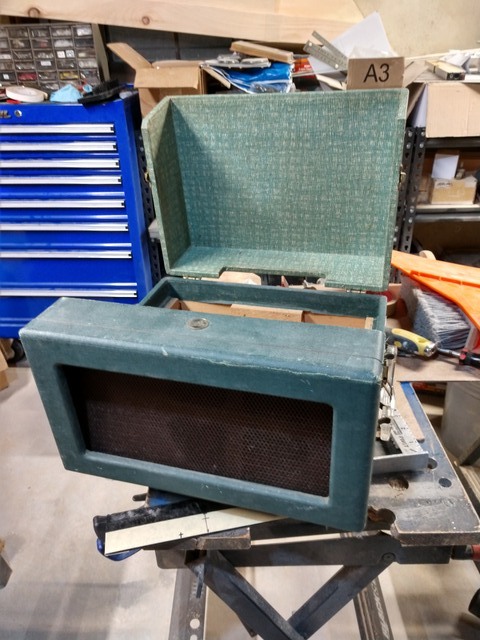
The grille was a mesh of a plastic like material. It got trashed when I tried to remove it. I had made a new one covered it with some grille cloth I got from PartsExpress.com. I used a guitar speaker I also got from them. The front is made from Masonite. I copied it as closely as I could to the original. There was some cool retro lettering on the grille, but the plastic had degraded so much, it disintegrated when I took it off. This is just sitting inside, not fastened in any way.
| 
3
I think it looks okay. The little thing on the top right side is a solid state amp module. That's what I'm hoping to use to power this baby.
| 
4
There's a large gap on the lid that is where I plan to mount the amp. I'd like to drill as few holes as possible in this, to preserve the old timey look.
|

5
I found a piece of black ABS plastic in my stash and cut it to size. I tried to mark the hole for the volume control knob and DC power jack as accurately as I could. If I was smart, I'd have made a paper template. But I'm not so my calculations were a bit off. In any case, I put some masking tape across the strip and drilled the marked spots.
| 
6
I have two holes, now I fit the amp through and discover that I was off enough that the holes need to be enlarged, to accommodate the amp.
| 
7
This is how it looks with the tape removed. The shaft nut hides the oblong shaped hole I had to extend with a small round file.
| 
8
This is the back side of the amp and it's mounting. I should make it a bit sturdier, but I'm not interested in turning this into a marathon project. If the need arises, I can always find some strips of angle aluminum and modify it later.
|

9
To fasten the grille, I have some strips of scrap wood leftover from my speaker stands. I'll use them to clamp the grille to the front face. Again I use masking tape to mark the drill holes. I'll use machine screws and trim washers to stay within the retro look.
| 
10
So four screws in front...
| 
11
...and two in the back, should be adequate to do the job.
| 
12
I hope the drill doesn't grab the material and let it wind around the bit. With any luck, the tape will help prevent that.
|

13
Six holes drilled and now it's time to remove the tape.
| 
14
The front looks alright. The metal is a bit too new to fit right in, but it doesn't take too long for a patina to build up on metal.
| 
15
This is how it will look during use...if it works.
| 
16
I made a serious blunder, what I thought was the power input is actually the source jack. The little green post with the two screws in it is the power input. I had drilled a hole and put a quarter inch guitar jack in the rear panel. Now I've got to remove it and figure out some way to make it look like it belongs there.
|

17
The silver circle on the bottom is the jack that has to come out. The power comes from one of those A/C to D/C converters, that're called Walabots on the electronics forums. Don't ask me where that name came from. I have a collection of them , I'll rifle through to find one that will be right.
| 
18
In the mean time, I secured the speaker wire using cable clamps on the strips of wood that once supported the record player turntable.
| 
19
A clamp on the back of the panel and that should eliminate and rattling of wire.
| 
20
This is a roll of automotive sound deadener, from my days as an automotive electronics installation. This is a Brand X, that wasn't particularly good. Dynamat is the standard most places use, but I found that Damplifier Pro was MUCH better. It's also more expensive, oh well, ya get what ya pay for.
|

21
I cut it to size and made notches where the wooden strips clamp the grille to the face.
| 
22
After maneuvering it into place, I used a J-Roller to press it into place. The bottom piece is only 1/4 inch Masonite, so it's not very soundproof.
| 
23
This is a twelve volt power supply I came up with. It's rated for 1 ampere. All my others were milliamps, so this won by default. I don't know the specs on the amp module.
| 
24
This is a grommet that I'll use to take up the size of the hole that I had the guitar jack in. Harbor Freight has a lot of questionable tools, but these assortments come in handy in cases like this.
|