
1
corrugated copper 1
Annealed 22 gauge Copper sheet was cut into pieces and cranked through an industrial tube wringer. I got this at Rio Grande jewelers supply but it is available on the net in several places and varying prices of a few dollars. Fun stuff! The tube wringer is pictured to the right of the Copper sheet. Very easy to use. To get good definition I placed the device on my studio work bench so that the handle was over the side and free to rotate, then aligned the copper in the teeth right on the edge. With a firm push down on the device, I cranked the sheet metal through. The first time I wasn't pressing hard enough and wasn't happy with the definition of the corrugation, so ran it through again. This is very simple, because the corrugation has already been laid in and it self aligns in the device!
| 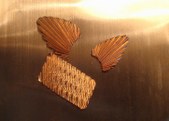
2
corrugated copper 2
the two fan pieces were corrugated in one direction. With a smooth flat nosed plier, I completed the crimps longitudinally and then crimped the ends on one end together creating fan embellishments. The rectangular piece was cranked through the tube wringer in one direction then pivoted 90 degrees and run through the tube wringer again. I've recently acquired a new resource book by Patricia McAleer titled, Metal Corrugation-Surface Embellishment and element Formation for the Metalsmith.
It's recommended that the pieces are annealed after each pass through the corrugator, but I didn't. These are experimental pieces and I was anxious to jump right into it. If more work is planned for these I would definitely anneal between tooling.
NOTE: the fan on the right is symmetrical and pleasing to the eye. The fan on the left was corrugated about 10 degrees off center and creates a little bit different look. Also the pleats don't come together as nicely on the crimped end if ...
| 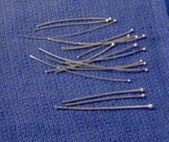
3
Sterling Ball Ended Head Pins
Various gauges of hand made ball ended head pins! The beauty of making your own is that no matter how small the hole is (remember trying to poke a factory made head pin through a fresh water pearl???) you can pick your gauge and work with any components you like! FREEDOM!
| 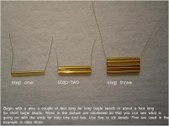
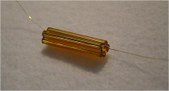
4
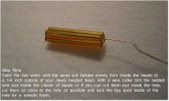
Bugle Beaded Bead Tutorial Step 1 thru 3
Step by Step with large pictures and instructions we can experiment with creating this elegant component for jewelry designing. The variations you may come up with for this idea will be limitless and I hope that you will email me with pictures of ways that you have discovered to incorporate this into your work!
Use 30 gauge wire for this technique!
All The Best!
Mona
|

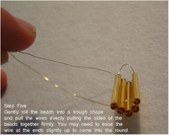
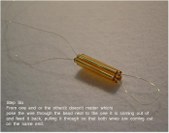
5
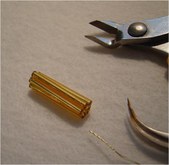
Bugle Beaded Bead Tutorial Step 4
| 
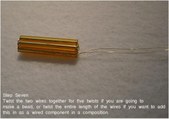
6
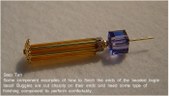
Bugle Beaded Bead Tutorial Step 5
| 
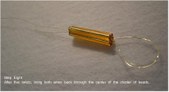
7
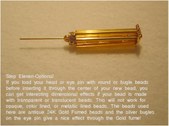
Bugle Beaded Bead Tutorial Step 5a
| 
8
Bugle Beaded Tutorial Step 6
|
9
Bugle Beaded Bead Tutorial Step 7
| 
10
Bugle Beaded Bead Tutorial Step 8
| 
11
Bugle Beaded Bead Tutorial Step 9
| 
12
Bugle Beaded Bead Tutorial Step 9a
|
13
Bugle Beaded Bead Tutorial Step 10
| 
14
Bugle Beaded Bead Tutorial Step 11
| 
15
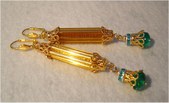
Golden Column Aqua Earrings Bugle Beaded Beads
"These are stunning...I wil..."
"Thank you Patty! They woul..."
"This is a stunning pair of..."
View Comments...
| 
16
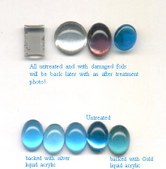
Acrylic Treated Glass Cabochons
I tried an experiment today that worked beautifully!
First I soaked the cabochons in a small ceramic dish of rubbing alcohol.
After a 10 minute soak, I used a soft rag and removed the remnants of
damaged foil finish from their backs. After they were dry and as clean
as I could possible get them(it did take quite a bit of rubbing to
take them back down to really clean), I inverted them with the flat
side up and covered the backs liberally with that crazy Pearlescent
liquid acrylic that I keep mentioning through my experiments with Polymer.
I used Silver Pearl liquid acrylic on most of them and then when dry I
rolled them over to see what I was going to get with this treatment.
While the stones are not mirror-like on the back the irridescent
effect of this liquid acrylic does offer a softened mirrored finish
that glows beautifully with a magnified pearl luster showing through
the curvature of the cabochons. Since I like this finish, I have
treate...
"This is something I would ..."
View Comments...
|
17
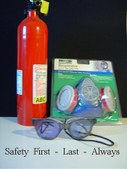
Safety First - Last - Always
Although lampworking is exciting, fun, and rewarding, never lose sight of a primary goal that should remain ever present in your thoughts and practices. Safety is a serious and important consideration. There are many publications that carefully detail safety precautions of working with hot glass and this notice is not meant as the end all authority on safety. I encourage you to add publications to your library on hot glass that detail explicitly how to manage your creative outlet safely.
Enhaling fumes from metal leafs or enhaling glass particles from frits and enamels can create long suffering and disabling conditions in your lungs. Burns from hot glass can damage your eyes, skin, clothing, and even set your work area on fire if you are not cautious. Please educate yourself as thoroughly as possible regarding safety associated with working hot glass.
| 
18
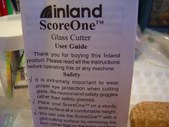
The Tool for Glass Cutting Smalls
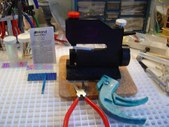
OK, for those of you who actually already know how to cut glass you will laugh out loud, and that's ok! I am laughing too!!! :) For over a year the glass cutting tools that I ordered sat in my storage closet waiting for me to find the nerve to tackle glass cutting. I don't do stained glass and have never cut a piece of glass in my life, up to now! I wanted to learn to cut glass so that I could split those pricey 1inch by 3 inch dichroic plates into strips. Those have also been parked unused for over a year. I bought all of this stuff at eBay from different sellers with stores.
Bidding is for the birds. I want my stuff right now...even if it is going to sit in the closet for more than a year! hahahahahaha
This is one of the glass cutting devices I ordered. The "Score One" is a wonderful device. Light weight, easy to operate...after all I am using it right?, and handles cutting thin strips like a dream except for very nubby gnarly textured glass. I will talk about tha...
| 
19
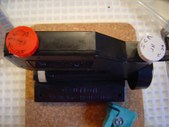
The Tools
First is the black thingy with red and white knobs. This is the Inland "Score One".
The red handled plier looking things are called grozing pliers. Here is a link to some offered at eBay with a complete description on how to use them. They are used for controlled nibbling on an uneven score line or as breaking pliers for parting thin scrap from the score line.
http://cgi.ebay.com/KNIPEX-German-Grozing-Pliers-Professional_W0QQitemZ2668558560QQ
The Blue funny looking pliers on the right are Grippers. These two pliers allow me to grip opposite sides of the score line. With a gentle downward pressure on the right, the glass snaps apart right along the score line! This process works fine, but if you are into tools like I am, get yourself a running plier. If you line up the line of a running plier with the score on your glass and gently press, separating the score line will only require one tool, instead of the two listed above. Just like to mention all of the options! Different th...
| 
20
Personal Adjustment on Score One
You would think the maker of this tool would make it easy to figure out which way to turn those knobs to get the desired function! Oh no...that would be to easy! I used a permanent marker and while reading the instructions for each knob, wrote abbreviations and arrows for decrease, increase on the tension and elevation control knobs. Every time you put a new piece of glass under the cutter, you will probably have to readjust these knobs, so get to know them well. Setting the tension and height at their best, will give you an even score line which results in a beautiful cut. These directions come with the tool and lay out in detail how to trouble shoot bad results. I have had minimal poor result following those instructions. Practice makes for a better operator of course. I only spent about 10 minutes with this device before I was getting very nice cuts of glass!!
|
21
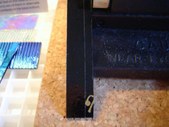
Scored Glass
Pressing down on the lever on the right side of this tool raises the scoring blade and allows you to place a plate of glass under the cutter. Adjust the glass under the scoring blade to the width that you want your strip to be and then gently lower the scoring blade until it is resting on the glass right and the edge. Guide the glass with your left hand and turn the wheel on the right side of the tool. This drives the glass evenly beneath the scoring blade and continue until you roll of the edge of the glass. This will be the edge most near you. If you enlarge this picture you will see a clean, even score in the glass.
| 
22
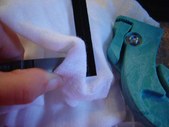
Left Grip on Glass
If your are not using the running plier I mentioned before, this is the two tool method I started with. I used a soft cloth to pad the grozing pliers on the left and gripped the glass at the edge near the score. With the right hand I used the gripper and grasped the opposite side of the score line and with a gentle downward tension on the right, the glass snaps right along the score line. I was taking pictures with one hand, so take a look at the next picture to see position of the gripper on the right!
| 
23
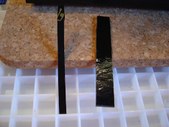
Right Grip on Scored Glass
A bit fuzzy, but you get the idea I hope!
| 
24
Split Glass
This is the back side of the glass, and you can see what a sweet even line I got with this method!
|