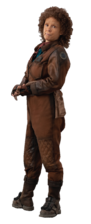
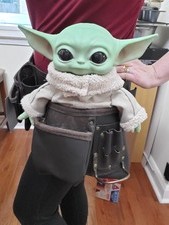
1
| 
2
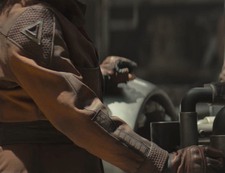
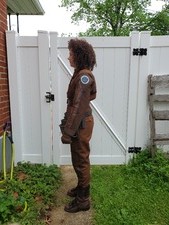
The front of the sleeve looks like leather to me, so that's what I'm using.
| 
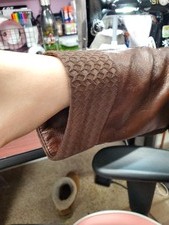
3
The knees have a sheen, so I'm going to use the same leather as the sleeves, here. I'll quilt it on a fleece back and then add it to the leg fronts BEFORE sewing the side seams closed.
| 
4
Great shot of the boots. I don't know what those are, but I will probably use foam for them.
|

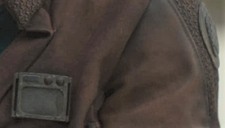
5
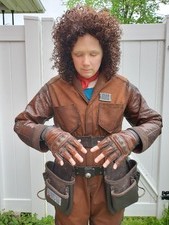
I love that this shows the sheen of the leather sleeve front. You can also see the rectangular bit is scrunched up, so it's not a solid plastic greeblie. It looks more like a patch.
| 
6
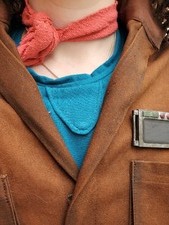
This shows the shirt detail and open collar really well. The collar opening looks like it was tacked down into place, which you can see in a later photo.
| 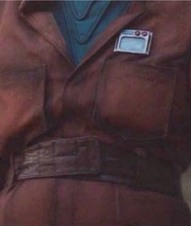
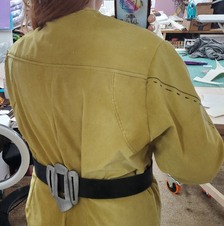
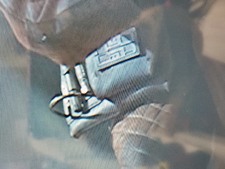
7
Belt detail and front loops. You can also see the pocket shape well. These are gusseted bottom patch pockets. They expand at the bottom so you can put larger things in them without straining the pocket. Kind of a cool detail for a TV costume to include.
| 
8
You can see the pocket gusset here and how it expands. It's not a flat pocket.
|

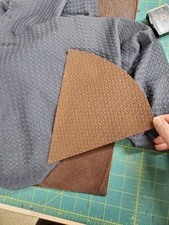
9
| 
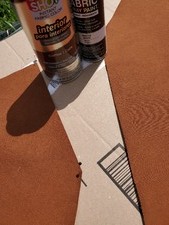
10
If you look in the upper left corner, it looks like a tack stitch to keep the collar and opening in place.
| 
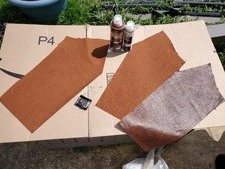
11
Top left again, you can see how the back of the triangle insert matches the yoke on the back of the jumpsuit.
| 
12
|

13
| 
14
| 
15
| 
16
|

17
Her boots vs the moto boots I bought. I removed the buckle straps and will make a piece for the calf of the boot.
| 
18
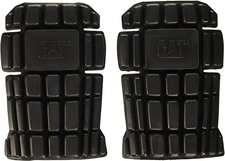
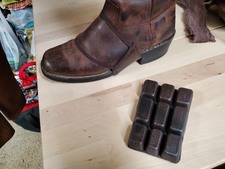
These CAT Knee Pad Inserts from Amazon were cheap at $10 and exactly what I needed! I cut the bottom 9 central pieces out as one (so it's 3x3) for each boot topper.
| 
19
I tied it on with a shoelace as a test and it's PERFECT!
| 
20
Her gloves vs the Shima Motorcycle gloves I found on Amazon. They're the screen accurate gloves.
|

21
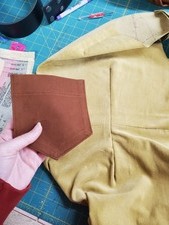
| 
22
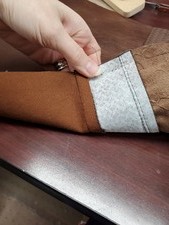
| 
23
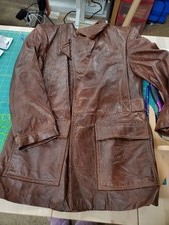
For her front sections of the sleeves and the knee pads, I bought an old leather jacket that was exactly the right color and weathering. I carefully took this apart for the pieces.
| 
24
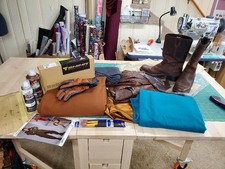
A completely disassembled jacket! You can also see some of my other supplies, like the cotton twill and shirt fabric. The black was going to be for the textured areas, but I found something better and stashed that for later.
|
25
I dyed the twill with 4 bottles of Dark Brown RIT liquid dye, and it still wasn't quite as dark as I would have liked. However, the weathering process will help that.
| 
26
My sleeve mod for the inset and front and back. I will add a 1/2" SA to the cut areas to it fits back together correctly. I've already cut the leather from the jacket sleeves. I was able to JUST make this fit!
| 
27
They dye job came out the correct color to go with the leather, but could have been a touch darker. Weathering will help it.
| 
28
The textured fabric I found from Joann's. It's a knit and was in their performance/Dance knit section with all the sparkly stretch fabrics. It only came in black and grey though.
I fused a piece to interfacing to keep it from stretching anymore and then used a sunflower yellow spray paint as a base coat, and brown fabric spray to get the color I needed. I am really happy with how it worked out! I'll do this same thing for the collar and cuffs too.
|
29
Weathering the twill for the sleeves. This was done before sewing, as I didn't want any spray paint to get get on the leather. That will be dry brushed later on. I used pins to keep it from blowing away off the cardboard.
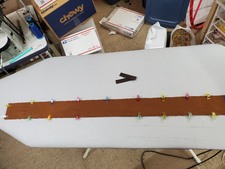
| 
30
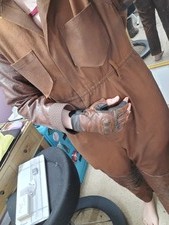
The twill sleeve pieces before painting and my leather piece for reference.
| 
31
After painting! I used the brown spray and then a light dusting of black on the edges, and then another coat of brown to soften the black a little.
| 
32
The leather, insert, and twill. I really like how this is looking! Everything has to fully dry before I can sew up the sleeves and add the cuffs. I also have to make the rectangular patch thing for the sleeve before sewing the sides closed.
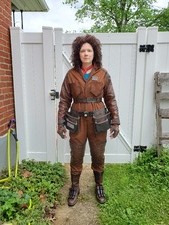
|

33
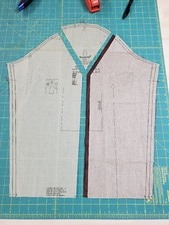
The pattern, Simplicity 8722, is HUGE. I used my measurements and sewn straight up, as is, I could fit two of me in it! This was also after taking 2.5" up in the bodice. The waistline of the pattern was at my hips! I'm 5'7" with a short torso, so I'm used to SOME adjustment there, but this was a LOT. Even though the pattern showed a very petite looking woman in this pattern... there is no way it wasn't modified to fit her better for the package photos.
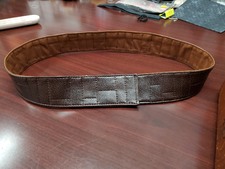
| 
34
Adding a belt over it, only made it look worse. There were so many drag lines and it just looks ill fitting.
| 
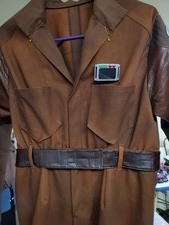
35
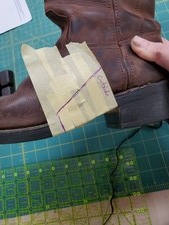
I decided to try adding in my darts as planned... this helped a little, but there was still a lot to do.
| 
36
At least the back was starting to look okay. I added in darts and a sway back adjustment.
|

37
I serially took in the side seams and legs, about 4" in at the waist, 2" at the hips, and 2" in the legs. This is when I could start adjusting dart placement. My shoulders were also graded and shaped back as they were quite broad.
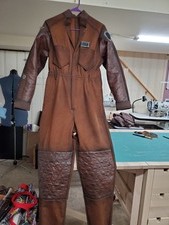
| 
38
I basted in elastic at my waist measurement. This helped bring the suit in around me evenly and it will lay nicely under the belt like this.
| 
39
My bellows pocket that I drafted from scratch! I'm going to create a separate post with a tutorial for doing that.
| 
40
Peli's pocket sits just above her belt top, so that is where I put mine. The point of the pocket also lines up with the bottom dart. The bodice dart is hidden under the pocket.
|

41
It bellows out perfectly at the bottom!
| 
42
The size and shape and placement look about right to me based on my own size.
| 
43
For the back arm accent piece, I stitched a basting line 1/4" from the edge and used this to help ease the edge over and iron it flat. It's a great little trick for curved edges that you need to fold over and iron.
| 
44
The stitches help to ease the curve into place.
|

45
Pinning the curve onto the back prior to adding the yoke or stitching up the side seams.
| 
46
What the yoke pattern looks like laid flat. You can see the dashed lines that mark where the true shoulder seam will be under the yoke. This is also helpful when lining this up on the garment.
| 
47
The yoke and the arm accent with correct dart placement on the right side of the photo.
| 
48
The Yoke was stitched onto the back and flipped up. It was basted at the neckline and then the front sections were top stitched down, and the arm area was basted down. This hides the true shoulder seams of the jumpsuit.
|

49
The sleeve is the right length here, as hers is also short on her. There will be a 2" cuff added, so I just have to adjust it a bit. The side with the pocket on it was also tailored even more to fit me better.
| 
50
The side with the pocket has the proper dart size and placement and was tailored in even more to fit it to me better. The legs were still too loose, so they were tapered in. You can see the difference on the two sides.
| 
51
This is the original pattern in the tissue paper underneath with my heavily modified and marked up pattern on top. You can see how much had to be take out and changed to fit my body and shape. The leg length on my front mockup has to be let down 4.5". I had to squeeze this onto what I had for mockup fabric, so I didn't bother with complete length since that wasn't super important.
| 
52
The back of the pattern with my mods. You can see the difference.
|

53
All of my pattern pieces (minus the collar and knees) laid out and ready to use!
| 
54
For the ladder patch I used canvas and leather with some snap and grommet hardware for a greeblie.
| 
55
I sewed it to the sleeve prior to adding the cuff.
| 
56
The cuff lining was sewn to the cuff outer and then under-stitched. That was then sewn to the sleeve.
|
57
Push your sleeve seam allowance towards the cuff, this will end up hidden inside the cuff.
| 
58
Sew your sleeve down the side.
| 
59
To secure the lining, you'll stitch from the outside, in the ditch of the seam from the sleeve to the cuff outer. This will catch the lining underneath.
| 
60
You can see how it caught the lining here. The raw edges of your cuff to sleeve seam are trapped inside, giving you nice neat finish.
|

61
Fold the raw edge of the cuff lining under and then flip the lining inside (shown inside out here).
| 
62
You can see how the under stitching gives the edge a nice crisp finish without visible stitching outside. This is one of my favorite techniques for garment construction.
| 
63
Now we have a perfectly finished sleeve.
| 
64
|

65
| 
66
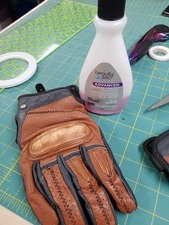
To weather the gloves I started by sanding off the logo and then wiping it down with acetone to remove any finishes.
| 
67
| 
68
|
69
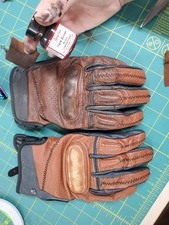
I then used Angelus leather paint rubbed into it to make it look grimey.
| 
70
I then cut the fingers off.
| 
71
The patches were made from marine vinyl and got glue sticks and then painted and weathered.
| 
72
|

73
| 
74
| 
75
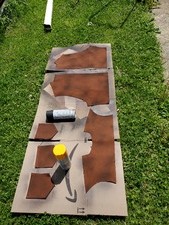
A sunny day was just what I needed to paint my fabric after cutting out all the pieces. I just randomly painted it to look old and grimey.
| 
76
I started the jumpsuit construction with sewing down the darts and then adding the pockets.
|

77
You can see the true color and paint weathering I did to the fabric before construction.
| 
78
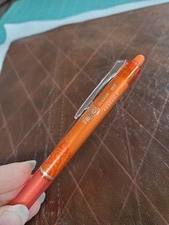
A Frixion gel pen was used to mark the quilt lines. It wipes right off when you're done.
| 
79
I used my industrial to quilt the leather to a low loft fleece interfacing. I wanted the stitches to show, so I needed my thicker thread on the industrial.
| 
80
The screen accurate tool belt was acquired from Harbor Freight. I had to remove the front central pouch and change up the closure.
|

81
Someone mentioned that the greeblie on her tool belt looked like a slightly scaled down Kylo belt buckle. So I found an Etsy seller who can make me one. I had it printed at 50mm x 98mm
| 
82
That looks like the greeblie lights up!
| 
83
| 
84
You can see that I removed the belt buckle and excess belt and added heavy duty snaps to close it instead.
|

85
I was so happy with the construction of this so far! I had added an elastic in the waist and then the belt loops.
| 
86
The elastic in the waist is the same as my natural waist measurement. It's not meant to be tight, but to just gather up the rest of the fullness of the jumpsuit and ease it around my waist. This gets covered with the belt outside, so you never see the stitches.
| 
87
Trying it on for the first time! It's fits and looks great!
| 
88
|

89
| 
90
Making her jumpsuit belt used a crackled faux leather from my stash and jumpsuit fabric for the back. The soft loop side of velcro was sewn to the fabric first.
| 
91
| 
92
The completed belt! I free hand stitched the geometric design on, trying to mimic that on her belt.
|

93
| 
94
The jumpsuit and belt before I added some spot weathering to the jumpsuit and badge.
| 
95
The boots were easy, I used painters tape on the boot and drew my pattern shape on that. I then cut it from vinyl and sewed the two layers together with 1/4" brown elastic loops in the side seams.
| 
96
|

97
For the boot armor, I used paint to weather them first.
| 
98
Scrap leather was glued to the back to give the foam some stability. It's thin in those grooved areas and would be prone to tearing over time. This will help keep them from falling apart.
| 
99
| 
100
|

101
I used scraps of leather to make the band at the top. After seeing the real costume in person at Celebration, these strips are stitched with the same geometric design as her belt. So I'll probably go back and add that to mine at some point.
| 
102
The jumpsuit after a lot of dry brush spot weathering on the seams and edges.
| 
103
| 
104
I completely didn't take any photos of the shirt. But I used the Patterns for Pirates 'Basic Tee' pattern as my base and added the triangle pieces to the front before adding the collar. I want to remake the front as she has 3 triangles and they're not centered like mine are.
|

105
| 
106
| 
107
| 
108
|
109
| 
110
| 
111
| 
112
|

113
| 
114
| 
115
| 
116
|

117
| 
118
| 
119
| 
120
|

121
| 
122
| 
123
| 
124
|

125
| 
126
| |
