|
Padme Naboo Family Gown - Deleted Scene
I could only buy 6 yards, all that my budget would allow at $10/yd. I managed to make it work with some clever pattern placement though ;-) I'm stingy with my fabric and like to avoid wasting as little as possible. I studied the gown from various angles (yay for the runway shots!) and drafted a pattern for the skirt and bodice. Patterning the bodice took a little thinking, but I was quite happy with my results.
The skirt was a breeze to put together after a little tweaking on the mock up. The front panel is self lined from what I can tell in the runway shots and the rest of the skirt is unlined. You can see the hem from the inside quite clearly (I need to hand sew this *ugh*). I sewed a ribbon into the waist and folded it over and hand stitched it down. Two dress hooks keep it closed and there is one small hook/eye half way down the front to keep the panel shut.
The bodice was a little harder with all the fancy seams and lack of seams where there usually would be (in the arm area). I went through 4 mock ups here until I found what I liked. The top portion where the neck is connected is interfaced and self lined, the bottom portion that has the strap thingy is the same way. The middle section with the sleeves is just one layer of fabric, I would have self lined this too, but I ran out of fabric :-( The one layer works fine, it just leaves the inside looking a little less finished than I prefer. The wrist hem is hand stitched as well. I managed to finish the bodice in about 3 hours. All that is left on it is the beading. I would KILL for some of those trocus shells, but I lack the funds and time right now to dye/drill them :-( I managed to find some beads that will work for now, but I want those shells eventually.
July 15, 2010 O M G!!! Perfect fabric was found in NYC!!! |
Date(s): TBA at Celebration V. Album by Kristin and Will. 1 - 22 of 22 Total. 3568 Visits. |
|
| Sign the Guestbook. Displaying 1 of 1 entries. |
what kind of fabric did you use. is it silk? i want to make this costume as well. if you could tell me that'd be awesome. thanks, aalya :)
- aalya rain | http://aalyarain.blogspot.com/, Wed, 24 Aug 2011 7:02PM |
|

1
Photo from www.padawansguide.com
| 
2
| 
3
| 
4
| 
5
| 
6
| 
7
Photo by me
| 
8
| 
9
My fabric has the same sheen in real life, the scanner killed any sheen though. I need to photograph this under the same conditions to really show how close it is. The grain/weave is the same and so is the way the
fabric behaves when stretched and moved.
The back is 'pad stitched' in place so when you cut out a shape, the two layers don't seperate.
Original fabric picture from www.padawansguide.com
| 
10
My fabric as photographed with the flash on in low lighting. The only photo shopping done was to add the words and the comparison picture.
| 
11
Almost done headband. Once it's dry I can add the rub n buff and detailing on the strips.
| 
12
Skirt Front Mock Up
| 
13
Skirt Back Mock Up
| 
14
Finished skirt front
| 
15
Finished skirt back
| 
16
Almost completed costume
| 
17
The white things are the clips for the back. They just need to be painted up.
| 
18
Add some beads and call it a day!
| 
19
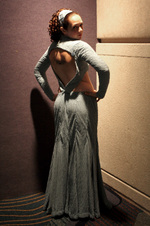
LOVE how this shows off my tattoo!
| 
20
| 
21
| 
22
| |
|
| | |
| |
|
|
|
|
