
1
Original Reference Image - "Vanity Fair"
Connix is known for her distinct "leia" buns and her Lt rank badge on her chest, over the rebel bird.
| 
2
This was used to determine the width of the quilting as well as the Rebel Symbol size and Rank Badge size.
| 
3
Photo found on Instagram of Connix (Billie Lourd) from the side during takes. Lines appear to be about 1/2" apart.
| 
4
Thread and Fabric. The thread actually matched the fabric really nicely in person.
|

5
| 
6
Porgs help with pattern drafting. This is the front pinned in place.
| 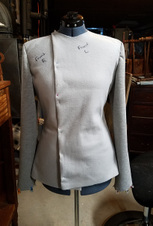
7
This was after all the pieces were drafted the seams altered for fit, and then everything basted together for a final fitting.
| 
8
The back of this fits so well.
|

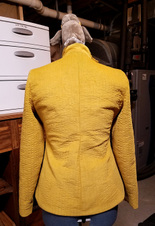
9
I have some long arms.
| 
10
I used a belt from my costume stash to check how it looked on the jacket while drafting. I didn't want the jacket to be too full and bunch up under the belt excessively.
| 
11
Since I was happy with the fit and shape of the jacket mock-up, I cut out the main fabric pieces and spray basted them to the fleece interfacing. I then had to draw lines 1/2" apart on all the pieces... this took all day to draw out and stitch all that quilting.
| 
12
So many lines...
|

13
The front pieces all quilted and pinned to the form.
| 
14
Back side piece all quilted.
| 
15
Cat helper, always a must.
| 
16
The fronts and backs all quilted and pinned in place to check for fit again.
|

17
After quilting the arms, the body pieces were sewn together and all seams were pressed open. The arms were then set in and that seam was also pressed open. Its so perfect. My best set sleeve in 15 years of costuming :D
| 
18
I almost got the shoulder lines to line up!
| 
19
Once the main body was sewn, I repeated the steps for the lining. The lining was then sewn to the jacket at the bottom hem, and then understitched to secure it in place. The hem was then pressed flat.
| 
20
Understitching helps keep the lining from wanting to roll out from under the main fabric and peek out on the outside. You can't see it from outer fabric, since you are stitching the lining to the seam allowance.
|

21
The jacket construction is 100% complete, including snaps for closures... which I always hate sewing on by hand.
| 
22
I love how this looks.
| 
23
The front placket lines up with the lines on the jacket front, it makes me so happy.
| 
24
Side seams. It's fitted at the waist and flares out ever so slightly for a more feminine shape.
|
25
The back fits me perfectly. I have a higher waist then my dress form, so it looks like is pulling here.
| 
26
I might have made the collar a little high, but I have a longer neck, so it should still look in proportion.
| 
27
Snaps under the placket go from the tip at the neck to the natural waist line.
| 
28
There is an heavy duty snap at the bust line, to prevent me from busting out of the jacket when I move around.
|

29
The front and placket are self lined and the back and arms are lined in a beautiful silk I had in my stash. It's secretly luxurious on the inside.
| 
30
I had 5 spools of thread. Upon stitching on the last snap, that is how much thread was left on the 4th spool! Two of the smaller spools were used strictly for bobbin thread.
| 
31
I used my Silhouette Cameo to make the rebel symbol for the front. The one on her jacket is not crisp and new. It's weathered and well worn. I created a weathered looking rebel in photoshop and then cut it out in the Silhouette software.
| 
32
Perfectly weathered rebel, with minimal work.
|

33
I placed the rebel according to how it looked on the reference image. I used the quilting lines for reference, taking into account my own size vs Billie Lourd. All of the resistance officers have the rebels in slightly difference places, some don't even have the rebel at all.
| 
34
I made the rank badge out of two layers of craft foam sheets glued together. I then used nail polish to paint the rank badge. The silver section was about 4 different colors dry brushed on and then white for more wear on the edges. The red and white stripes are also nail polish.
It was what I had in my stash.
| 
35
This is in the bathroom lights which are LED. There is a strong magnet epoxied to the back of the badge.
| 
36
Lt Porg reporting for duty!
|

37
| 
38
| 
39
| 
40
|

41
| 
42
| 
43
| 
44
|

45
| 
46
| 
47
Resistance officers in crowd during TLJ. Some have 'sashes, some have rebel insignia, some have ranks, some belts are lighter than others, some have hats. Sort of a mish mosh of looks all over, probably dependent on the division.
| 
48
"Junior" officers on the left and right, no pouches on the belts here.
|

49
Fitted jacket, again, a single pouch in the back.
| 
50
Fitted back with no visible darts or vent as in the higher up officers.
This one has a cross body strap and a single pouch on the belt back.
| |
