
1
| 
2
| 
3
|

4
| 
5
| 
6
|

7
| 
8
| 
9
A great premade brooch that works just fine for the necklace peice of this costume. I also bought some wide sequined trim for a temp necklace. When I have a littel more time/money I'll make the neckalce the proper way :-)
|
10
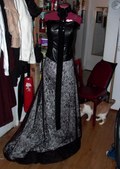
The skirt fabric is only draped here, the skirt hasn't yet been made.
| 
11
| 
12
My Finished Dress :-)
The dress form is a little high up so the mermaid trian doesn't quite show here.
|

13
| 
14
| 
15
|

16
| 
17
| 
18
|

19
| 
20
Scan of new fabric found for skirt.
| 
21
New fabric for the skirt, MUCH more accurate than the floral print I have now.
It really is black, not purple.
**This fabric was a one off from where I bought it and is no longer available.
|

22
Detailed notes of the necklace and how I think it is made.
Click "Original" to enlarge to better see the notes.
| 
23
A blown up picture of the brooch, my hoop with a sketched out version of the brooch, 3mm Swarovski Bicones, 10mm Glass jewels, 30mm long bugle bead tubes, and tiny jet seed beads. All from M&J :-)
Later added were Swarovski Sew on jewels in Marquise and Pear shapes.
| 
24
The 10mm Glass jewels for the center. Sitting on the black velvet for the choker.
|

25
My WIP next to the original. I opted for Marquise sew ons instead of trying to make the moon shaped beads (I couldn't find beads like that in NYC). I actually like my version better lol.
| 
26
Close up :-)
| 
27
Back of the skirt (simply pinned).
The tulle was added to the train to give it some volume like the original. I think it may need a little more though?
|

28
Side View
| 
29
Another side
| 
30
The two layers of tulle netting on the train. I actually took apart an old crinoline that I was going to throw out anyway :-)
|

31
I'm just holding the back of the skirt to my body for the photo. The train may be a little long, but after Dragon Con I can fix that.
| 
32
The train
| 
33
Side View
|

34
Front
| 
35
Leia likes it under the dress form :-)
| 
36
Almost done! I just need to fill in with seed beads on the top center and then add the strands!
|

37
11-20-08
A TON of vintage black glass beads from Western Germany. The large black bag on the top left has 1200 beads and the bag in the lower left corner has over 4000! There's more than enough to make my necklace MUCH more accurate and better looking :-)
| 
38
| 
39
12mm and 4mm black faceted vintage beads. I've used 1000 4mm beads and 75 12mm beads so far on the necklace strands.
|

40
Beading the necklace begins!
I've opted for heavy duty black beading wire. This will prevent the disaster that was Dragon Con. All my gorgeous silk string knotted itself together and had to be restrung at the con. The beading wire will coil nicely for storage and not tangle in transit.
Black crimps keep the beads from sliding off the bottom.
250 4mm vintage Black Faceted beads per strand.
| 
41
You can see how I used two crimps on the end. Just in case one crimp should fail, there is a back up.
| 
42
The long beaded strands. Leia was helping, so there she is at the bottom of the photo.
|

43
| 
44
Setting the grommets into the velvet neck band.
| 
45
Showing how the velvet, short strands, and long strands hang.
|

46
| 
47
The brooch piece will snap over this in the end, hiding the grommets and large snaps.
| 
48
LONG!
|

49
The new corset!
| 
50
It closes with a heavy duty separating zipper to make it easier to take on and off.
| 
51
Showing the new skirt and how the train lays.
|

52
Full view!
| 
53
The old corset from 4 years ago on the top and the newest one on the bottom.
Both were made with the same pattern, but I've since learned how to fit it to me better.
| 
54
Working on the new brooch for the necklace! This is version 2 since version 1 started falling apart after Dragon Con.
Done on black faux suede with the same beads as before.
|

55
| 
56
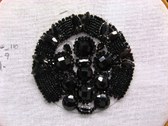
Done Beading!
| 
57
Now on to the mounting step. I drew out a circle the same size as the brooch on rigid plastic (this was an old folder from high school).
|

58
I then cut out the brooch leaving about 1/2" all the way around. I notched the edge to make it easier to fold under.
| 
59
The plastic was then glued to the brooch and the tabs folded and glued over.
| 
60
What it looks like when done.
|

61
After it dried I cut out a circle of the faux suede to be sewn to the back. I sewed it along the edges after adding a large snap.
| 
62
Here you can see the finished brooch with the snap on the back. This allows the necklace to be closed and the brooch hides the closure by snapping over it.
| 
63
The opposite side of the snap the brooch is actually sewn to the collar.
|

64
Once snapped in place it looks like one piece :-)
| |
