
1
Note: You start this at your own risk.....
Picture shows trim to be removed...
| 
2
3 screws removed and plastic behind door lever removed...
| 
3
Upright plastic part above removed...
| 
4
Screw found in armrest...
|

5
Armrest removed by pulling back and up. Be careful of wires...
| 
6
Plug removed by depressing small 'button' on plug...
| 
7
Remove door trim by pulling bottom of door trim and 'popping' clips out. (12 in total, beware of wires to red light...
| 
8
Pull away sellophane plastic. Be aware of Black sticky stuff!!! It gets everywhere...
|

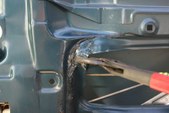
9
Remove external door handle. Held by 2 screws inside door...
| 
10
View of one handle screw position. Use 10mm socket/spanner...
| 
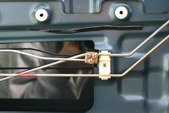
11
Lock is removed by removing 3 screws on back edge of door...
| 
12
Metal needs to be bent square and flat, to provide a flat true surface for new lock to be fixed to...
|

13
After removal of lock from door, remove 6 screws holding cover on...
| 
14
Undo circlip holding large cog in, and remove cog.
Reassemble...
| 
15
Please excuse bad picture quality! New lock fixed into postion...
| 
16
New Rod was connected to existing. On this particular installation it was necessary to remove a small amount of metal next to plastic bracket...
|

17
Refit sellothane plastic stuff back. Don't forget to get that black sh1t off your hands before handling the door trim!!!
| 
18
Finished!
Another big thank you to ALC from www.mdocuk.co.uk for the inspiration and original instructions.
| 
 19 19
Pdf 1, 368kb. Will download straight away. Pdf viewer available from www.adobe.com
| 
20
Pdf 2. 216kb
|

21
Pdf 3, 286kb
| |
