|
Lamp Work Beads & Fused Glass
I have been lampworking for about six years now!
I work with a dual gas torch (oxygen and propane). All of my work is kiln annealed for long enduring quality. The most recent work is first and chronicled in reverse order showing progress from day one, in the pictures at the end. If you want to see how I have progressed, start at the bottom and work your way to the top! This keeps the several people who are watching my progress from getting bored with scrolling to the bottom every time they drop in to see what is new! For questions or comments you can email me directly at mhair@pdq.net! Thank you all for your wonderful support and encouragement!
Hugs to All, Mona
To view all of my torched glass on one page, instead of scrolling through multiple pages, click on the Show All button at the bottom right of this page! |
Date(s): September 5, 2005 update #3. Album by Mona Hair. Photos by Mona. 1 - 18 of 274 Total. 6007 Visits. |
|
| Sign the Guestbook. Displaying 19 of 19 entries. |
|
|
Hi there, I found your website by means of Google whilst looking for a similar subject, your web site got here up, it seems good. I have bookmarked it in my google bookmarks. Hi there, simply was aware of your weblog via Google, and found that it is truly informative. I am going to be careful for brussels. I will be grateful in the event you continue this in future. Lots of other people might be benefited out of your writing. Cheers!
- tao of badass | http://www.taoofbadasssytem.com/, Mon, 28 Jan 2013 11:22AM |
Mona I just love the new bracelet. Are any of the hangies made out of your kidney stone? Just kidding... hope you are doing well. As always, your work is so inspiring. susanne/drsuze
- susanne/drsuze, Wed, 6 Sep 2006 12:00PM |
Mona, your work continues to Amaze me--you are so so talented -besides being a great person and my friend
- Delores, Thu, 2 Mar 2006 6:28AM |
Hi Mona, I just want to say i love your work . I started jewelry making a few months ago and now i'm thinking of expanded my horizons and trying lampworkbeads. How did you decide to start making beads and what do i need to get started?Once again i love your stuff and your very talented...Leann
- Leann Nutter, Mon, 2 Jan 2006 3:02PM |
I am in awe of what beautiful work you are producing!! I am trying very hard not to be envious. And I love silver. Every time I see your work I think....and I could be trying to do some of that! I know you've worked hard to be where you are today creating those beautiful pieces. I wish you continued success. Love, Susan
- Susan, Thu, 1 Dec 2005 5:05PM |
All you beads are just Beautiful.
- Diane Geary, Mon, 12 Sep 2005 3:27PM |
LOVE the chrysalis/butterfly mode Mona!!!!!
- Sandra Miller, Mon, 29 Aug 2005 5:19PM |
I would love to see a catalog with price information
- cyndy, Mon, 8 Aug 2005 8:06AM |
Mona you are so talented! I love your new beads, necklaces and you! Love, Lisa Marinuucci
- Lisa Marinucci, Mon, 18 Jul 2005 4:40AM |
Wedding beads are just awesome..and the leaves turned out just great. Love those little accent beads too. Makes me want to learn faster. LOL
- Colleen, Mon, 4 Jul 2005 4:34PM |
I LOVE the Tequila Sunrise and the Lime. Your etched beads are to die for !! Keep up the good work, I gotta practice 5 yrs before I get anywhere near this good.
- Sandy C., Mon, 20 Jun 2005 10:40AM |
I love the etched lace beads. They are versatile and with the leaves, should be gorgeous to work with!
- Betty Spaulding, Tue, 14 Jun 2005 5:12PM |
Mona..the beads for BeeGee are absolutely scrumptious!!! She is going to love working with your creations as I did!!!
- Sandra Miller, Tue, 7 Jun 2005 6:58PM |
I love the things from nr 15 and so on, do you sell some?
- Mia, Thu, 21 Apr 2005 12:17PM |
Gorgeous Pears Mona! I like #2 best personally, but all are lovely in each their own way.
- HMDundas, Wed, 13 Apr 2005 11:59AM |
That is ONE HOT BEAD Mona! Call the fire dept. I think they have a 5 alarm on their hands! :) Thanks Sarah! Yuppp, smokin! In hand it is even more fiery! Hugs, Mona
- Sarah, Fri, 1 Apr 2005 3:52PM |
LOVE that HOT BEAD Mona! Hi Jai! Thanks very much! Big Hugs to You!-M
- Jai, Fri, 1 Apr 2005 3:28PM |
|
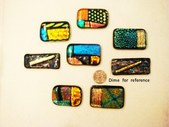
1
Grouping with a dime reference
A kind gentleman over at Twitter by the name of Hap asked for a recognizably sized object for comparison in the photo! Here you go!
Thanks Hap! Hugs, Mona
| 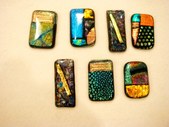
2
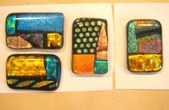
Final Firing Plus New Pieces
There are three pictures here of the rectangle cabs after the second firing. Now their depth and uniformity is much improved. You may not be able to tell that much difference in the pictures, but in hand the pieces have uniformity of form and depth that has a dramatically improved tactile property. They feel like sleek wafers and I think wearable art should not only look like art, but FEEL like art. From that perspective the second firing made the difference in what was a passable first attempt, and a spectacular final result. Without being able to touch them, I hope you'll trust me on this. Don't hold back from the second run in the kiln. It's a pivotal point in quality.
| 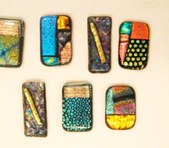
3
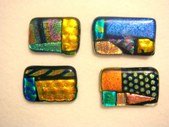
View #2 of the Second Firing
There are three new pieces here that weren't in the first batch. I'll probably send them through again.
With the second firing I brought them up to 1260 F slower than with the first fuse. About 400 F per hour until up to temp of 1260 F and held for 30 minutes. Next a fast ramp up to 1480 with a 10 minute hold, then a crash cool down to 960 F and a hold for 30 minutes. Then I just shut off the kiln and waited for about 8 hours. It takes that long for my kiln to come down to room temperature.
| 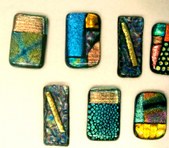
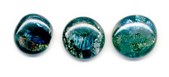
4
View #3 of the Final File
The two long pieces with diagonl bold dichroic strips over the top and the center piece at the bottom are new. My cutting and layering was a bit more precise on these and they look pretty good. I still may run them through again. Maybe I'm to picky? LOL
By the Way...I was not stingy with the glass. These are all big bad girls. average is approx 2 inches by 1 inch. I have purchased some of those tiny little brick pendants of dichroic glass from others and it just leaves me wanting more...feeling unsatisfied.
In the case of dichroics more is better right? big smile here!
| 
5
Cleaned up for second firing
With a glass grinder fitted with a coarse diamond sander I filed, shaped, and refined the edges of the pieces that needed it. Then I refined those edges with a super fine diamond sander. Now I'll re-fire the cabochons for the final finish! More pictures coming later!
| 
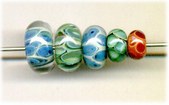
6
My First Fused Glass Cabochons
This morning I pulled my first fused glass cabochons from the kiln. An eight hour cool down left me hanging in anticipation to see how my first fusing attempt would come out. I will need to do a bit of refining and then a refuse on these to make them perfect, but over all I am very happy that I finally had the nerve to give it a try!
"Wow...great job for your f..."
View Comments...
| 
7
First Lampworked Cabochons #1
With the glass class I took from George O'Grady a few weeks ago, he showed us how to make a cabochon with Borosilicate glass. I am still learning to manipulate Boro Colors and am not ready to try this with Boro yet, but with Bullseye Glass in solid black, clear, and dichroic glass (all 90 COE) I tried creating some experimental cabochons. Until I torched my first PMC my kiln had never been run up higher than 950 F degrees. With those first PMC pieces I lost some of my inhibitions toward heating glass this hot. How I did this was:
cut a few dichroic pieces and set them aside. Place a layer of kiln shelf paper on a small kiln shelf and set it aside.
At the torch, I selected a black rod of glass(you could start with any color actually) and I heated the tip until I created a gather the size of a medium size grape. With the glass red hot, I pressed the gather straight down on a graphite marver and created a flat table of glass at the end of the rod. Next I heated and applied...
| 
8
First lampworked Cabochons #2
The nicest part about this technique is that:
1. there was no need to grind edges of the cabochon, as they were already fire polished to a beautiful finish
2. there was no need to tack glass pieces with Klyr Fire or Glass Tac, as they were directly fired into the cabochon and didn't need any additional support
3. I didn't have to ramp the kiln up and down multiple times to create multiple layers of fused glass.
I don't know how well I will be able to develop this technique, but will post more information as I have it available.
4. Finally, the process did not require any molds or mold preparation and getting a well controlled round cabochon shape that looks consistently nice is possible.
Note: Wear Safety glasses when checking your glass in the kiln, as the heat can cause premature cataracts and other damages to your eyes. Clean up your kiln shelf paper carefully with a damp cloth, as enhaled fibers from this product can cause health problems wit...
| 
9
Boro Experimentals 2
With some new colors arriving today, I couldn't get to the torch fast enough! These are few experimentals I tried out today! More coming very soon!
| 
10
Class Beads
These are some of my very first Boro Beads from George O'Grady's Class.
| 
11
First Boro Beads
George O'Grady held a class here in Houston this past weekend! I was priviledged to have been able to attend. I torched these beads after I got home from class yesterday. Some of the beads from class are still being annealed by Michael Miles and I won't have them for a few days.
| 
12
Boro First Beads Different View
Another view of the Boro beads I torched at home after George's class!
| 
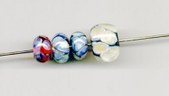
13
Floral Tube Bead - Iris
A Raku treated elongated glass bead is surface worked with hand made variegated stringers of stems of leaves glass and striated floral stringer in shades of amethyst glass. Length is 1 5/8 inches and width at center is 1/2 inch.
| 
14
Floral Tube Bead Another Shot - Iris
The tip at the top of this bead is white and blends into the background!
| 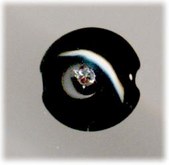
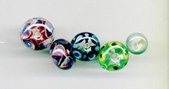
15
Black Lentil with imbedded Cubic Zirconia
As a trial, I created a black glass lentil, dotted the center with a tiny white dot. Then I capped the tiny white dot with a bit of amethyst colored glass and melted down to surface level and gave the bead it's final shape. I heated just the center of the bead and gave it a little poke with a tungsten pick, and dropped a prewarmed 2mm CZ into the poked spot. With a graphite marver I gently stoked over the top of the CZ to level it, then caped over it with a tiny gather of clear glass.
I treated both sides the same way.
To finish the shaping from the small amount of additional glass I heated one side then gently pressed it into the lentil mold. Then I repeated this maneuver for the opposite side. Lastly I flame polished both sides, evened out the heat, and placed it into the kiln!
I used the very same method on the next bead with the CZ embedded into the center of the red rose.
Size of this lentil is 1/2 inch.
| 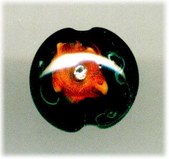
16
Red Rose Lentil with CZ Center
| 
17
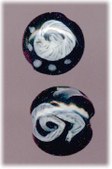
Twisted Ivory Stringer On Black
Just some trial beads here. Light Ivory glass was striped onto clear, encased in more clear glass, and then twisted in to spiral glass stringer-3mm in diameter.
I did some test swirls here to see if I would get the gauzy appearance I was hoping for with this combo and I did! Now I can pull a bunch of the stringer and actually do what I was hoping to do!
I have pulled stringer of this type, but finer in diameter in the past, but if you are working with a soft glass like ivory or white and you want to keep your spiral definition make sure your encase your soft glass stringer on your clear glass base before your pull your gather. It also helps to pull your stringer a little bit larger. The clear glass in the center of a slightly larger stringer will hold your spiral work in dimension and position better. The outer casing of glass will keep your color from bleeding all over the place and possibly devitrifying!
| 
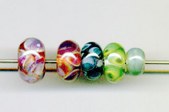
18
ORION Fantasy Giant Lentil
I called this the ORION Fantasy because I have been watching "The Fifth Element"(twice today) and this giant lentil reminds me of the little universe jewel that Orion wore around his neck!
The lentil is massive as far as lentils go. It measures 1 1/2 inches in diameter and 3/4 inch thick in the center. The lentil is a base of Italian Moretti Black Glass. Treatments include Solid Silver Foil, some chips of dichroic, and stippling in colors of amethyst, emerald, sapphire, peridot. Even a couple of shots of Double Helix are in here! All were fire polished down to a smooth surface with softly rounded edges at the perimeter. This is the largest and heaviest bead I have ever made. It took two full rods of black just to lay down the base for the bead, then a really long time for the shaping surface work, and encasing of surface work.
| |
|
Continued ...
| Next 18 | Show all |
| |
|
|
|
|