Day 1: Gov't Trail to Dripping Canyon
- Pollys Island/Big Man Panel/ Long House.
Day 2: Dripping Canyon to Bullet Canyon
- Quail Panel/ Two Story Ruin/ Totem Pole.
Day 3: Bullet Canyon to Pouroff Pool
- Green Mask Panel/ Split Level Ruin.
Day 4: Pouroff Pool to Kane Canyon junction
- Todie Canyon/ Turkey Pen Ruins
Day 5: Kane Gulch Junction to Kane G. Ranger Station
Troop 24 "The High Adventure Troop" Backpacking Trip
-Cascade Bill Mooseker
Date(s): March 2002. Album by Cascade Bill. Photos by WHM. 1 - 135 of 135 Total. 1635 Visits.
enlarge 89KB, 800x540 1 ut02-d1-001 Breaking Camp - We got to the Gov't Trail trailhead late in the day, but early enough to consider starting out on the trail rather than camping at the trailhead. The well defined trail petered out just as the light faded so that we couldn't see the cairns to go on, so we pitched our tents on the mesa top where dark found us. I found a nice sandy spot to pitch my tent. Later that night we had a bunch of rain and snow and I found out why my nice sandy spot existed - it was a puddle and my tent bottom became a water bed. Fortunately, Roger had pitched his tent on a slightly higher spot so I transferred my bag to his tent for the remainder of the night.
enlarge 99KB, 800x540 2 ut02-d1-002 Steve and Braxton taking down their tent - Roger to right. You can see the pools of water left in the depressions from the previous night's snow and rain.
enlarge 86KB, 540x800 3 ut02-d1-003 Dan and Braxton - Although the sun was out, the morning air was quite chilly.
enlarge 95KB, 800x540 4 ut02-d1-004 Starting out - with the morning sun we could see our route clearly (see cairn at right foreground).
enlarge 136KB, 540x800 5 ut02-d1-005 At the lip of the canyon, we could see ruins high up on Polly's Island across the gulch. We speculated as to how they ever got up there.
enlarge 114KB, 540x800 6 ut02-d1-006 Polly's Island acorss the Gulch (at left) from the canyon rim before the Gov't Trail makes its descent. The canyon at the center is the rincon around Polly's Island.
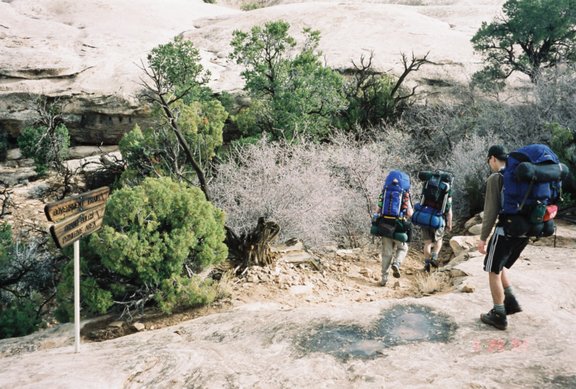
enlarge 135KB, 800x540 7 ut02-d1-007 Roger, Shelby and Steve heading down the Gov't trail at the canyon rim.
enlarge 155KB, 540x800 8 ut02-d1-008 Braxton and Dan (lower left) and Fred (center right) on the Gov't trail making it's way down into the Gulch.
enlarge 155KB, 540x800 9 ut02-d1-009 Steve on trail down to Gulch - Canyon at upper center is man Gulch. Polly's canyon come into the Gulch at right behind canyon wall at right.
enlarge 96KB, 540x800 10 ut02-d1-010 Unnamed site near Polly's Island.
enlarge 109KB, 800x540 11 ut02-d1-011 Fred, Dan, Braxton, and Steve - shooting the Bull near Polly's Island.
enlarge 58KB, 800x540 12 ut02-d1-012 Faint petroglyphs near Polly's Island (enlarge picture to view)
enlarge 94KB, 800x540 13 ut02-d1-013 Heading back to the Gulch from rincon canyon around Polly's Island.
enlarge 89KB, 800x580 14 ut02-d1-014 A small granary up canyon from Polly's Canyon.
enlarge 120KB, 567x800 15 ut02-d1-015 Going up the Wash above Polly's Canyon - there are few bench trails from Polly's Canyon to Step Canyon so most of the time you are in the wash. Here the wet sand is pretty good footing but a lot of places have soft sand or fist sized cobbles that make for rougher going.
enlarge 89KB, 800x540 16 ut02-d1-016 Famous Big Man Panel Pictograph - located on the right side (east) going up canyon quite a ways from Polly's Canyon. Look for trails going up the hill as the panel is not visible from the wash. - For more Big man photos see 2000 trip:
enlarge 93KB, 800x540 17 ut02-d1-017 More Big Man
enlarge 136KB, 540x800 18 ut02-d1-018 Fred - Natural Arch (noted on topo map) we missed this on our trip down canyon in 2000. Easy to spot going up Canyon.
enlarge 101KB, 800x565 19 ut02-d1-019 Pictogaphs on alcove near Natural Arch. These are pretty exposed and have faded somewhat.
enlarge 102KB, 800x540 22 ut02-d1-022 These large figures in yellow have faded quite a bit. Their color is unusual.
enlarge 115KB, 800x540 23 ut02-d1-023 Ruin near pictograph panel - note that a larger structure was to the right (carbon on walls from smoke) built in the stick plus mud method that was not as durable as the rock and mud mortar method.
enlarge 109KB, 540x800 24 ut02-d1-024 Another view of Granary and ledge - note hiking stick at left for scale.
enlarge 104KB, 540x800 25 ut02-d1-025 Pictograph Panel at Long House.
enlarge 116KB, 800x540 26 ut02-d1-026 Hand prints at Long House.
enlarge 104KB, 540x800 27 ut02-d1-027 Long house is situated in a large ovehanging alcove located on a bench above the wash. The bench would have provided a good place to grow crops.
enlarge 144KB, 800x540 28 ut02-d1-028 Looking down at the crew in the wash (L-R: Steve, Roger, Danny, Fred, Shelby, and Braxton) from the bench at Long House
enlarge 115KB, 540x800 29 ut02-d1-029 Long House- from the bench.
enlarge 77KB, 800x527 30 ut02-d1-030 Pictograph of Turkeys - along wash above Long House.
enlarge 80KB, 800x540 31 ut02-d1-031 Numerous handprints along ledge above wash just adjacent to turkey pictographs.
enlarge 124KB, 540x800 32 ut02-d2-001 Wash has undercut the walls here - you could see branchse and other debris wedged into the ceiling of the overhang. It made you glad that you wouldn't be here if there were a flash flood.
enlarge 124KB, 540x800 33 ut02-d2-002 Fred following the trail crossing a bench - steep up and down.
enlarge 137KB, 593x800 34 ut02-d2-003 Going up the wash.
enlarge 123KB, 661x800 35 ut02-d2-004 View from another bench - this is close to Step Canyon.
enlarge 122KB, 730x800 36 ut02-d2-005 Fiogure from the Quail panel (Step Canyon).
enlarge 108KB, 800x540 37 ut02-d2-006 More figures from the Quail Panel.
enlarge 83KB, 800x540 39 ut02-d2-008 More figures - note stylized headresses on the two yellow figures. A lot of color in this panel.
enlarge 91KB, 800x551 40 ut02-d2-009 The Quail for which the panel is named.
enlarge 86KB, 800x540 41 ut02-d2-010 A lot of faded figures here.
enlarge 84KB, 800x540 42 ut02-d2-011 More details.
enlarge 111KB, 800x540 43 ut02-d2-012 Shaman's mask - at far end of the Quail panel this pictograph is the most unusual figure of all. The panel is in a large alcove with no ruins.
enlarge 102KB, 800x540 44 ut02-d2-013 Shelby in small cave in Step Canyon.
enlarge 109KB, 800x540 45 ut02-d2-014 Ruins in small cave.
enlarge 86KB, 800x540 46 ut02-d2-015 Ceiling details at small cave.
enlarge 114KB, 800x540 47 ut02-d2-016 View looking up Step Canyon from small cave.
enlarge 153KB, 540x800 48 ut02-d2-017 View of Two Story Ruin from wash. The cliff here is impressive.
enlarge 114KB, 800x540 49 ut02-d2-018 View of Two Story ruin from ledge - note defensive wall in foreground. T.S. ruin is back further along the ledge. You can see the entrance of Step Canyon beyond.
enlarge 110KB, 800x540 50 ut02-d2-019 View of defensive wall - you either have to go over it or thru the door which could easilly be blocked up. A long drop awaits one who would try to go around the wall to the left.
enlarge 102KB, 800x540 51 ut02-d2-020 Pictographs at Two Story Ruin.
enlarge 88KB, 800x540 52 ut02-d2-021 More pictographs at Two Story Ruin.
enlarge 108KB, 540x800 53 ut02-d2-022 Two Story Ruin.
enlarge 175KB, 577x800 54 ut02-d2-023 The Totem Pole Hoodoo - and Fred!
enlarge 132KB, 580x800 55 ut02-d2-024 Fred - Just a ways below the Bullet Canyon/ Grand Gulch confluence you go over a large bench with good views.
enlarge 114KB, 540x800 56 ut02-d2-025 There is a small granary across the canyon (in shadow - use original size to see). It would have been quite an effort to reach this structure.
enlarge 98KB, 540x800 57 ut02-d2-026 View looking up Grand Gulch at the mouth of Bullet Canyon (to right). The camp spots usually fill up.
enlarge 121KB, 540x800 58 ut02-d3-001 Ruin in Grand Gulch above Bullet Canyon. There is an upper level that is reached by going up a chimney (Shelby is making his way up in this photo).
enlarge 101KB, 800x540 59 ut02-d3-002 Cascade Bill, Fred and Roger at ruin. I made it up to here with a lot of effort ( and trepidation) but passed on the slot chimney up to the upper level. In my youth, I always wanted to be Roy Rogers or Gene Autry but instead I turned into Gabby Hahes!
enlarge 129KB, 540x800 60 ut02-d3-003 Roger. Shelby and unidentified hiker at upper level of ruin.
enlarge 140KB, 540x800 61 ut02-d3-004 Danny, Roger, and Shelby: Just below the junction of Shieks Canyon there is a series of Slickrock steps and pools - a very scenic part of the canyon.
enlarge 111KB, 800x540 62 ut02-d3-005 View of very interesting pictograph that is part of the Green Mask Panel complex. There is some info in an ammo box here that states that the heads of the figures have faded away over time but it looked to me that there wasn't anything there.
enlarge 103KB, 800x540 63 ut02-d3-006 Adjacent figures on panel
enlarge 98KB, 800x540 64 ut02-d3-007 Very interesting figure showing childbirth - note no heads again.
enlarge 134KB, 800x540 65 ut02-d3-008 Ruin adjacent to panel shows these circular patterns placed on top of a blackened rock face (Shelby at right)
enlarge 76KB, 800x540 66 ut02-d3-009 Very old pictographs far above existing floor - looks like a portion of the wall or ledge has collapsed.
enlarge 95KB, 800x540 67 ut02-d3-010 More figures - note headresses and more turkeys/birds. (This was the last picture on the roll and I hadn't brought another - left my pack down at the junction of Shieks ) so I didn't get a photo of the Green Mask, which is impressive but high up and far away requiring a telephoto lens to get a good photo anyway.
enlarge 139KB, 800x540 68 ut02-d3-011 I thought this might be another ruin, but I'm not so sure - in some places the rock breaks apart so that it appears as if it were a built up wall.
enlarge 96KB, 800x540 69 ut02-d3-012 We met this family - Ron Morrow (editor and publisher of the Climbing Art) as they were taking a break.
enlarge 119KB, 540x800 70 ut02-d3-013 Desert Varnish on the canyon walls.
enlarge 120KB, 540x800 71 ut02-d3-014 The canyon twists and turns and is very scenic in this stretch.
enlarge 81KB, 800x552 72 ut02-d3-015 We had lunch under this large alcove and found these stylized handprints.
enlarge 121KB, 800x540 73 ut02-d3-016 More canyon walls.
enlarge 131KB, 800x577 74 ut02-d3-017 We found an alcove with several ruins.
enlarge 110KB, 800x540 75 ut02-d3-018 Roger and Shelby exploring ruins.
enlarge 120KB, 800x540 76 ut02-d3-019 View of ruin.
enlarge 151KB, 540x800 77 ut02-d3-020 View of Split Level Ruin from trail.
enlarge 125KB, 540x800 78 ut02-d3-021 Split Level Ruin - This multi level ruin is very fragile and has been roped off, but you can get quite close as this photo illustrates.
enlarge 120KB, 800x540 79 ut02-d3-022 Another view of Split Level Ruin.
enlarge 111KB, 540x800 80 ut02-d3-023 Inaccessible Ruins on ledge in cliff above the Split Level Ruin.
enlarge 128KB, 540x800 81 ut02-d3-024 Upper end of the Split Level alcove - note stakes marking roped off area.
enlarge 99KB, 800x540 82 ut02-d3-025 Very dramatic view of Split Level Ruin.
enlarge 124KB, 540x800 83 ut02-d3-026 Note combination of rock wall with mud applied to sticks method of construction here.
enlarge 121KB, 800x540 84 ut02-d3-027 Notice roof construction here - you can see why they don't want a bunch of people walking all over it.
enlarge 91KB, 540x800 85 ut02-d3-028 Ruin below the Pouroff Pool - I don't know how Shelby got up there but he did.
enlarge 123KB, 540x800 86 ut02-d3-029
enlarge 112KB, 540x800 87 ut02-d4-001 Hoodoo - between Pouroff Pool and Todie Canyon.
enlarge 130KB, 540x800 88 ut02-d4-002 Ruins high up on Todie Canyon walls.
enlarge 134KB, 800x540 89 ut02-d4-003 Roger and Shelby - near spring in Todie Canyon. See Ruins on ledge above.
enlarge 132KB, 540x800 90 ut02-d4-004 Cascade Bill at Todie Canyon ruin.
enlarge 128KB, 540x800 92 ut02-d4-006 Canyon Wall at Todie Canyon.
enlarge 101KB, 800x540 93 ut02-d4-007 Ruins in lower Todie Canyon.
enlarge 116KB, 540x800 94 ut02-d4-008 Looking up Todie Canyon.
enlarge 93KB, 800x540 95 ut02-d4-009 Petroglyph Panel in Todie Canyon.
enlarge 104KB, 800x540 96 ut02-d4-010 Details of Petroglyph Panel in Todie Canyon.
enlarge 126KB, 800x540 97 ut02-d4-011 Details of Petroglyph Panel in Todie Canyon.
enlarge 117KB, 800x540 98 ut02-d4-012 Details of Petroglyph Panel in Todie Canyon.
enlarge 124KB, 540x800 99 ut02-d4-013 Details of Petroglyph Panel in Todie Canyon. Note birdlike head of stick figure - compare to Quail Panel figures.
enlarge 131KB, 540x800 100 ut02-d4-014 Details of Petroglyph Panel in Todie Canyon: Bearpaw? Snake or river?
enlarge 119KB, 540x800 101 ut02-d4-015 Ledge- Todie Canyon : note possible remains of structure in foreground.
enlarge 123KB, 800x540 102 ut02-d4-016 More Petroglyphs.
enlarge 119KB, 800x540 103 ut02-d4-017 Another Petroglyph.
enlarge 100KB, 540x800 104 ut02-d4-018 More circular spirals.
enlarge 112KB, 800x540 120 ut02-d4-034 Fred investigating ruins at Turkey Pen - note difference in construction, and fire blackend wall at left showing where another structure has collapsed or been destroyed.
enlarge 104KB, 800x540 121 ut02-d4-035 Figures at Turkey Pen Ruin. Note how different these are from the previous panel at the alcove just down canyon.
enlarge 117KB, 800x540 122 ut02-d4-036 The Turkey Pen - Fred.
enlarge 105KB, 800x540 123 ut02-d4-037 Looking back to the lower levels of Turkey Pen - This alcove is on a ramp that climbs steadily up.
enlarge 115KB, 540x800 124 ut02-d4-038 Looking at the end of the lower ramp. The upper level is reached by going up through and opening in the wall where the logs are sticking up at right. (You could go up to the upper level in 2002 but this was closed in 2005). Also note log bridge to support wall.
enlarge 82KB, 540x800 125 ut02-d4-039 Fred looking a grinding stone (metate) at Turkey Pen.
enlarge 111KB, 540x800 126 ut02-d4-040 Close up of constructed bridge to support wall and floor of ledge - yucca ropes appear to be still in good condition after all these years.
enlarge 114KB, 540x800 127 ut02-d4-041 Junction Ruins - we spent our last night at the junction of Kane Gulch canyon. The Junction ruins are quite extensive. The accessible portions show a lot of wear and tear as well as poorly executed attempts to patch up the ruins.
enlarge 107KB, 800x540 128 ut02-d4-042 Kiva showing central support beam - the roof has been completely removed here, but the extensive structure is revealed. Note the fire blackened sides. I don't think an asthmatic Anazazi would have lasted long.