 | 1.
Star Wars Ladies Toile Robe a l'Anglaise When I saw this fantastic toile print fabric done up with a Star Wars twist, I KNEW it had to become an 18th century dress!
Toile Fabric: www. knitoriousfabric.com/collections/products
Patterns: JP Ryan Robe a l'Anglaise and 18th Century Strapless Stays, American Duchess 1780's Cap pattern.
The split bum pad and petticoat were drafted by me.
Fun facts: I used an old bedsheet for the sleeve flounces, bum pad, and the cap! The lining to my dress bodice is an unbleached cotton that used to be a medieval shift that I haven't worn in 13 years. |
| 45 Visits
57 Images
Shared Album | |
|
 | 2.
Chemise a la Reine I made this Chemise from 8 yards of Cotton Voile, and used a silk dupioni from my stash for the waist sash and in the hair. I used a moire silk for the petticoat. Since it was going to be chilly that day, I also made a short cloak from a vintage heathered wool and a satin lining. I'm allergic to wool, so it had to be lined to avoid itching. I didn't really care if it wasn't period correct, so long as I was warm and comfortable. The shoes and stays were already made by me several years ago, so it was nice to be able to use them again for another project. I styled a wig I had in my costume room from another project and added a silk sash, fabric flowers, and ostrich feathers. Jewelry was from my collection of antique pieces. It was refreshing to have something so light and airy to wear for a change.
The dress was draped on my form and channels for ties were added at the waist and neckline area. These were gathered into the correct size for my body and then the shoulder pieces were drafted. Once the shoulders were in place, I was able to add the neckline ruffle. This was a 3 yard piece, utilizing the selvage edge of the cotton voile, so that I would not need to hem that part. It was gathered and stitched to a silk ribbon, and then hand sewn to the neckline. It was done like this so I could remove it at a later date if I so chose.
The sleeves were then drafted and channels were sewn a few inches from the bottom edge. This would allow the bottom edge to form a ruffle effect when gathered and tied. Silk ribbons were used to tie the sleeves.
The sash was a silk dupioni that I had from a previous project. I bias cut it to be 6" wide by about 4 yards long. This way I could wrap it around my waist a few times and then tie a nice big bow. A vintage RS slide buckle was added to the front for a little bling.
I had to make a new petticoat for this particular dress. The one I made a few years ago was made to sit over side hoops and was the wrong shape under this dress. It was hanging significantly lower at the sides and peeking from under the dress. This was drafted as two big rectangles that were then pleated into a waist band with silk ribbon ties added.
There is a bum pad under this dress, so the dress was hemmed based around that. I didn't want a train, as I didn't want to have to worry about picking it up all the time. The dress was made and then allowed to hang for 2 weeks to let the fabric stretch and settle. I then leveled the dress form to one inch higher than I would be in the shoes that would be worn with this. It was carefully marked all along the edge for where the bottom ruffle would be. I made an almost 10 yard piece for the bottom ruffle. It was first baby roll hemmed, and then a gathering stitch was made across the top. I gathered the entire length by hand, carefully pinning it to the dress as I went. It was sewn to the dress and then the excess fabric from the dress itself was cut away with pinking shears. Another line of stitching was added to help secure everything inside.
Tutorials and photos that I Referenced:
Petticoat
"Red Shoes Red Wine" - https://redshoesredwine.com/sewing-18cent-petticoats/
Dress
"Fresh Frippery" - https://freshfrippery.com/2015/04/07/easy-chemise-dress/
"American Duchess" - http://blog.americanduchess.com/2015/05/the-midnight-chemise-la-reine.html?m=1
Cloak
"The Fashionable Past" - http://koshka-the-cat.blogspot.com/2013/03/18th-century-short-cloak-tutorial.html |
| 390 Visits
34 Images
Shared Album | |
|
 | 3.
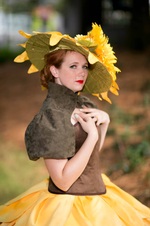
Flower Monster - Sunflower Dress (Dragon Con 2016)I made this to wear with friends on Saturday night of Dragon Con 2016. We are going as "Flower Monsters", or pretty much a walking garden. There will be roses, wisteria, poinsettias, daisies, and my sunflower.
The design is all my own creation, inspired by a fully bloomed sunflower as well as ballet. I'm not a ballet dancer, but I do love the costuming. I used inspiration from their platter/pancake tutus for my skirt.
The skirt is a full circle, so that when I sit on the ground, I look like a sunflower from above. The hat is massive, and covered in a giant sunflower as well as 4 smaller ones and some leaves. The hat itself is also a sunflower.
Materials:
40 yards of Hunter Green Tulle (Petticoat)
2 yards Hunter Green quilting cotton (Petticoat lining)
12 yards of Casa Chrome Yellow Satin (for 24 Petals)
1 yard Pale Yellow Quilting Cotton (petal skirt lining)
3/4 yard of faux brown suede (Bodice)
1 yard of some random olive drab green fabric from clearance (Bolero)
2 yards Olive Drab quilting cotton (Bolero and bodice Lining)
Krylon Spray Paint "Bauhaus Gold"
Hoop Steel
16 yards Green grosgrain Ribbon (for hoop steel casing and support)
2 yards 3/4" waistband elastic
Hooks and Eyes |
| 250 Visits
39 Images
Shared Album | |
|
 |
|
 | 5.
Custom Jedi Kit (August 5, 2008)It's done! I actually remade myself another Jedi kit. I haven't costumed as a Jedi in 5 years, I think the last time was at Dragon Con 2003! I swore I would never again wear one because everyone and their mother has a Jedi costume.
Well, while watching Hero's and several Samurai movies on TV I was inspired by the clothes. I went on to design my own custom Jedi, something different than what you always see. No tabbards on mine (I've never been a fan of those), and a short sleeved outer tunic. I also trimmed it in handmade pleated trim to give it a more finished and tailored look. The skirt is a full circle skirt made from crinkle cotton that has a really nice drape to it (and is lightweight). All the seams on every peice of the costume are finished and frenched. I also made the belt myself from leather trimmings (www.mjtrim.com) and nailheads.
I'm very happy with how it turned out, and actually look forward to wearing it! I just need a lightsaber now... |
| 4711 Visits
12 Images
Shared Album | |
|
 | 6.
Zombie Leia (October 31, 2008)This was created for Halloween, put a little spin on my usual Princess Leia getup. I created a whole new dress for this (actually screen accurate with proper seam placement, scarf hood, and double layered lol). It was really a shame to shred such a perfect reacreation... but shred away I did! The shredded areas were then smeared with used coffee grinds to give that 'Just-risen-from-the-grave" look. Luckily my poor leia boots are already scuffed and dirty, so no more work was needed.
I used Ben Nye Color Cake in Calypso Blue for the face and arms... since their brand worked so well for my twilek, I figured I'd try again. The blue goes on just opaque just enough so I don't look like a smurf. I then powdered on some black eye shadow with my blush brush along the cheek bones and forehead. I then used a make up sponge to put more shadow around my eyes for the sallow dead look. I used scab make up for the bloody areas (and it does dry like a really gross scab) and fake liquid blood for gooey oozey blood effects. I'm still perfecting the make-up, I'm happy with the base color, but the scabs and blood need a little work before NYCC.
I won $50 at work for the gorey catagory and 2nd place in Rebel Scum's Halloween costume contest!
This costume was so much fun to wear. The kids at the NYC Halloween parade were either terrified or wanted to give me a high five (wtf?) lol. I can't wait to scare up more people sometime soon! |
| 1184 Visits
8 Images
Shared Album | |
|
 | 7.
Madame Zircon Can Can Dress (September 1, 2007)Update! Sept 27 - 95% done! I just need to Hem the skirt and get cool stockings! I've always wanted a can can outfit like those in the Movie Moulin Rouge. I decided since I had a corset already, I'd design around it and thus Madame Zircon was born.
Since I have $300 that I can freely play with and not feel guilty spending (yay for that eBay commercial gig!) - I'm going all out and getting all the pieces exactly how I want them.
The (*) denotes Items I currently have already.
Materials...
Oragandy Ribbon
* -Turquoise 38mm, 55 Yards ($82.50)
* - Black 38mm, 55 Yards ($82.50)
*Velvet Ribbon, Black in 1/2' - 5/8", 1 Yard ($0.98)
*Black Elastic 1/4" - 1 Yard ($0.49)
Swarovski
* - Blue Zircon SS12, 1 Gross ($7.49)
* - Aquamarine 18mmx13mm Octagon, 2 pieces ($6)
* - Silver setting for Loose Octagon ($1.49)
Black Feather Plumes, 2 Pieces ($7.98)
Turquoise Thread - 2 Spools ($3)
Fabrics ($80 total)
* -Turquoise Satin, 10 Yards @ 60"
* -Black Satin, 10 Yards @ 60"
* -Black on Black Stripe Satin 5-6 Yards (Free)
* -Black Cotton or Muslin Corset purchased from Timelss Trends :-) www.timeless-trends.com |
| 2460 Visits
49 Images
Shared Album | |
|
 | 8.
Ren Garb/Costumes | So far only one Ren Styled costume, my 'Purple Princess' which I made for Halloween 2006. |
| 572 Visits
5 Images
Gallery Album | |
| |