
1
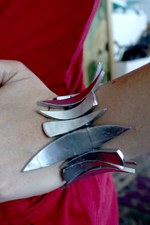
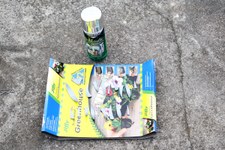
Caprica Six Bracelet
*Picture found on Flickr from ellyvstheworld*
I just increased the resolution to see the detail as best as I could. It actually looks like the metal curved parts have bars on the back and that they slide around the strap loosely. I'll be making mine attached to the strap since I don't have any metalwork skills and am using sculpey.
| 
2
My completed bracelet. It's a bit thicker than the original, but I like it anyway.
| 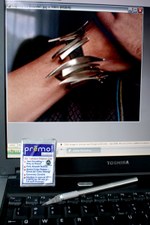
3
I enlarged the photo and increased the res until it was the same size as my wrist when held up to the screen. I then used a measuring tape to measure the individual shapes lengths and widths and went from there.
|
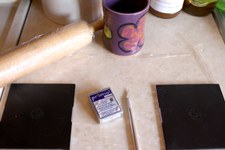
4
My tools! Sculpey, plastic wrap covered rolling pin and counter top, and thin CD jewel cases as a thickness gauge. Oh, and my very important cup of coffee, can't do anything without my coffee :-D
| 
5
The sculpey was rolled flat using the jewel cases as a gauge, I then made it a bit thinner (about 1/8").
| 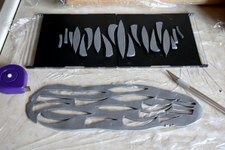
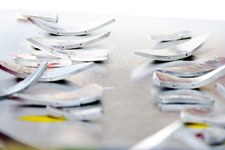
6
All my pieces cut out and ready to have the pins inserted (removed later). I made one 9cm oval for the center piece and then made 5cm 'tooth' shaped pieces and 6cm ovals. for the ends I just added some random smaller parts, I may not need them, but more 'beads' are always better than not enough.
|
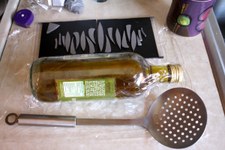
7
You can see the triangle for the ring in the back. I covered an Olive Oil bottle with plastic wrap (food and sculpey = sick). I was boiling the pieces and then laying them quickly on the bottle to keep their curved shape while cooling.
| 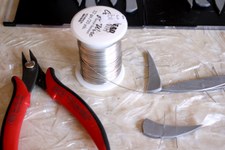
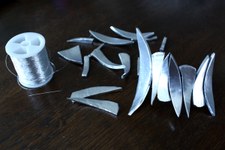
8
Wire for the holes. I inserted this before boiling it to make holes that monofiliment will then go into later on. After boiling the pieces, you just pull out the wires and you have a perfect hole :-)
| 
9
BOIL!!! I first curved the pieces by hand and dropped them into the water gently, they kept their shape pretty well. You only need to keep these thin bits in the water for about 30 seconds.
Yes, you CAN boil sculpey! I find it works better for thin and odd shaped bits than baking... plus it's faster and less smell ;-)
|

10
Cooked pieces cooling on the OO bottle. The OO bottle curve was just enough to replicate the look of the original curves.
| 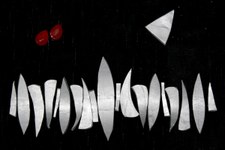
11
All the cooked pieces lined up for a photo op. The two red beads are going to be the earrings later on. They're a cherry quartz, though I may change to Siam Swarovski tear drops later... not sure yet.
| 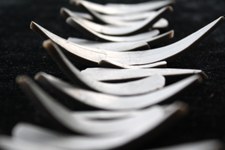
12
Curviliscious!
|
13
Ready to be painted. I forgot to take pictures of the sanding process, but it's kind of straight forward. Just smooth away any ridges or bumps for a cleaner metallic look. I'm using Rustoleum chrome paint that I happened to have around from my Padme headpiece!
| 
14
SHINY!!! You can see the holes for the stringing later on.
| 
15
The beads were then sewn onto a black elastic band with silver thread.
|
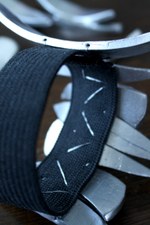
16
Showing how the beads are sewn on to the elastic band.
| 
17
My Shoes!!! LOVE THEM! Only $20 at a thrift shop in Brooklyn (Brand NEW), they retail for $300 online YIKES! I'll be taking care of these beauties, they are so freaking comfortable!
| 
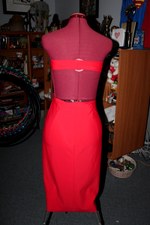
18
The skirt was the easy part. A simple tube with darts to shape it to the wearer and a single seam in the back (no side seams).
|

19
The skirt was done (except for the slits and hemming) and it was onto the middle section with those famous cutouts.
| 
20
Just draped on the form with the skirt for comparison.
| 
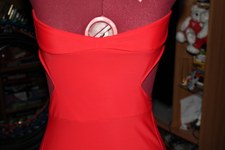
21
The middle section, I self lined it and then top-stitched the cutout area for the look of the original. It only looks high up on the chest for now, there's a large seam allowance in there just in case I screwed up.
|

22
Side View :-)
| 
23
And the Back. I guess I'll use a dress hook on the upper area to keep it closed.
| 
24
|
25
| 
26
| 
27
My Six wig!
|

28
Taken with Will's camera phone, not the best photo, but a photo for now :-)
| 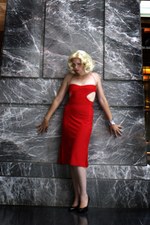
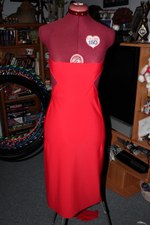
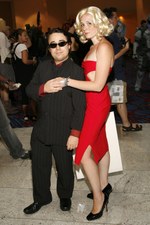
29
My Completed Six dress.
Photo taken at WW Philly by Will :-)
| 
30
My Completed Six dress.
Photo taken at WW Philly by Will :-)
|
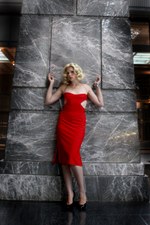
31
My Completed Six dress.
Photo taken at WW Philly by Will :-)
| 
32
My Completed Six dress.
Photo taken at WW Philly by Will :-)
| 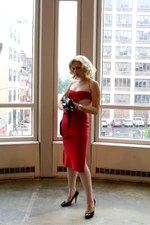
33
I dare you to mess with a Cylon.
Photo taken at WW Philly by Will :-)
|

34
My Completed Six dress.
Photo taken at WW Philly by Will :-)
| 
35
I made earrings to match too!
| 
36
|

37
| |