
Keeping in mind the size of your guinea pig, decide on the dimensions you want your cozy to be. Choose your fabrics--you'll need to pick an outer fabric and a lining fabric. Most people use a soft fleece for the cozy lining. The outer fabric can be anything, but heavy or medium fabrics work best. Don't pick anything too flimsy.
Cut out two rectangles of fabric exactly the same size. The shorter side of your rectangles should be cut to the height you want your cozy to be. Cut the long sides twice as long as you want the width of your cozy to be. Two 22" X 13" pieces of fabric makes a roomy cozy for my 2 1/2 pound pig. My 2 1/2 pound pig also likes fitting himself into smaller-sized cozies.
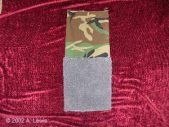
The fabric on the left (camouflage) will become the outside of the cozy. The fabric on the right (grey fleece) will become the inside lining.
|

One at a time, fold each piece and pin right-sides-together, along the shorter side of the rectangle so that you have two "tubes." This is a picture of each piece pinned together before they are sewn.
|

Sew a seam where you've pinned. You should now have two "tubes." Here is what they look like after the seems have been sewn:
|

Turn ONE of the "tubes" right-side-out. It does not matter which one. Here, the grey, fleece lining fabric tube has been turned right-side-out.
|

Now slip one "tube" inside the other "tube" so that the RIGHT SIDES of the fabric are facing each other. Here is a picture of the grey tube being slipped inside the camouflage tube:
|

When one tube is completely inside the other, pin the two tubes together. At one end of the tube, pin the outside fabric to the lining fabric. Your pins should only be going through TWO layers of fabric.
|

Now sew where you have pinned. Remember, at this point, you are only sewing through TWO layers. When you are done with this step, you should have a "two-layered tube."
|
After that seem is sewn, you should have one big long tube. The right side of the outer fabric and the right side of the lining fabric are on the outside. The wrong side of the outer fabric and wrong side of the lining are on the inside.
|

Now "feed" the outer fabric into the lining fabric.
|

This picture shows that the outer fabric has been fed inside the inner fabric. It is starting to look more like a bag. But the bottom of the bag is still open-ended and so it is still a tube.
|

Making sure all bottom raw edged are matched up, pin straight across the bottom edge--through ALL FOUR layers of fabric.
|

Sew straight across, through all four layers!
|

Now there is a seam straight across the bottom edge. It's now a bag, an inside-out bag.
|
Turn the bag right-side-out. This picture shows the bag in the process of it being turned right-side-out.
|

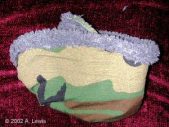
Here it is turned completely right-side-out. It's all finished... almost...
|

Just add a piggie and you're done!
|

A photo of a fleece cozy that Calypso made using Lily Grace's directions.
|

Another one of Calypso's fleece cozies that she made using Lily Grace's directions.
|

Luna models a cozy that Izzy made based on LilyGrace's directions. (Edge not turned back to form a cuff.)
|
