 | 1.
Captain Killy Formal Wear | A design entirely of my own creation, based on the look of Captain 'Killy' from the mirror universe in 'Star Trek Discovery'. Debuted at Farpoint Convention 2020. |
| 329 Visits
41 Images
Shared Album | |
|
 | 2.
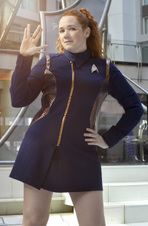
Star Trek Discovery: Ensign Sylvia Tilly This is an original concept of what my version of a Skant on the USS Discovery would look like. There is already one out there as worn by Commander Nhan. I designed this one as an homage to the TOS Skants from the 60's blended with the fine details of the Discovery Uniforms.
Fabric: Shao Refined Ponte Solid from Joann Fabrics
Copper Zipper by the yard from Etsy
Stretch Mirror Foil HTV from Amazon (Deltas, Stripes, and Zipper Placket)
Badge from Altered Alloy on Etsy |
| 322 Visits
106 Images
Shared Album | |
|
 |
|
 |
|
 |
|
 | 6.
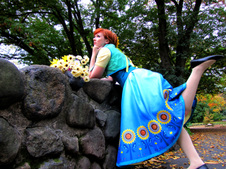
Anna Adventure Dress Anna's "Adventure" dress from Frozen. I used Simplicity S0745 as a base. I altered the whole thing. It called for the pattern to be made as one solid dress instead of a separate Shirt, Bodice, and Skirt.
Pattern: Simplicity S0745 - Heavily Altered
Fabrics:
Black Rayon Panne Velvet for the bodice (lined in black cotton)
Cotton Sateen for the shirt
Poly Crepe for the skirt (cotton for lining)
Notions:
Dritz Small Eyelets (pack of 25)
DMC #905 (green), DMC #550 (purple)
DMC #601 (pink)
DMC Yellow (I lost the label, sorry)
Wrights single fold bias tape in metallic gold (I couldn't find double fold)
Wonder Under lightweight iron on webbing
Notes:
I used Simplicity S0745 for my base for this. I saw the blog of the designer of the pattern, and it was an inspiration. When I got the pattern I had not realized it was all one dress, however, it was easy enough to alter.
For the shirt, I simply added the "shirt" pattern pieces (#24 and #25 in the package) to the bodice pieces (#26 and #27) and overlayed them as per the lines on the patterns. I traced out the new pieces (front and back) onto scrap wrapping paper, marked them, and cut them out. The sleeves, cuffs, and collar were left as is. I had to make a placket for the front since the pattern calls for the back to be zipped up. This is not practical for a shirt, so I just sewed the back up and left the front open. The pattern has a false front already, I just made it real. I forgot to take pictures of the placket and how it attached. The very top closes with a hook and eye, and there are snaps going down the front under the placket.
For the bodice, I used the bodice patterns (#26 and #27) as they were and included the darts in the front and back as normal. Instead of closing the back with a zipper, I opted for a corset style back. My weight flucuates through the year, this will allow the costume to always fit me unless I lose a drastic amount of weight. At least then all I have to do is take it in on the sides and back. This whole costume has no lining, so I did need to make lining for my bodice. It's just a layer cut exactly like the bodice fabric and sewn to it on the inside.
For the skirt, this was altered a lot. Considering the original pattern calls for 3 panels, no lining, no pleats, and no waistband (since it was to be all one connected dress). The pattern piece (#8) for the skirt has two marks at the top. One for the back and one for the front. You would cut a dip for the front that the dip in the bodice lines up to. I just cut five panels with only the back marking, as this made a perfectly even waist. In the front of the skirt, I box pleated the it and hid the seams in the pleats, facing inward. This way, it appears as all one piece of fabric, instead of panels. I also did the same to the sides. The skirt is nice and full and swings beautifully and has a great shape. I also lined this (again, no lining?) by making 3 panels for the lining (since it didn't need to be pleated). I cut a long strip for the waistband and folded it in half and encased the raw edges of the waist inside.
For the appliques, I used the bodice as it was, as it looked good enough to me. I added the shoulder parts by using the flower from the pattern and drawing on the stems. I realized after I did it, it doesn't really look like that at all, but it's close enough and anyone who nit-picks it, needs a life. I hand embroidered over the applique on the bodice - 14 hours of hand work on the front and shoulders alone. I still have to the back as well. The skirt appliques were completely redone by me. The pattern pieces were not to my liking (really good, just not for me). I used wonder under to draw my designs onto, ironed it onto the fabric, cut out the shapes, peeled off the paper, and ironed it on to the skirt. These will all eventually be embroidered over as well. For now, the appliques work.
**Before doing this, I tested all fabrics first to see who they'd react to the heat of the ironing needed to melt the layers together. I didn't want to end up with a nice iron shaped hole in the skirt because it melted the fabric. Luckily, all fabrics worked out perfectly. The velvet obviously took the best, since it has a nice pile and lots of fibers to grip the glue of the Wonder Under. |
| 2482 Visits
27 Images
Shared Album | |
|
 | 7.
Zuul the Gatekeeper I made my Zuul dress and styled the wig and made a quick helmet for Will's Keymaster Vinz Clortho.
I made this kind of in a rush for a Halloween party that was "couple" themed. Will and I have a few of those costumes, but Hallween is always a time for us to do something simple and new and comfortable. Cons are spent in multiple layers of fabrics, corsets, heels, hats, props, and more. This had to be easy to wear and not break my heart if a drunk person spilled booze on it (since it was attending two parties). Zuul and Vinz were perfect. Will had most of the clothes already, I jsut needed to spend a whole $4 on a collander from eBay and then hot glue a ton of spare AV cables and phone coil cords into it. |
| 3900 Visits
8 Images
Shared Album | |
|
 | 8.
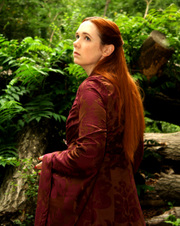
Sansa Stark Purple Gown *UPDATE 12/29/2013* - I made a Winterfell inspired cloak to go with the dress for a winter photo shoot at Fort Tryon Park/The Cloisters in NYC.
I made a gored cloak from 3 yards of light coating wool (60" wide) in a burgundy color. The fabric was about $25.
The cloak closes with an old leather belt that is snapped to the upper front with heavy-weight snaps. It crosses over the front of the chest and then closes in the back with the original belt buckle. The belt was $1 at a thrift shop.
The fur mantle was made from reclaimed fur from a coat my mother-in-law was having altered. She gave me the scraps rather than toss them.
It was so warm, warmer than my actual winter coat and I didn't want to take it off to go home lol. Riding the subway in a long dress with a train is not practical though, so that battle was lost.
This was a last minute addition to be Dragon*Con list. I've wanted a Sansa style dress for a while, but just didn't do it. I bought Fabric on Tuesday and cut it out that night. Wednesday night I sewed up the dress. Friday LATE night (after work and an event) I added the piping trim, adjusted the fit a little, and hemmed it. I also made the petti-skirt and "scarf" like piece for under the bodice.
This was originally not meant to wrap as far as it does, but to be just a robe front. However, I lost a bit of weight and cut the pieces for my then 31" waist. I tried it on and realized my waist was now 29". So now it wraps a bit, but still looks lovely all the same :)
The little closures are actually bees, because I could not find Dragonfly ANYTHING large enough. I don't have time to make them right now, so these bees will be painted gold and work for now.
The front of the dress is piped all the way to the hem line, I had noticed that some of her dresses had a similar detail on them, and this was a great way to finish off a raw edge with little work. The sleeves have this same detail, and then they are folded back and tacked in place for a regal look.
I did manage to match up the fabric pattern pretty well on the left and the right. That is something that rarely happens for me, so I was excited that it worked out so well.
The "scarf" thing (does this have a more technical term?) is made from a 3 yard piece of poly shantung that was hemmed and pleated at the neckline. I then pressed the pleats all the way to the bottom so it would lay better under the dress. You can see in photo of Sansa and Loras walking, as she plays with this scarf, it goes all the way to the ground. Hers was a lighter-weight fabric, but the one I used matched my fabric really nicely.
I used McCall's 4491 (discontinued) medieval dress pattern as a start. I then cut new princess seams starting mid shoulder going down. This was done in both the front and the back. I changed the neckline from a rounded one to an angled one. The front was also cut so that it was open. I altered the center back pieces so that they just had a seam instead of the lacing closure. I then adjusted the back and shoulders while I was wearing it for a better fit as the pattern adjustments caused some gaping in those areas. I did not use the bottom sleeve pattern piece (didn't have enough fabric left). I did use the top piece, but altered it very slightly for fit, I also used the underarm gusset as it makes the sleeve fit and move so much better. It's not a hard piece to insert and does help the fit of the garment. |
| 6155 Visits
25 Images
Shared Album | |
|
 | 9.
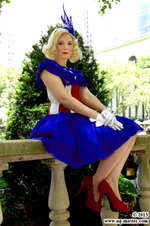
Captain America Cocktail Dress (March 2013)The original piece of awesome art was made by Kelsey Michele on Deviant Art (http://kelseymichele.deviantart.com/art/Avengers-Gowns-Thor-and-Captain-America-305808542 ). She used The Avengers as inspiration, by turning their costumes/looks into gorgeous evening wear. Of course I fell in love with Cap's 50's style cocktail dress.
My main goal for this dress was to be able to wear it as a dress, and not let it become something that looked like a costume only. I wanted it to look like fashion.
I used a royal blue Duchess Satin and a Royal Blue poly chiffon. The chiffon was a bit more purple in hue than the satin, but once laid over the satin, it looked more blue. It's actually nice to see a color shift of lighter blue under the darker chiffon as the dress moves.
I started with Vintage Vogue pattern V1094 as a base. I was going to make this a back zipper dress, but after looking at the pattern and seeing finished dresses, this design is better suited to the original side zip the pattern calls for. Instead of making the lining layer 4 panels and the chiffon layer in 6, I made the whole thing in six. I serged the top edge of the layers together, and then box pleated the entire waist line. The original pattern called for gathers, but I felt the pleats looked better and more polished. |
| 2983 Visits
17 Images
Shared Album | |
|
 | 10.
Selena Kyle Gala Dress This was a last minute addition for Dragon*Con 2012 to be worn to the Dragon*Con New Year party I was hosting. The dress was purchased from eBay and is probably no where near accurate, but it's really awesome looking anyway. I didn't have pearls for D*Con because they got left at home and I forgot to visit the stores in the Peach Tree mall during the day.
The mask I made from scraps of various embroidered laces I had laying around. I cut them apart and pieced them together for what I thought looked nice. They were then sewing together and spray painted black (since the scrap bits were all metallic silvers and golds). I then sewed on a silk ribbon to tie it behind my head. The ears were borrowed from 1966 Catwoman costume because I didn't have time to make lace ears to match. I do want to make matching ears eventually. |
| 2373 Visits
5 Images
Shared Album | |
|
 | 11.
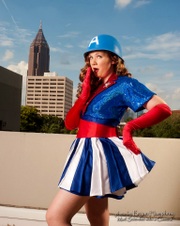
Captain America USO - Lead Variants These are the multiple versions of the Lead Singer Variant of the Captain America USO Dancing Girls. They all have the blue/white skirts with blue trimmed petticoats, but they also various changes of lapels and hats. I did the one with the Blue Bodice and the 'A' helmet.
*Version 1 - Red Satin Lapels and Red/White Stripe Hat
You see this version during the war bond scenes in the beginning. *Version 2 - Red sequin lapels, sequin bolero top, and "A" helmet
You see this version sitting atop the motorcycle during the big NYC Dance number. I think this is my favorite version because of the bolero top. It's so cute and balances out the whole costume really nicely. I drafted my pattern for this using the stretch hologram blue sequins to coordinate with the hologram red sequin lapels. The whole thing is lined in a blue swimsuit type lycra to stretch with the sequins. The bolero snaps onto the dress bodice at the neck to keep it from shifting. The Lapels then snap to the bolero mid way up and at the point.
The Helmet was an unissued Danish helmet from the 1960's. It was originally molded off the American helmets from what I read. It came with a liner as well. I used Rustoleum to paint the whole helmet and finished it with a clear matte spray. The "A" was stenciled free hand and then painted with regular white acryllic paint.
*Version 3 - Red Satin Lapels and Helmet
You see this version overseas when Cap is doing his speeches to the troops. Cap later borrows the dancer's helmet when he goes on his rescue mission.
|
| 2841 Visits
19 Images
Shared Album | |
|
 | 12.
Captain America USO - Back Up Variant This is the back-up dancer variant from the NYC war bonds scene. They have the Red/White skirts and blue satin bodices with the Sequinned Lapels and hats. I'm working on the Satin Lapels and hat as well, but that is TBD when I'll get it done.
Worn for the Dragon*Con 2011 and 2012 Parades and for the 2011 USO Dancing Girl photo shoot as well as at NYCC. |
| 9548 Visits
27 Images
Shared Album | |
|
 | 13.
Dorothy Gale (Halloween 2011)I decided to start this costume on the way home one night as I was browsing Facebook. I came accross my friend Maggie's site, Costumer's Guide. She had posted this great blog by Austin Brown called "The Ruby Slipper Project ". Afterreading and digesting his blog about the exact recreation of those famous red shoes, I was hooked. I knew I needed to make my own pair... this of course meant I needed a matching costume too ;-) I had always wanted a Dorothy costume ever since I was a little girl, now I'm finally fulfilling my dream :-)
I searched eBay for 2 hours looking for a good shoe. I managed to find a pair that was brand new and had the french style heel for only $20. The bnous is that they are super comfy Aerosoles!
I spent about another 3-4 hours searching online for the correct transparent Ruby colored 5mm flat sequin. Doesn't sound too hard to find, right? Most sequins you find are cup shaped and iridescent or metallic or opaque. I'm too frugal to spend $35 on only 5000 sequins from Schrum Studios . I knew they had to be out there cheaper, I used to work in the trimmings industry after all. I finally hit paydirt - over 14,000 sequins for under $13 (from CCartwright)! Sometimes saving money takes a little research, but it is so worth it in the end.
The fabrics were the easiest part and came from Fabric.com and my personal stash.
Materials:
5yds - Blue 1/4" Gingham Check Cotton (Fabric.com)
4 - Fashion Button 3/4" Waterbury White (Fabric.com)
2yds - Light Blue Ric Rac 5/8" (from M&J Trimming)
2yds - Soft White Cotton shirt fabric (in stash)
Light Blue Invisible Zipper
100 gram pack of Ruby 5mm Flat Sequins (item #I5f64N from CCartwright)
Red Fabric (in stash)
**UPDATES**
October 30th - I had to rush to make the bows as I could not find the correct sized/shaped ruby gems for the shoe anywhere in NYC's trimming shops (go figure). I'm sorry I didn't really take making-of pics, it really was a rush job, and they will be remade in the future. I will most likely be casting my own gems from resin, but that is for another day next year.
October 29th - I popped in Wizard of Oz and managed to completely draft a mock up and finish the dress and blouse in about 11 hours!
October 12th - I got one shoe completely finished and the other one is started.
October 6th - I managed to finish one half of the first shoe
October 5th - The sequinning madness begins! I covered the shoes in a beautiful red fabric prior to sequinning.
October 1st - All the materials have been ordered and received. I got the fabrics and trims from Fabric.com and the sequins from Cartwright's Sequins online. I found the shoes on eBay with the french shaped heel - they are super comfy too! |
| 4435 Visits
39 Images
Shared Album | |
|
 | 14.
Marie Antoinette - Day Dream One of many costumes worn in the movie, this beautiful blue silk gown is accented with a red Velvet belt and rhinestone buckle.
Patterns used:
JP Ryan - Strapless Stays
JP Ryan - Pock Hoops
JP Ryan - Robe A l'anglaise
Fabrics/Trims:
- medium weight blue/slightly grey green slubby silk (gift from my mother)
- Organdy pale blue ribbon for the bodice and skirt ruffles
- copen silk ribbon for the edge of the sleeve flounce
- size 24 self cover buttons for the sleeves
- hook/eye tape for the front closure
- white light weight cotton for the bodice lining
- cotton broadcloth for the pocket hoops
- cotton twill and silk for the stays
July 3rd - Stays are almost done, I ran out of boning though halfway through! |
| 3621 Visits
28 Images
Shared Album | |
|
 | 15.
Kaylee's Coveralls (June 26th, 2011)My version of Kaylee's coveralls. I made the shirt from fabric I found for $2 last summer. It was close enough looking to something Kaylee wore. I wasn't too concerned with that part being 100% accurate so much as proper looking.
The coveralls ($15) were altered French Military Man's coveralls. Unfortunately men lack hips, so I had to add gores to the hip area to fit the female form much better. I also removed the sleeves and all original pockets.
The bear patch was bought on eBay for about $4, I got it so long ago though.
The parasol was also bought on eBay and it was about $10.
So far, this is working out to be one of the cheapest costumes yet! |
| 2449 Visits
5 Images
Shared Album | |
|
 | 16.
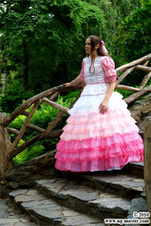
Alice in Wonderland - Scraps (To Be Debuted at Dragon Con)This is my research and costume page for the Alice in Wonderland "Scraps" dress. It's the dress she is wearing when she takes a ride on the Hatter's Hat to the Red Queen's palace (before becoming Um).
March 12 - Compiling my Research photos into one easy to see spot. I already have the ribbons needed for the bodice/Shoes/Arm Wrap, as well as a decent lace for the skirt and bodice. I just need the fabrics for the dress and the giant flower. I'll also need a proper wig (because Alice is not a red head) and shoes for a base. |
| 7645 Visits
30 Images
Shared Album | |
|
 | 17.
Kaylee's Fluffy Layer Cake Shindig Dress (April 15, 2009)UPDATE: 6/26/11 - I've started making the petticoat and ruffled skirt WIDER. I got a new, properly sized, hoop skirt and the old skirts need to be expanded to fit over the new hoops.
Kaylee's Layer Cake Dress from the Firefly Episode "Shindig"
Awards
1st Place Champion's Cup - Farpoint 2010
1St Place Workmanship - Farpoint 2010
Best Recreation Costume - Farpoint 2010
Materials:
*Silk Organza for the ruffles
White, Peach/Pink, Pink
*White Cotton Poplin for the skirt base and Petticoat as well as bodice lining
*White Silk Charmeuse for the Bodice and Peplum Underlayer
*Embroidered Poly Organza for the Bodice
**All Trims from M&J Trimming - www.mjtrim.com**
- 02115 - Pink 15mm Organdy - for under the buttons
- 02125 - Pink 25mm Organdy - For the edge of the peplum and sleeves
- 02138 - Pink 38mm Organdy - for the 'belt' on the bodice
- 41524 - Pink Ruffle Organdy - for the ruffles on the bodice
- 13037 - 13mm White Bridal Buttons
- 33175 - Pink Orange Dotted Tassel Fringe
- Closeout - Green Tassel Fringe
- Discontinued - LONG white chainette fringe that was hand knotted and then dyed to match the color needed
Notes:
- I had to dye the sleeve fabric with a special polyester dye called Jacquard iDye Poly. I used a mix of Red with a touch of the Violet. I found the fabric takes the violet really well while the red washed out. It took a little trial and error, but after a few tests, I got a result I was happy with.
- The silk that goes under the sleeve was too stark as it was in white, so I dyed this in a very diluted solution of fuchsia RIT dye. With it a slightly pink color, it makes the sleeves look a lot better.
- The bodice and upper sleeves are lined in cotton poplin so the costume breathes. The inside of the lining was hand sewn to the outer fabric.
- The front panel of the bodice that is ruched, measures twice the length of the flatlined piece underneath, this gives a great ruched effect that was then ironed down to form the 'pleats'.
- The ribbon was not strong enough in color on it's own, so I had to double it over and sew it to make one ribbon. This was then used to trim the peplum and middle of the bodice. The same was done for the belt.
- The belt is a doubled over piece of ribbon that closes with a hook and eye. The original dress looked like it had a belt to me, in some shots it seems to move around. If it were sewn to the dress, this wouldn't happen.
- The entire petticoat consists of about 50 yards of ruffles that were pulled by hand. I didn't have a ruffle foot at the time, so I had to create two gather stitches and pull each to the proper size needed. Each ruffle on the PC has a rolled hem on either side of the ruffle to prevent fraying.
- The overskirt has about 50-60 yards of ruffles as well. I recieved a ruffle foot for Christmas just as I was starting the white layer (my last layer), so those were made with the ruffler foot - what a life saver! All the edges of the OS ruffles are done with a rolled overcasting stitch to prevent fraying. This also helped give the ruffles body. There are only 8 layersof ruffles on the skirt, the final ruffle is the peplum on the bodice. |
| 10005 Visits
53 Images
Shared Album | |
|
 | 18.
1966 Catwoman (October 2009)Awards:
*2nd Place Comic Category Big Apple Comic Con 2009
*1st Place at Work Costume Contest
*1st Place "Sewing Costumes" Contest on Pattern Review
Oct 1, 2010 - Will's Felix Henchman costume is completed! The hat and shirt only took me 3 hours to complete and $16 to make! Cheapest, fastest costume EVER!
May 15, 2010 - New Claws!!! The bases for my old claws were too tight, so I decided to try some brass guitar finger picks instead. They worked beautifully and fit so much better!
Oct 20 - The suit was finished in time for Big Apple Con! It was a hit and quite popular with Julie Newmar herself :-D I also managed to find the boots at the very last minute (the morning of the day I needed to wear it).
Oct 14 - ALL the seam binding is in place. I never want to see seam binding again *oy* It was worth it though since the suit doesn't itch at all now :-D
Oct 11 - Claws and Gloves are done! This costume is 95% done now!!! I just need to find the boots!
Oct 7 - The collar is done! *New Pics added*
Oct 3 - The arms are done and sewn in!
Oct 2 - Adjusted the fit of the body suit since the ribbon cinch and zipper was added. I also added stirrups to the pant legs to keep it tight while wearing. *New Pics Added*
Oct 1 - Bodysuit is 75% done, need to add sleeves, collar, zips, and ribbon cinch as well as adjust any sizing after completion.
Sept 25 - Bought my fabric for the catsuit... starting to draft the patterns for it. Also working on the ears and mask.
Sept 23 - Found "the" belt on Etsy :-D SCORE! |
| 14679 Visits
51 Images
Shared Album | |
|
 | 19.
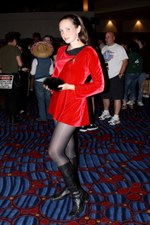
Classic Star Trek Scant Uniform (Debuted at Dragon Con 2009!)My classic Star Trek Scant Uniform. Thanks to my friend Jenn for the awesome pattern and tips on using it!
Pattern called for 4 yards of 60" wide fabric, I only had 1.5yds and let me tell you, it was a headache getting it all to fit just so after adjusting the pattern. I don't suggest 4 yards because that is just way too much waste, but 2.5 should really suffice.
I got my patch from a vendor at Wizard World, luckily it was a heat seal patch so all I had to do was iron it on :-)
Unique Stitch glue is my friend, it hemmed the dress and sleeves beautifully without visible stitch marks from hand hemming... which I didn't want to do anyway lol.
Boot and hose, I had already on hand, just had to fix and shine up my old boots. |
| 4471 Visits
6 Images
Shared Album | |
|
 | 20.
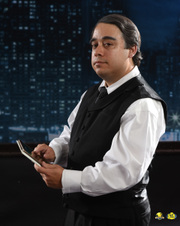
Caprica Six and Head Baltar (Dragon Con 2009 Debut!)Progress pictures of my Caprica Six Red Dress and Will's Head Baltar Suit.
June 20, 2009
In a rush to finish costumes for Wizard World Philly, I managed to get my Six Dress done and finish Will's BDU's, all in one night! Thanks to John for the webbing for Will's belt and the BSG patch, it was a life saver!
May 31, 2009
*Started the dress in the afternoon at around 1pm and am 90% done by 10pm! That's with a dinner break for an hour as well.
I honestly didn't think it would be so easy to put together, but with basic draping skills it was a snap. I'm really not crazy about this stlye dress on me, I feel fat for the first time in months *ew*, but Will likes it, so I'll wear it to Dcon for him.
*Finished the bracelet completely.
May 30, 2009
* Started making the bracelet, ring, and earrings for the dress. I also have my fabric bought.
* Still swatching for Will's costume. |
| 4389 Visits
37 Images
Shared Album | |
|
 | 21.
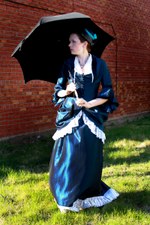
c.1876 Dinner Dress This dress was not made by me, just accessorized by me. The dress was made by a very talented seamstress, Michaela :-) I purchased this from her because it was absolutely gorgeous and I have a thing for Victorian gowns.
Her webpage with this gown...
http://costumes.glittersweet.com/historical/otherblue.htm
I accessorized this with an antique umbrella I found at a flea market for only $30!!! It's in remarkable condition, I have a feeling the fabric was replaced at some point in its life, but it was probably for the better as I can actually use it. All I had to do was clean off the dirt from the gold handle and mother of pearl (yes, gold!) and sew on a new button closure (using a victorian button to match the handle inlay). I have always wanted an antique umbrella, they are just so ornate and gorgeous, but they were always in horrific condition or WAY to expensive. Imagine my surprise when this beauty caught my eye. I was able to talk the vendor down to $30 from $50, I'm a regular customer of his lol.
I also used an antique fan I had on hand and repaired ages ago. Ivory handled with the same silk taffeta I used on my wedding gown to match the original fabric. The sequins were taken off one at a time and re-applied carefully to match the original.
Both the umbrella and the fan look so pretty with the dress. I probably don't need them, but they are gorgeous :-D |
| 2537 Visits
16 Images
Shared Album | |
|
 | 22.
Supergirl Materials from Spandex World = $30
Boots = TBD
This is a cross between the comic book version and the movie version, it's my version that I made for myself. Envisioning what Supergirl's costume might look like in the real world :-)
02-19-08
It's really only 90% done. I still have to make the cape and get boots :-) The 'S' on the chest isn't sewn completely on yet either ;-) |
| 4418 Visits
14 Images
Shared Album | |
|
 | | |